Modding:Modding resources: Difference between revisions
Jump to navigation
Jump to search
(update to match my notes) |
m (removed a broken tool, clarity edits) |
||
| Line 4: | Line 4: | ||
* [https://github.com/ShinyHobo/BG3-Modders-Multitool/releases Modders Multitool] | * [https://github.com/ShinyHobo/BG3-Modders-Multitool/releases Modders Multitool] | ||
* [https://www.uuidgenerator.net/ UUID Generator] | * [https://www.uuidgenerator.net/ UUID Generator] | ||
* [https://airtightinteractive.com/util/hex-to-glsl/ Airtight Interactive Convert Hex Color to GLSL vec3] | * [https://airtightinteractive.com/util/hex-to-glsl/ Airtight Interactive Convert Hex Color to GLSL vec3] | ||
* [https://www.w3schools.com/colors/colors_picker.asp W3C Color Picker] | * [https://www.w3schools.com/colors/colors_picker.asp W3C Color Picker] | ||
| Line 10: | Line 9: | ||
=== Modding on Linux === | === Modding on Linux === | ||
[https://github.com/bottlesdevs/Bottles Bottles] | |||
== Asset Editing and Creation == | == Asset Editing and Creation == | ||
| Line 61: | Line 60: | ||
== Fixing neck seams on Custom Heads == | == Fixing neck seams on Custom Heads == | ||
=== Things | === Things Needed === | ||
* [https://richwhitehouse.com/index.php?content=inc_projects.php&showproject=91 Noesis], OR | * [https://richwhitehouse.com/index.php?content=inc_projects.php&showproject=91 Noesis], OR | ||
* [https://www.autodesk.com/developer-network/platform-technologies/fbx-converter-archives Autodesk's FBX Converter] | * [https://www.autodesk.com/developer-network/platform-technologies/fbx-converter-archives Autodesk's FBX Converter] | ||
| Line 72: | Line 71: | ||
* Select your custom head and go into Edit mode (TAB key) | * Select your custom head and go into Edit mode (TAB key) | ||
* Select only your neck seam vertices and create a vertex group called neck_seam | * Select only your neck seam vertices and create a vertex group called "neck_seam" | ||
* Click the Normal Transfer button from Padme's addon - it should auto-smooth your normals with a 180° angle and add a Data Transfer modifier. | * Click the Normal Transfer button from Padme's addon - it should auto-smooth your normals with a 180° angle and add a Data Transfer modifier. Make sure that the Data Transfer modifier is above anything else in that section. | ||
[[File:datatransfernormals.png|thumb|right|upright=1.5|data transfering normals]] | |||
* Select the imported .fbx head mesh as your source | * Select the imported .fbx head mesh as your source | ||
* Set the modifier to only apply to your newly created vertex group | * Set the modifier to only apply to your newly created vertex group "neck_seam" | ||
* Check Face Corner Data and select Custom Normals | * Check Face Corner Data and select Custom Normals | ||
* Leave all other settings as default, apply the modifier (downward arrow between the camera icon and the x button) | * Leave all other settings as default, apply the modifier (downward arrow between the camera icon and the x button) | ||
* Export your custom head with the Better Collada | * Export your custom head with the Better Collada addon and settings | ||
Revision as of 23:16, 2 August 2022
Tools
- Mod Manager
- LSLIB
- Modders Multitool
- UUID Generator
- Airtight Interactive Convert Hex Color to GLSL vec3
- W3C Color Picker
- Materialize
Modding on Linux
Asset Editing and Creation
YouTube playlist by LadyHircine: https://www.youtube.com/playlist?list=PLN_fdYMu4EUpbU_s9rkbUqUkyKDUVGgkx
Blender
- Blender: 2.79b and/or 2.93 (get it from Steam or from their website, all platforms, FREE)
- Better Collada Exporter
- Better Collada export settings (see screenshot)
File:Better collada export settings.png
Better Collada export settings
- Padme's Blender Helpers
- LL's Blender Helpers for 2.79b
- Vertex Color Master for Blender
- Normal Baking in Blender https://youtu.be/tndUB5b4STI
GIMP
- GIMP
- GIMP .DDS Plugin (Linux users can get GIMP's .DDS plugin from their Package Manager also.)
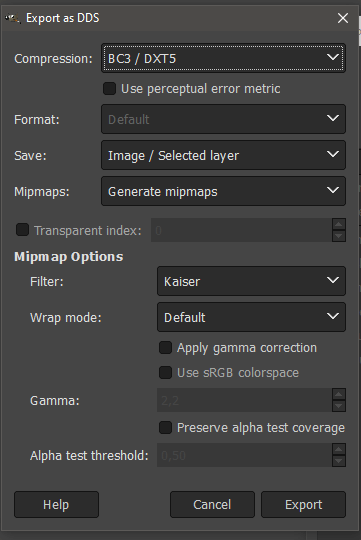
- GIMP .DDS export settings (see screenshot)
Adobe
- Photoshop: https://www.adobe.com/products/photoshop.html
- Photoshop .DDS Plugin: (Choose only ONE)
- Substance Painter (You can also purchase via Steam)
- Substance Painter shader starter
Mod Resources
Norbyte's Patch 3 Modfixer is required even in Patch 8.
- Custom Backdrops for Character Creation and Level Up
- Custom Armor Tinting
- Padme's BG3 Tutorials and Modding Resources
- Add Scars to Your Character
- Sample Equipment Mod
- Sample Datamined Mod
- Withers The Trader
- Customizable Starting Equipment
Mod Folder Location
- Windows: AppData\Local\Larian Studios\Baldur's Gate 3\Mods
- Mac: TBD
- Linux: SteamLibrary/steamapps/compatdata/1086940/pfx/drive_c/users/steamuser/AppData/Local/Larian Studios/Baldur's Gate 3/Mods
Fixing neck seams on Custom Heads
Things Needed
- Noesis, OR
- Autodesk's FBX Converter
- Padme's Blender addons (link above in Asset Editing and Creation section)
Blender doesn't import custom normals from .dae files, but there's an option to import them from .fbx files. First convert the .gr2 mesh to .dae with LSLIB, then convert that .dae to .fbx with either Noesis OR Autodesk's FBX Converter and use it as your Data Transfer source object to get rid of the neck seam.
Steps
- Select your custom head and go into Edit mode (TAB key)
- Select only your neck seam vertices and create a vertex group called "neck_seam"
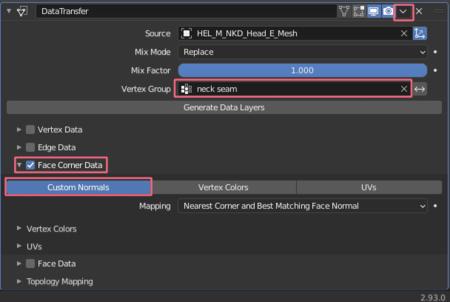
- Click the Normal Transfer button from Padme's addon - it should auto-smooth your normals with a 180° angle and add a Data Transfer modifier. Make sure that the Data Transfer modifier is above anything else in that section.
- Select the imported .fbx head mesh as your source
- Set the modifier to only apply to your newly created vertex group "neck_seam"
- Check Face Corner Data and select Custom Normals
- Leave all other settings as default, apply the modifier (downward arrow between the camera icon and the x button)
- Export your custom head with the Better Collada addon and settings

