Modding:BG3 Mini Tool: Difference between revisions
(Created page with "{{Modding box}} The BG3 Mini Tool is a tool by Padme4000 that has many useful functions for speeding up your modding workflow. Where to download the tool: https://www.nexusmods.com/baldursgate3/mods/502") |
No edit summary |
||
| Line 4: | Line 4: | ||
Where to download the tool: https://www.nexusmods.com/baldursgate3/mods/502 | Where to download the tool: https://www.nexusmods.com/baldursgate3/mods/502 | ||
===Using mini tool to create/edit the .loca=== | |||
If you don't want to edit the .loca manually, you can use Padme's mini tool to do it for you! Open the localization editor via the CharacterCreationAppearanceVisuals buttons, and find the open localization button in there. | |||
This is what it looks like once open: | |||
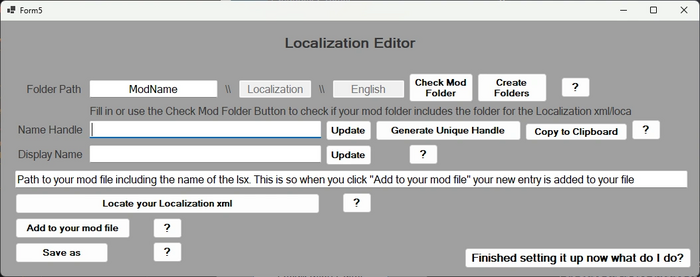
[[File:Locaeditor.webp|700px]] | |||
So first we see a Folder Path setup, if you haven't already, create the folders for the .loca file. Though while we are editing it the extension is .xml. | |||
If you want to use the tool to create your folders, create a folder called Mods in the same folder as the tools exe. And put your mod folder in here. Now for the first box in the editor, fill in the exact name your workspace folder has, then you can check mod folders to see if it can see them and if you don't have them click Create folders. The tool will create the missing folders. | |||
For Name Handle you want to first click Generate Unique Handle, and once it has one, click the Update button. Remember to always click the update button. And always check your files once done, just in case the tool didn't work for whatever reason or you forgot to press update, as you don't want clashing uuids/handles. | |||
For Display Name, you want to write what you want the user to read when your asset is active. For example in character creation, it is the name your asset has when hovering over it. Once you have done that, click the Update button. | |||
If you don't yet have a localization file, use the Save as button. | |||
If you already have one setup, first use the Locate function to locate your localization.xml, the box above will fill in with that path. Then click Add to your mod file to add the new handle to your mod. | |||
Congrats! You have finished setting up/using the mini tool to edit/create your localization file. | |||
Just remember before packing to convert the xml to .loca with lslib, or if using multitool to pack, make your file extension .loca.xml for multitool to auto convert for you. | |||
Revision as of 22:55, 12 April 2024
| This page is a modding page, and follows its own rules and standards separate from the rest of the wiki. |
The BG3 Mini Tool is a tool by Padme4000 that has many useful functions for speeding up your modding workflow.
Where to download the tool: https://www.nexusmods.com/baldursgate3/mods/502
Using mini tool to create/edit the .loca
If you don't want to edit the .loca manually, you can use Padme's mini tool to do it for you! Open the localization editor via the CharacterCreationAppearanceVisuals buttons, and find the open localization button in there.
This is what it looks like once open:
So first we see a Folder Path setup, if you haven't already, create the folders for the .loca file. Though while we are editing it the extension is .xml.
If you want to use the tool to create your folders, create a folder called Mods in the same folder as the tools exe. And put your mod folder in here. Now for the first box in the editor, fill in the exact name your workspace folder has, then you can check mod folders to see if it can see them and if you don't have them click Create folders. The tool will create the missing folders.
For Name Handle you want to first click Generate Unique Handle, and once it has one, click the Update button. Remember to always click the update button. And always check your files once done, just in case the tool didn't work for whatever reason or you forgot to press update, as you don't want clashing uuids/handles.
For Display Name, you want to write what you want the user to read when your asset is active. For example in character creation, it is the name your asset has when hovering over it. Once you have done that, click the Update button.
If you don't yet have a localization file, use the Save as button.
If you already have one setup, first use the Locate function to locate your localization.xml, the box above will fill in with that path. Then click Add to your mod file to add the new handle to your mod.
Congrats! You have finished setting up/using the mini tool to edit/create your localization file.
Just remember before packing to convert the xml to .loca with lslib, or if using multitool to pack, make your file extension .loca.xml for multitool to auto convert for you.
