Modding:Fixing neck seams: Difference between revisions
Jump to navigation
Jump to search
No edit summary |
No edit summary |
||
| Line 1: | Line 1: | ||
Main page: [[Modding Resources]] | {{PageSeo | ||
|title=Modding Resources | |||
|description=This page is a hub for everything related to Modding Baldur's Gate 3. Check out the following guides to learn how to mod BG3. | |||
|image=Modding_resources.webp | |||
}}Main page: [[Modding Resources]] | |||
== Tools Needed == | == Tools Needed == | ||
* Blender | * Blender | ||
Revision as of 21:46, 29 July 2023
Main page: Modding Resources
Tools Needed
- Blender
- Noesis
- Padme's Blender Add-ons
First convert the .GR2 mesh to .DAE with LSLIB, then convert the .DAE to .FBX with Noesis and use it as the Data Transfer source object for either tutorial.
Note: You can skip Noesis completely if you use the Modders Multitool. It will convert meshes you search for into .DAE and .FBX automatically.
Steps
- Select your custom head and go into Edit mode (TAB key)
- Select only your neck seam vertices and create a vertex group called
neck_seam - Click the Normal Transfer button from Padme's add-on - it should auto-smooth your normals with a 180° angle and add a Data Transfer modifier
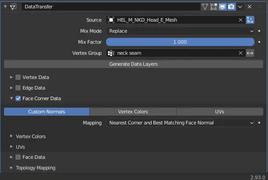
- Select the imported
.FBXhead mesh as your source - Set the modifier to only apply to your newly created vertex group
- Check Face Corner Data and select Custom Normals
- Mapping should be Nearest Corner and best Matching Face Normal
- Apply the modifier, export your custom head
screenshot
