| (26 intermediate revisions by 8 users not shown) | |||
| Line 1: | Line 1: | ||
{{ | {{Location page | ||
| description = Knights of the Shield Hideout | | prefix = The | ||
| | | name = Knights of the Shield Hideout | ||
| alt name = | |||
| image = Knights of the Shield Hideout.jpg | |||
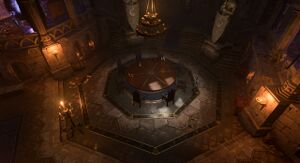
| image description = A round table in the Knights of the Shield Hideout | |||
| act = three | |||
| summary = The hideout can be accessed through the [[Elfsong Tavern|Elfsong Tavern Basement]] or the [[Lower City Sewers]]. | |||
| region prefix = the | |||
| region = Lower City | |||
| north = | |||
| west = Lower City Sewers | |||
| east = | |||
| south = Elfsong Tavern | |||
}} | }} | ||
==Overview== | |||
===Knights of the Shield Hideout=== | ===Knights of the Shield Hideout=== | ||
From the Elfsong Tavern Basement, a switch hidden along the racks of wine will open a wine barrel with stairs that lead down to the hideout. | From the Elfsong Tavern Basement, a switch hidden along the racks of wine will open a wine barrel with stairs that lead down to the hideout. | ||
Within the hideout | Within the hideout the party can encounter a group of [[Githyanki]] led by {{CharLink|Har'rak|Ch'r'ai Har'rak}}, who are looking for the Astral Prism. They can be snuck up on or conversed with, and if {{CharLink|Lae'zel}} is in the party a successful {{Ability Check|Intimidation, Persuasion|18}} makes them leave without a fight and gains ({{Approval|Lae'zel|+1}}). | ||
===Hidden Room=== | ===Hidden Room=== | ||
On the far North wall, behind a large knight statue, is a button that can be seen with a | {{Main|Hidden Room}} | ||
On the far North wall, behind a large knight statue, is a button that can be seen with a {{skill|Perception}} check. Behind is {{CharLink|The Emperor|the Emperor's}} old room, containing a number of items which can be interacted with. | |||
== | ==Related locations== | ||
* | * {{Loc|Elfsong Tavern}} | ||
* | * {{Loc|Hidden Room}} | ||
* | * {{Loc|Lower City Sewers}} | ||
* | == Related literature == | ||
* | * {{MdRarityItem|'To silence'}} | ||
* | * {{MdRarityItem|Enhanced' Weapons - Sales Ledger}} | ||
* | * {{MdRarityItem|Inroads by Arms Dealer Gortash}} | ||
* | * {{MdRarityItem|Investment Opportunities}} | ||
* {{MdRarityItem|Note to All Knights of the Shield members}} | |||
* {{MdRarityItem|Old Ledger}} | |||
* {{MdRarityItem|Order 251: Tethyr}} | |||
* {{MdRarityItem|Patriar Correspondence}} | |||
* {{MdRarityItem|Record of Operations in Neverwinter}} | |||
==Related quests== | ==Related quests== | ||
* | * {{Quest|Visit the Emperor's Old Hideout}} | ||
== Notable characters== | |||
{{div_col}} | |||
* {{MdCharLink|Har'rak|Ch'r'ai Har'rak}} | |||
* {{MdCharLink|W'wargaz|Ch'r'ai W'wargaz}} (conditional) | |||
* {{MdCharLink|Tska'an|Ch'r'ai Tska'an}} (conditional) | |||
* {{MdCharLink|Ri'zel|Gate Master Ri'zel}} | |||
* {{MdCharLink|Zyrlak|Gate Master Zyrlak}} | |||
* {{MdCharLink|Ghush'ins|Veteran Gish Ghush'ins}} | |||
* {{MdCharLink|Zhendila|Veteran Gish Zhendila}} | |||
* {{MdCharLink|Ly'iss|Veteran Raider Ly'iss}} | |||
{{div_col end}} | |||
=== Reinforcements === | |||
{{div_col}} | |||
* {{MdCharLink|Kharyk|Raider Kharyk}} | |||
* {{MdCharLink|Zeddi'in|Raider Zeddi'in}} | |||
* {{MdCharLink|Zerentha|Raider Zerentha}} | |||
* {{MdCharLink|Dor'il|Warrior Dor'il}} | |||
* {{MdCharLink|Ma'aryk|Warrior Ma'aryk}} | |||
* {{MdCharLink|Ni'ima|Warrior Ni'ima}} | |||
{{div_col_end}} | |||
==Notable loot== | ==Notable loot== | ||
*{{ | * {{MdRarityItem|Boots of Psionic Movement}} Looted from [[Ch'r'ai Har'rak]] | ||
*{{ | * {{MdRarityItem|Cerebral Citadel Armour}} inside the Emperor's Wardrobe | ||
*{{ | * {{MdRarityItem|Cerebral Citadel Gloves}} inside the Emperor's Wardrobe | ||
*{{ | * {{MdRarityItem|Hhune Mausoleum Key}} | ||
* {{MdRarityItem|Silver Key}} | |||
* {{MdRarityItem|Sword of the Emperor}} inside the hidden room {{coords|-734|589}} | |||
== External links == | |||
* {{FRWiki|Knights of the Shield|long}} | |||
{{Lower City}} | |||
[[Category:Locations]] | [[Category:Locations]] | ||
[[Category:Act Three Locations]] | [[Category:Act Three Locations]] | ||
Latest revision as of 18:51, 4 March 2025
| Lower City | ||||
| Lower City Sewers | ← | Knights of the Shield Hideout | ||
| ↓ | ||||
| Elfsong Tavern | ||||
Overview[edit | edit source]
Knights of the Shield Hideout[edit | edit source]
From the Elfsong Tavern Basement, a switch hidden along the racks of wine will open a wine barrel with stairs that lead down to the hideout.
Within the hideout the party can encounter a group of Githyanki led by Ch'r'ai Har'rak, who are looking for the Astral Prism. They can be snuck up on or conversed with, and if Lae'zel is in the party a successful ![]() DC 18 Intimidation, or Persuasion check makes them leave without a fight and gains (
DC 18 Intimidation, or Persuasion check makes them leave without a fight and gains (![]() +1).
+1).
Hidden Room[edit | edit source]
Main article: Hidden Room
On the far North wall, behind a large knight statue, is a button that can be seen with a check. Behind is the Emperor's old room, containing a number of items which can be interacted with.
Related locations[edit | edit source]
Related literature[edit | edit source]
Related quests[edit | edit source]
Notable characters[edit | edit source]
Reinforcements[edit | edit source]
Notable loot[edit | edit source]
 Boots of Psionic Movement Looted from Ch'r'ai Har'rak
 Cerebral Citadel Armour inside the Emperor's Wardrobe
 Cerebral Citadel Gloves inside the Emperor's Wardrobe
 Hhune Mausoleum Key
 Silver Key
 Sword of the Emperor inside the hidden room X: -734 Y: 589

