The Hollow: Difference between revisions
Jump to navigation
Jump to search
m (→Overview) |
|||
| (9 intermediate revisions by 6 users not shown) | |||
| Line 1: | Line 1: | ||
{{stub}} | |||
{{Relative location | |||
|region = Emerald Grove | |||
|location = The Hollow | |||
|south = Ravaged Beach | |||
|north = Makeshift Prison | |||
|west = Secluded Chamber | |||
|east = Sacred Pool | |||
}} | |||
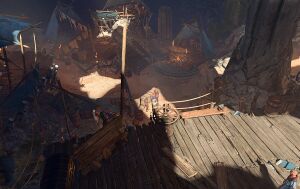
'''The Hollow''' is the section of the [[Emerald Grove]] that most of the tiefling refugees reside in, and the primary way of accessing the [[Tiefling Hideout]]. | |||
== Overview == | |||
[[File:The Hollow.jpg|thumb|The Hollow]] | [[File:The Hollow.jpg|thumb|The Hollow]] | ||
{{SpoilerWarning}} | |||
Mechanically, The Hollow serves as a connective hub area for the Emerald Grove. In addition to providing easy access to other areas of the grove, it is also the home to several different traders, as well as several other important characters. It is also one of the locations where [[Shadowheart]] and [[Wyll]] can be recruited as [[Companion|companions]], provided they haven't already joined the party. | |||
=== Characters === | |||
==== Companions ==== | |||
*If not previously recruited on the [[Ravaged Beach]],{{CharLink|Shadowheart}} may be found and recruited near the oxen, at {{coords|223|544}} | |||
*{{CharLink|Wyll}} can be found and recruited near the combat training at {{coords|204|550}} | |||
==== Traders ==== | |||
<center> | |||
<gallery mode="nolines" heights="200px" widths="200px"> | |||
Arron Model.png|[[Arron]] | |||
Auntie Ethel Human Model.png|[[Auntie Ethel]] | |||
Dammon Model.png|[[Dammon]] | |||
Mattis Model.png|[[Mattis]] | |||
</gallery></center> | |||
==== Others ==== | |||
<center> | |||
<gallery mode="nolines" heights="200px" widths="200px"> | |||
Asharak Model.png|[[Asharak]] | |||
Ide Model.png|[[Ide]] | |||
Gan Model.png|[[Gan]] | |||
Umi Model.png|[[Umi]] | |||
Guex Model.png|[[Guex]] | |||
Eramas Model.png|[[Eramas]] | |||
Aradin Model.png|[[Aradin]] | |||
Doni Model.png|[[Doni]] | |||
Meli Model.png|[[Meli]] | |||
Komira Model.png|[[Komira]] | |||
Rolan Model.png|[[Rolan]] | |||
</gallery></center> | |||
=== Related quests === | |||
*[[Find the Nightsong]] | |||
== | *[[Rescue the Druid Halsin]] | ||
*[[Steal the Sacred Idol]] | |||
== Interactions == | |||
* Speak to the tiefling children training to fight. | * Speak to the tiefling children training to fight. | ||
* Speak to the man and the child arguing over a stolen locket. | * Speak to the man and the child arguing over a stolen locket. | ||
| Line 17: | Line 56: | ||
* Speak to Aradin about why they went to the goblin camp. | * Speak to Aradin about why they went to the goblin camp. | ||
* Speak to the three arguing tieflings about if they should leave or not. | * Speak to the three arguing tieflings about if they should leave or not. | ||
* Speak to Komira as you head into the Sacred grove about her daughter. | * Speak to Komira as you head into the Sacred grove about her daughter. | ||
==Notable | == Notable loot == | ||
Notable items obtained in this location, whether looted, purchased, or obtained as a quest reward: | Notable items obtained in this location, whether looted, purchased, or obtained as a quest reward: | ||
*{{ | *{{MdRarityItem|Amulet of Elemental Torment}} | ||
*{{ | *{{MdRarityItem|Corellon's Grace}} | ||
*{{ | *{{MdRarityItem|Dragon's Grasp}} | ||
*{{ | *{{MdRarityItem|Rain Dancer}} | ||
*{{ | *{{MdRarityItem|Scale Mail Armour +1}} | ||
*{{ | *{{MdRarityItem|Spellthief}} | ||
==Hidden | === Hidden treasure === | ||
*The haystack by the two oxen tended by [[Toron]]. To reveal this location, players who are under the effect of [[Speak with Animals]] may talk to the | *The haystack by the two oxen tended by [[Toron]]. To reveal this location, players who are under the effect of [[Speak with Animals]] may talk to the [[Bored Ox]] or else pass a {{Ability Check|Perception|7}}. | ||
*Past the oxen, where [[Doni]] loiters, there's a pair of [[Metallic Gloves]] lying on the horse cart. They can be picked up without it counting as stealing. The locked Travel-Worn Chest right aside the cart is also worth checking. | *Past the oxen, where [[Doni]] loiters, there's a pair of [[Metallic Gloves]] lying on the horse cart. They can be picked up without it counting as stealing. The locked Travel-Worn Chest right aside the cart is also worth checking. | ||
*Behind the | *Behind the storage shed where you find [[Pandirna]] there's a pouch on the ground with a good amount of riches. The player can access the storage from both sides: either by using a lockpick action on the front door (a forbidden action), or climbing into the roof on the back via the [[Makeshift Prison]]. Caution: there's exploding plants along this path that are only revealed by an ability check. | ||
[[Category:Locations]] | [[Category:Locations]] | ||
[[Category:Act One Locations]] | [[Category:Act One Locations]] | ||
[[Category:Locations in Druid Grove]] | [[Category:Locations in Druid Grove]] | ||
Latest revision as of 04:10, 22 January 2024
This article is a stub and in need of expansion. See the editing manual for how to contribute or the style manual for guidelines. |
| Emerald Grove | ||||
| Makeshift Prison | ||||
| ↑ | ||||
| Secluded Chamber | ← | The Hollow | → | Sacred Pool |
| ↓ | ||||
| Ravaged Beach | ||||
The Hollow is the section of the Emerald Grove that most of the tiefling refugees reside in, and the primary way of accessing the Tiefling Hideout.
Overview[edit | edit source]
Spoiler warning: The following content contains unhidden spoilers. Read at your own risk. |
Mechanically, The Hollow serves as a connective hub area for the Emerald Grove. In addition to providing easy access to other areas of the grove, it is also the home to several different traders, as well as several other important characters. It is also one of the locations where Shadowheart and Wyll can be recruited as companions, provided they haven't already joined the party.
Characters[edit | edit source]
Companions[edit | edit source]
- If not previously recruited on the Ravaged Beach, Shadowheart may be found and recruited near the oxen, at X: 223 Y: 544
- Wyll can be found and recruited near the combat training at X: 204 Y: 550
Traders[edit | edit source]
Others[edit | edit source]
- Meli Model.png
Related quests[edit | edit source]
Interactions[edit | edit source]
- Speak to the tiefling children training to fight.
- Speak to the man and the child arguing over a stolen locket.
- Speak to the tiefling child trying to sell goods.
- Speak to Aradin about why they went to the goblin camp.
- Speak to the three arguing tieflings about if they should leave or not.
- Speak to Komira as you head into the Sacred grove about her daughter.
Notable loot[edit | edit source]
Notable items obtained in this location, whether looted, purchased, or obtained as a quest reward:
 Amulet of Elemental Torment
 Corellon's Grace
 Dragon's Grasp
 Rain Dancer
 Scale Mail Armour +1
 Spellthief
Hidden treasure[edit | edit source]
- The haystack by the two oxen tended by Toron. To reveal this location, players who are under the effect of Speak with Animals may talk to the Bored Ox or else pass a
 DC 7 Perception check.
 - Past the oxen, where Doni loiters, there's a pair of Metallic Gloves lying on the horse cart. They can be picked up without it counting as stealing. The locked Travel-Worn Chest right aside the cart is also worth checking.
- Behind the storage shed where you find Pandirna there's a pouch on the ground with a good amount of riches. The player can access the storage from both sides: either by using a lockpick action on the front door (a forbidden action), or climbing into the roof on the back via the Makeshift Prison. Caution: there's exploding plants along this path that are only revealed by an ability check.
