Modding:PAK files
| This page is a modding page, and follows its own rules and standards separate from the rest of the wiki. |
Necessary Tools[edit section | visual editor]
- LSLIB by Norbyte
- Modders Multitool by ShinyHobo
- Install LATEST release.
- Make sure the folder you use for Multitool is separate from the LSLIB folder.
The Tool has an official wiki that now breaks down unpacking and other parts of the tool: BG3 Modders Multitool Wiki
Please use that for the most up-to-date information.
Now to ExportTool.
This project needs the granny2.dll file to work correctly. Due to licensing issues at one point, Norbyte removed this file from some of the later versions of ExportTool, but it exists in older versions, such as v1.15.13, the link to which is above.
Verify that the granny2.dll file is present in the ExportTool's root folder and in the Tools sub-folder. If the file is present in both of these folders, then nothing more needs to be done with ExportTool and you can skip to the next section of this guide.
If the granny2.dll file is missing from the root folder and/or the Tools sub-folder of the latest version of ExportTool, then you will need to copy the file over from the older version v1.15.13. Open the archive ExportTool-v1.15.13.zip, copy the granny2.dll file, and paste it where you unpacked the latest version of ExportTool in the root folder and in the Tools sub-folder. Nothing more needs to be done with ExportTool.
To run ExportTool, open ConverterApp.exe.
Unpacking Process[edit section | visual editor]
Currently we no longer need to directly unpack the game pak files thanks to Multitool updates. Instead, you can index your files and unpack the files as you need them. This saves you some hard drive space, as BG3 has a lot of files.
Indexing[edit section | visual editor]
Multitools wiki post on Indexing and Searching
In Multitool, go to Utilities > Index > Index Pak Files and this will now index all the unpacked pak files. Much quicker and easier to maintain than unpacking all of the paks.
- When we get new hot fixes, follow the above again to index the new hotfix paks.
However, whenever we get a full patch release, it is advised to first clear out the index and reindex using the following method: Utilities > Index > Clear Index and then Utilities > Index > Index Pak Files
If you still want to unpack game paks manually rather than unpacking individual files via the new method, you can use: Utilities > Game File Operations > Unpack Game Files.
- As of Patch 4, when a new patch is released, the hotfix paks get implemented into the main paks.
Index Search Unpacking[edit section | visual editor]
If you know the common name used on assets you want to unpack, you can use index search (once it has finished indexing) to unpack specific assets. For example, let’s say we want to create head mods, and thus we need the head models unpacked from the assets.
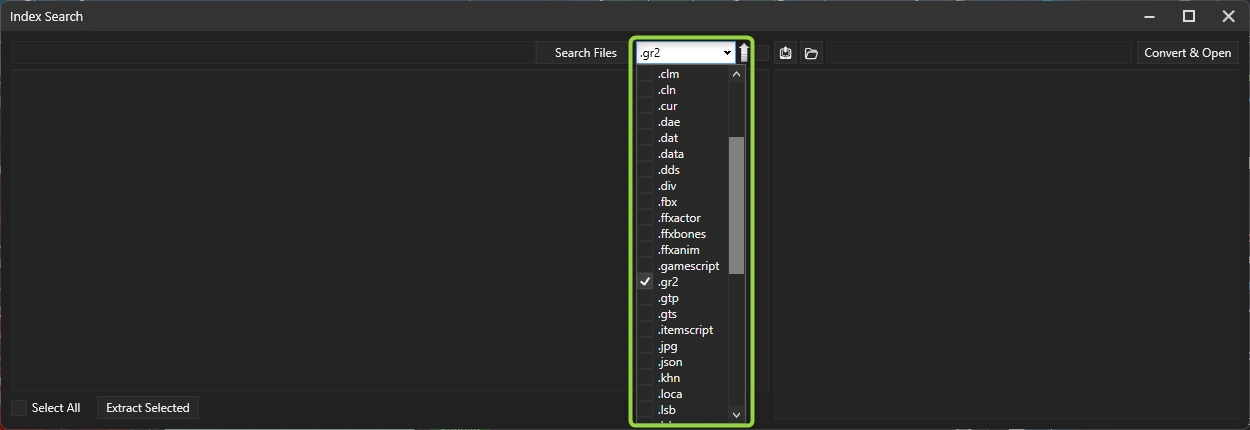
Here we search using the filter to only show GR2 Assets, as shown below:

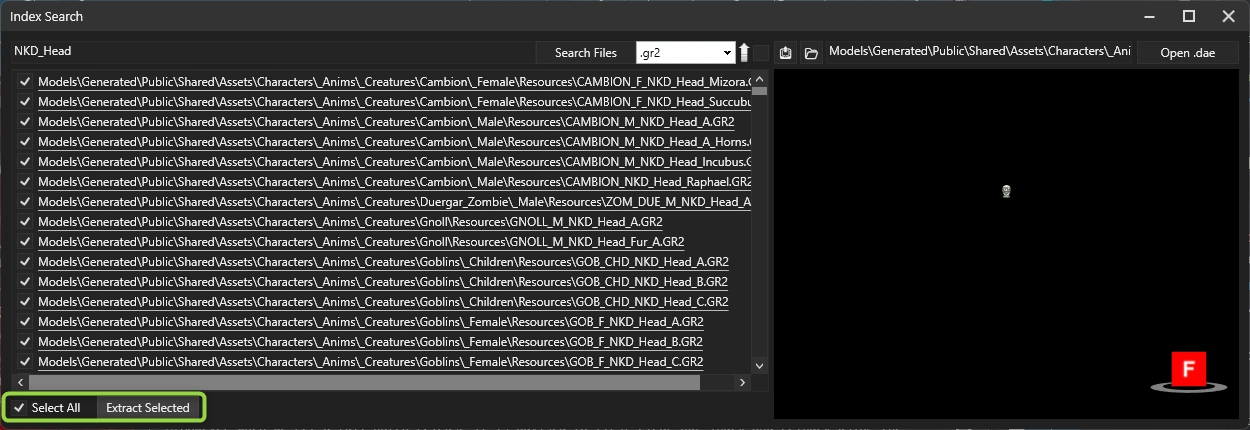
Then we search for NKD_Head as shown below:

Now we Select All and Extract Selected.
Note that this will extract more than just the races we can play as, but will use considerably less space than extracting the whole of the models.pak, if all we want to do is create head mods. You can also use this to go through the list to select specific assets you want to extract. This is not exclusive to GR2's, just pick the assets you want to filter and then you can extract.
- Be aware of your hard drive space where you placed the multitool, as it will create an UnpackedData folder where it extracts these files to.
Manually Unpacking[edit section | visual editor]
If you still want to unpack game paks manually rather than unpacking individual files via the new method you can use Utilities > Game File Operations > Unpack Game Files.
- Generally this is only advised if you have more than enough hard drive space to dedicate to unpacked files, as they can take up quite a bit of space.
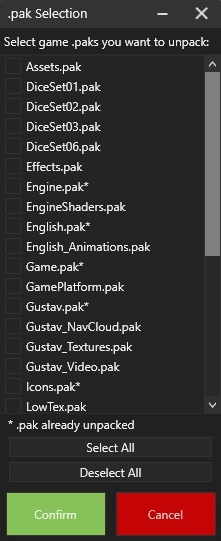
- A menu will appear similar to below:
- (As of Patch 4 when a new patch is released the hotfix packs get implemented into the main paks)

Common files:
- English.pak — this is where the localization files are located, aka all text strings that are displayed in the game.
- Gustav.pak — text files in .lsf format. Level data, dialog files, equipment stats, spells.
- Materials.pak — materials (shaders). It is useless in itself, but you can see what materials are in the game to assign them to your model.
- Models.pak — models in .gr2 format. Heads, hair, armour, architecture, etc.
- Textures.pak — textures in .dds format. There are not a lot of them here, since most textures are held in VirtualTextures. These are mostly color ID masks that divide the armour into zones for coloring. But there are textures for faces, hair, tattoos. Some environment textures.
- Shared.pak — text files in .lsf format. Overlaps with Gustav in some respects. Model data with assigned materials, skin, hair, eye colors, etc. for the character editor, also equipment stats, spells.
- VirtualTextures.pak — Most of the textures of the game are here, packed in virtual textures to improve performance.
- Voice.pak — voice lines.
Check the boxes against what you need and click Confirm. Unpacking may take a while.
Files conversion[edit section | visual editor]
Most unzipped files are not viewable or editable as-is, so you will have to convert them to a readable format.
.lsf → .lsx[edit section | visual editor]
Most files from Gustav.pak and Shared.pak. Modders Multitool can convert them to readable .lsx. Once you are done unpacking the files, you need to click Decompress Files and wait for the files to be automatically converted.
.gr2 → .dae[edit section | visual editor]
Model (mesh) files from Models.pak.
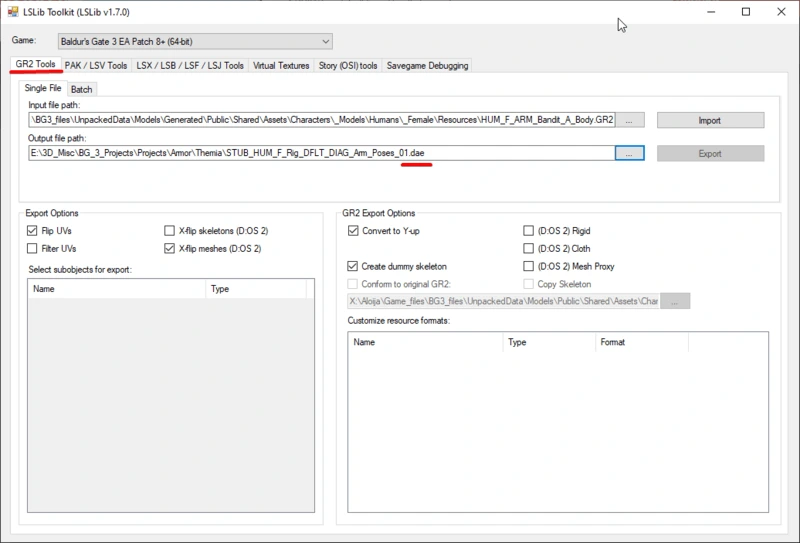
These can be converted using ExportTool. In the first tab of the GR2 Tools program specify the path to the desired .gr2 file and below the path where the converted file will be saved. !!! You must add .dae after the name !!!

First click the Import button to import the game .gr2 model, then Export to convert it to .dae format.
.dae can be opened with any 3D editor.
You can also import .gr2 directly into Blender 3.x.x+.
Norbyte has updated their plugin for importing and exporting models, the latest can be found here.
In the addon settings we specify the path to divine.exe from ExportTool.

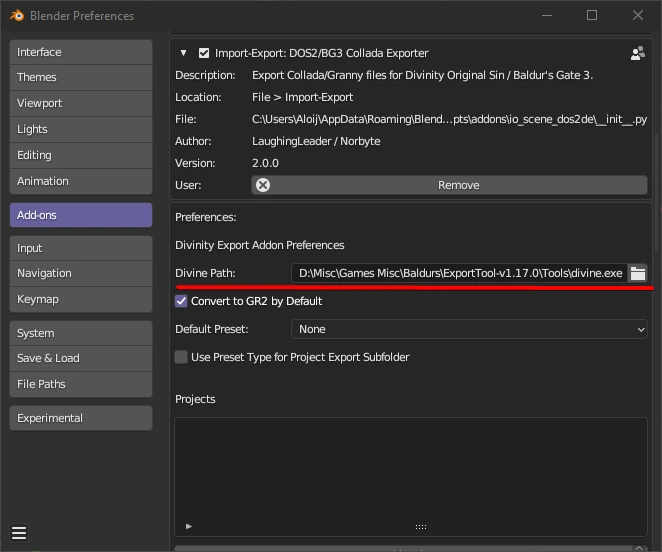
Now you can import .gr2 directly into Blender.

.dds[edit section | visual editor]
Texture files from Textures.pak.
These can be opened by installing the Adobe Photoshop Plugin from the Nvidia website. For those who don't have Photoshop, the free Gimp from version 2.10.10 onwards should have .dds support. Paint.net can also open .dds files and is free.
If you need to import textures into other programs or engines (Substance Painter, Blender, Unreal, Unity), it's best to save them in Targa (.tga) format. This will leave the alpha channel intact.
.gts → .dds[edit section | visual editor]
Virtual textures from VirtualTextures.pak.
They can also be unpacked with ExportTool (starting with version 1.17.0). Go to the Virtual Textures tab, specify the .gts file, export path and click Extract Textures. It will make a bunch of .dds files.
.wem → .ogg[edit section | visual editor]
Audio files from Voice.pak.
For .wem you will need Automatic .wem to .ogg Converter script from Nexus Mods. It is made for Monster Hunter: World, but it works perfectly with BG3 files.
Inside the archive there is a folder WEM to OGG Converter. You need to put the files from it into the folder where .wem files are located and run script.bat. The script will automatically convert all .wem to .ogg files that can be opened with a standard media player.
.loca → .xml[edit section | visual editor]
Localization text from English.pak (the same for other languages).
The .loca files can be converted with Export Tool. Select the .loca file and specify the name of a .xml file to use as output.
Command line example[edit section | visual editor]
Refer to https://github.com/Norbyte/lslib/blob/master/Divine/CLI/CommandLineArguments.cs to make sure the command line arguments are still the same.
Divine -g bg3 -a convert-resource -s "C:\Path\To\file.lsf" -d "C:\Path\To\dest.lsj"
Divine -g bg3 -a convert-resources --input-format lsf --output-format lsj -s "C:\Path\to\input\Folder" -d "C:\Path\to\output\folder"
Example of a python call:
from pathlib import Path
import subprocess

divine = Path("C:\\Path\\To\\Divine.exe")
subprocess.call([str(divine),
                 "-a", "convert-resources",
                 "-g", "bg3",
                 "--input-format", "lsf",
                 "--output-format", "lsj",
                 "-s", "C:\Path\to\input\Folder",
                 "-d", "C:\Path\to\output\Folder"
                 ])