Modding:Virtual textures
| This page is a modding page, and follows its own rules and standards separate from the rest of the wiki. |
A virtual texture is essentially a digital box that BG3 uses to store textures in so they load quicker. This is good for the game's performance, but not so good if you want to extract and edit them. So here is how to extract them.
This tutorial requires Modder's Multitool, LSLib v19 and a knowledge of how to find things with the multitool.
You may also find this spreadsheet helpful.
How to find the mesh name[edit section | visual editor]
You can skip this step if you know the mesh name. The wiki has many item pages with the File names included. The Deathstalker Mantle, for example.
- First thing you need to find the item is its name - the exact item name it has. For example, 'The Deathstalker Mantle'. Put the name (or the NPC's name, to lead you to their CharacterVisuals entry) in the modder's multitool index search. This should lead you to its entry in the english.loca file, where you can find the handle.
- Take the handle (a handle is h[string of numbers], similar to an UUID) and search that. For example, The Deathstalker Mantle's handle is hb7ee75e7g15f1g42a7gacf3gafe7628d8b10. This should lead you to the RootTemplate of the item. (If it doesn't have an entry in the RootTemplate, it's in the ParentTemplate's file instead.)
- You can then find its mesh mapkey. Search that and you should find the meshes lsx entry, which will lead you to the mesh name. For example, The Deathstalker Mantle's mesh name is UNI_DarkUrge_Bhaal_Cloak.
Finding the GTexFileName with the mesh name[edit section | visual editor]
You will need to find the GTexFileName in order to find the correct virtual texture to extract. So search the mesh name in the search index in Multitool.
You may need to append it with HUM_M_ instead of whatever race you are looking for, as most of the universal gtex are under HUM M meshes. The same applies with HUM F and meshes that are different on the female to the male.
Some meshes also share textures with other versions of the mesh, so you may need to remove the _a or _broken (for example) appendage if you aren't getting any matches.
For example, we like 'HUM_M_ARM_Bandit_C_Body' so we search this in the multitool.
It has an entry in 'Shared\Public\Shared\Content\Assets\Characters\Humans\[PAK]_Male_Armor\_merged.lsf' so we click convert & open for that.
We CTRL+F HUM_M_ARM_Bandit_C_Body and find a mesh entry for it.
  <node id="Resource">

                    <attribute id="AttachBone" type="FixedString" value="" />
                   <attribute id="AttachmentSkeletonResource" type="FixedString" value="" />
                   <attribute id="BlueprintInstanceResourceID" type="FixedString" value="" />
                   <attribute id="BoundsMax" type="fvec3" value="0.5363549 1.713599 0.176041" />
                    <attribute id="BoundsMin" type="fvec3" value="-0.5405712 0.6668076 -0.219203" />
                   <attribute id="ClothColliderResourceID" type="FixedString" value="" />
                   <attribute id="HairPresetResourceId" type="FixedString" value="" />
                   <attribute id="HairType" type="uint8" value="0" />
                   <attribute id="ID" type="FixedString" value="8e7bcc4a-2b65-d704-1cf0-a1a3bc8b8bd3" />
                   <attribute id="MaterialType" type="uint8" value="44" />
                  <attribute id="Name" type="LSString" value="HUM_M_ARM_Bandit_C_Body" /> (bolded for importance!)
We scroll down to the end of the mesh entry and find the Objects.
       <attribute id="LOD" type="uint8" value="0" />
    <attribute id="MaterialID" type="FixedString" value="57a6fd6e-c00d-60eb-5e52-31560b95332b" />
        <attribute id="ObjectID" type="FixedString" value="HUM_M_ARM_Bandit_C_Body.HUM_M_ARM_Bandit_C_Body_Mesh.0" />
           </node>
This material ID (57a6fd6e-c00d-60eb-5e52-31560b95332b) is what we need. We scroll back up to the very start of the _merged.lsf (materials are usually near the top) and CTRL+F for that.
We find:
                <node id="Resource">
                   <attribute id="DiffusionProfileUUID" type="FixedString" value="" />
                   <attribute id="ID" type="FixedString" value="57a6fd6e-c00d-60eb-5e52-31560b95332b" />
                   <attribute id="MaterialType" type="uint8" value="22" />
                 <attribute id="Name" type="LSString" value="HUM_M_ARM_Bandit_A_Body" />
                 [material continues, cut for length]
We scroll down to the end of the material, past the vector parameters and we find the VirtualTextureParameters ID:
            <node id="VirtualTextureParameters">
            <attribute id="Enabled" type="bool" value="True" />
            <attribute id="ExportAsPreset" type="bool" value="True" />
            <attribute id="GroupName" type="FixedString" value="Texture Map" />
         <attribute id="ID" type="FixedString" value="d53fa1a1-aa8e-2564-1077-42f6c36086c5" />
            <attribute id="Index" type="int32" value="0" />
            <attribute id="ParameterName" type="FixedString" value="virtualtexture" />
              </node>
So we search d53fa1a1-aa8e-2564-1077-42f6c36086c5. Luckily for us, it is in the same file. (If it isn't, you may need to search the multitool for it.)
<node id="Resource">

                   <attribute id="GTexFileName" type="FixedString" value="b049a62336641c449903f6ec8b4dae67" />
                   <attribute id="ID" type="FixedString" value="d53fa1a1-aa8e-2564-1077-42f6c36086c5" />
                   <attribute id="Localized" type="bool" value="False" />
                   <attribute id="Name" type="LSString" value="HUM_M_ARM_Bandit_A_Body" />
                   <attribute id="Prefetch" type="bool" value="False" />
                   <attribute id="PrefetchMipLevel" type="int8" value="-1" />
                   <attribute id="ReferencedColorSpaces" type="uint32" value="6" />
                   <attribute id="SourceFile" type="LSString" value="" />
                    <attribute id="VirtualTextureLayerConfig" type="uint32" value="3" />
                   <attribute id="_OriginalFileVersion_" type="int64" value="144115205255725056" />
               </node>
The GTexFileName, b049a62336641c449903f6ec8b4dae67, is the correct string. Now you can extract it from the virtual textures.
And we do see that it shares a texture with the other bandit models- it is the part under the armour. We will need to go back and extract the armour and accessories separately by looking at the materials under the different mesh chunks listed in the mesh entry.
Unpacking using Multitool[edit section | visual editor]
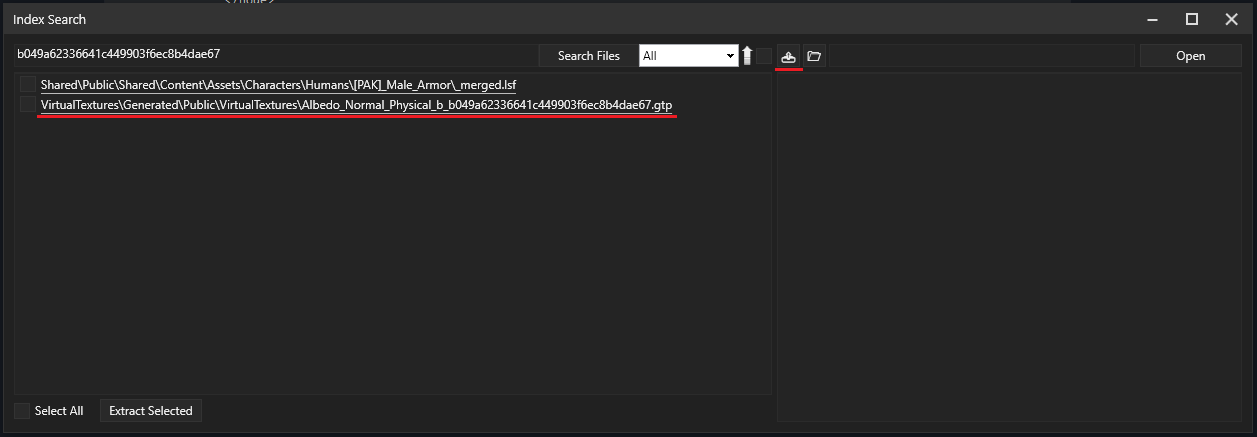
Now that you have your GTexFileName, you can extract the textures from VT. Search your GTexFileName (in this case: b049a62336641c449903f6ec8b4dae67) in the multitool. Select the file that's inside VirtualTextures and click on the Extract file icon.

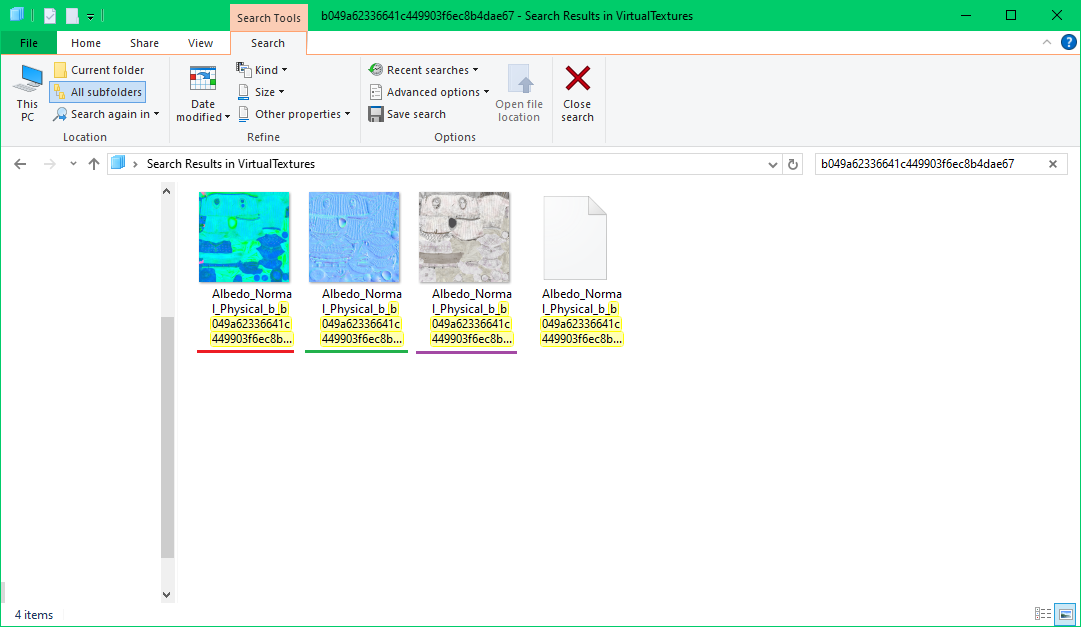
Now go to your Multitool/UnpackedData/VirtualTextures folder and search for b049a62336641c449903f6ec8b4dae67.

Here are the three texture files you will need, in .dds format. The red underlined one is the PM (Physical Map), the green underlined one is the NM (Normal Map), and the purple underlined one is the (BM) Base Map. The PM is usually brighter colors, the NM is usually almost all blue, and the BM is usually very light with a sort of beige tone. We recommend copying all of these to your project folder and renaming them with the mesh name + _BM, _NM, or _PM, so it's easier to keep track of them later.
Congrats, you've successfully exported textures from VT and can now use them for your modding project!
Lslib[edit section | visual editor]
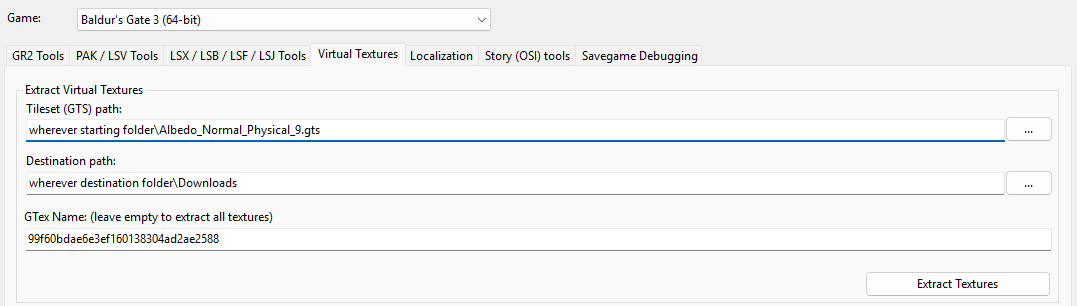
Lslib v19+ also lets you unpack just specific gtp files via the gtex name. This is handy if an individual gtex file can't be found via multitool.

Remember to match the first number/letter of the gtex name to whatever gts youre extracting it from.
Alternately you can just unpack all the VT into one folder and just search with Windows Search, but this is extremely file heavy and not recommended.
Remember Mipmaps[edit section | visual editor]
The extracting process strips the virtual textures of their mipmaps! Even if you are not editing some maps, you need to import them into GIMP(or any similar program) and resave with mipmaps to generate new ones if you are including them with your mod. See here for save settings.