Modding:Clothing Texture Maps
| This page is a modding page, and follows its own rules and standards separate from the rest of the wiki. |
Armor/Clothing Texture Maps (Basic)[edit section | visual editor]
Base Map - BM[edit section | visual editor]
Colour strength
Physical Map - PM[edit section | visual editor]
Glossiness
- Red Channel = Metallic (Darker = Matte)
- Green Channel = Roughness (Darker = Glossier)
- Blue Channel = Ambient Occlusion (Contains Lighting Data)
Normal Map - NM[edit section | visual editor]
Normals Note: Red channel is not used, moved to Alpha instead
Color Map - MSKColor/MSKcloth[edit section | visual editor]
Defines the material colours based on area - also needed to make Dyes work on armor/clothing.
Parameters and corresponding colours inside MSKColor/MSKcloth[edit section | visual editor]
| Parameter | 0-1 | Hex |
|---|---|---|
| Cloth_Primary | 1 0.5 0 | #FF8000 |
| Cloth_Secondary | 1 0 0 | #FF0000 |
| Cloth_Tertiary | 1 0.5 0.5 | #FF8080 |
| Leather_Primary | 0.5 0 1 | #8000FF |
| Leather_Secondary | 0 0 1 | #0000FF |
| Leather_Tertiary | 0.5 0.5 1 | #8080FF |
| Metal_Primary | 0 1 0.5 | #00FF80 |
| Metal_Secondary | 0 1 0 | #00FF00 |
| Metal_Tertiary | 0.5 1 0.5 | #80FF80 |
| Accent_Color | 1 0 0.5 | #FF0080 |
| Custom_1 | 0 0.5 1 | #0080FF |
| Custom_2 | 0.5 1 0 | #80FF00 |

Armor/Clothing Texture Maps (Advanced)[edit section | visual editor]
One can read here to learn about the actual creation of textures for your custom armor/clothing, and check out here for more in-depth explanations on inserting your textures into a mod. This section is only meant to expand on the previous one with some images and the occasional code example, and with only brief mentions of texture editing.
Shader (Configs)[edit section | visual editor]
These files get assigned to each and every material used for models, and essentially tells the game how to render an object - what texture maps it allows and the different parameters one can edit.
A lot of the shaders used in the game are VT-only (short for Virtual Textures), meaning their textures can only be loaded via specially encoded .gtp files. Currently we can unpack and edit these but not re-insert them back into the game as VT’s or create custom ones without the setup and use of Script Extender (see guide here if interested).
Shader configs are inserted as paths leading to the file into the SourceFile section of your material entry:<node id="Resource">
<attribute id="DiffusionProfileUUID" type="FixedString" value="" />
<attribute id="ID" type="FixedString" value="yourUUIDHere" /> Material ID for model
<attribute id="MaterialType" type="uint8" value="4" />
<attribute id="Name" type="LSString" value="YourModelName" />
<attribute id="SourceFile" type="LSString" value="Public/Shared/Assets/Materials/Characters/CHAR_BASE.lsf" />
<attribute id="_OriginalFileVersion_" type="int64" value="144115198813274414" />
<children>
your textures + settings here etc
</children>
</node>
Public/Shared/Assets/Materials/Characters/CHAR_BASE.lsfAnd these are the basic code entries needed to insert said texture maps:
<node id="Texture2DParameters"> _BM
    <attribute id="Enabled" type="bool" value="True" />
    <attribute id="ExportAsPreset" type="bool" value="True" />
    <attribute id="GroupName" type="FixedString" value="01 Texture Map" />
    <attribute id="ID" type="FixedString" value="yourUUIDhere" />
    <attribute id="ParameterName" type="FixedString" value="basecolor" />
</node>

<node id="Texture2DParameters"> _NM
    <attribute id="Enabled" type="bool" value="True" />
    <attribute id="ExportAsPreset" type="bool" value="True" />
    <attribute id="GroupName" type="FixedString" value="01 Texture Map" />
    <attribute id="ID" type="FixedString" value="yourUUIDhere" />
    <attribute id="ParameterName" type="FixedString" value="normalmap" />
</node>

<node id="Texture2DParameters"> _PM
    <attribute id="Enabled" type="bool" value="True" />
    <attribute id="ExportAsPreset" type="bool" value="True" />
    <attribute id="GroupName" type="FixedString" value="01 Texture Map" />
    <attribute id="ID" type="FixedString" value="yourUUIDhere" />
    <attribute id="ParameterName" type="FixedString" value="physicalmap" />
</node>

<node id="Texture2DParameters">
    <attribute id="Enabled" type="bool" value="True" />
    <attribute id="ExportAsPreset" type="bool" value="True" />
    <attribute id="GroupName" type="FixedString" value="01 Texture Map" />
    <attribute id="ID" type="FixedString" value="yourUUIDhere" />
    <attribute id="ParameterName" type="FixedString" value="MSKColor" />
</node>
Some shaders allow for additional maps or features to be used for armor/clothing, such as:
Glow Maps[edit section | visual editor]
As their name implies, these allow for glowing sections to be added to armor/clothing. You’d need to swap to a shader config that allows for Glow Maps to be able to use insert them. There's a few non-VT possibilities for this, depending on what look you’re trying to achieve. Some standard ones are:
Public/Shared/Assets/Materials/Characters/CHAR_BASE_GM.lsf^ Basic, this one only lets you set glowmap color via an overlaid GlowColor. Supports MSKcolor maps!
Public/Shared/Assets/Materials/Base/Base_GM_Pulse_FX.lsf^ A little more advanced, as it lets you set Glow Map color via either an overlaid GlowColor OR you can insert the colors directly into the Glow Map depending on your chosen settings, and also lets you set a pulse animation on the glow. Does not support MSKcolor maps!
<node id="Texture2DParameters"> _GM
    <attribute id="Enabled" type="bool" value="True" />
    <attribute id="ExportAsPreset" type="bool" value="True" />
    <attribute id="GroupName" type="FixedString" value="01 Texture Map" />
    <attribute id="ID" type="FixedString" value="yourUUIDhere" />
    <attribute id="ParameterName" type="FixedString" value="Glowmap" />
</node>
And the GlowColor setting for both shader configs:
(Note: You may need to use the American spelling 'GlowColor' and not the British spelling 'GlowColour' depending on which shader you're using. You can extract the config file for the shader you're using (e.g. 'CHAR_BASE_GM.lsf') if you want to double-check which spelling it uses).<node id="Vector3Parameters">
<attribute id="BaseValue" type="fvec3" value="0 0 0" />
<attribute id="Enabled" type="bool" value="True" />
<attribute id="ExportAsPreset" type="bool" value="True" />
<attribute id="GroupName" type="FixedString" value="Glow" />
<attribute id="IsColor" type="bool" value="True" />
<attribute id="ParameterName" type="FixedString" value="GlowColour" />
<attribute id="Value" type="fvec3" value="1 1 1" />
</node>
<node id="ScalarParameters">
    <attribute id="BaseValue" type="float" value="0" />
    <attribute id="Enabled" type="bool" value="True" />
    <attribute id="ExportAsPreset" type="bool" value="True" />
    <attribute id="GroupName" type="FixedString" value="Glow" />
    <attribute id="ParameterName" type="FixedString" value="UseGMColor" />
    <attribute id="Value" type="float" value="1" />
</node>
1 = the color of the Glow Map itself dictates colors
<node id="ScalarParameters">
    <attribute id="BaseValue" type="float" value="1" />
    <attribute id="Enabled" type="bool" value="True" />
    <attribute id="ExportAsPreset" type="bool" value="True" />
    <attribute id="GroupName" type="FixedString" value="Glow" />
    <attribute id="ParameterName" type="FixedString" value="PulseSpeed" />
    <attribute id="Value" type="float" value="1" />
</node>
Between 0 - 1 = pulse animation and its speed
There are some Glow Map shaders that let you set colors via a ColorMap, which essentially is a colored gradient - these are more often used for VFX stuff than armor/clothing.
Alpha (aka Transparancy)[edit section | visual editor]
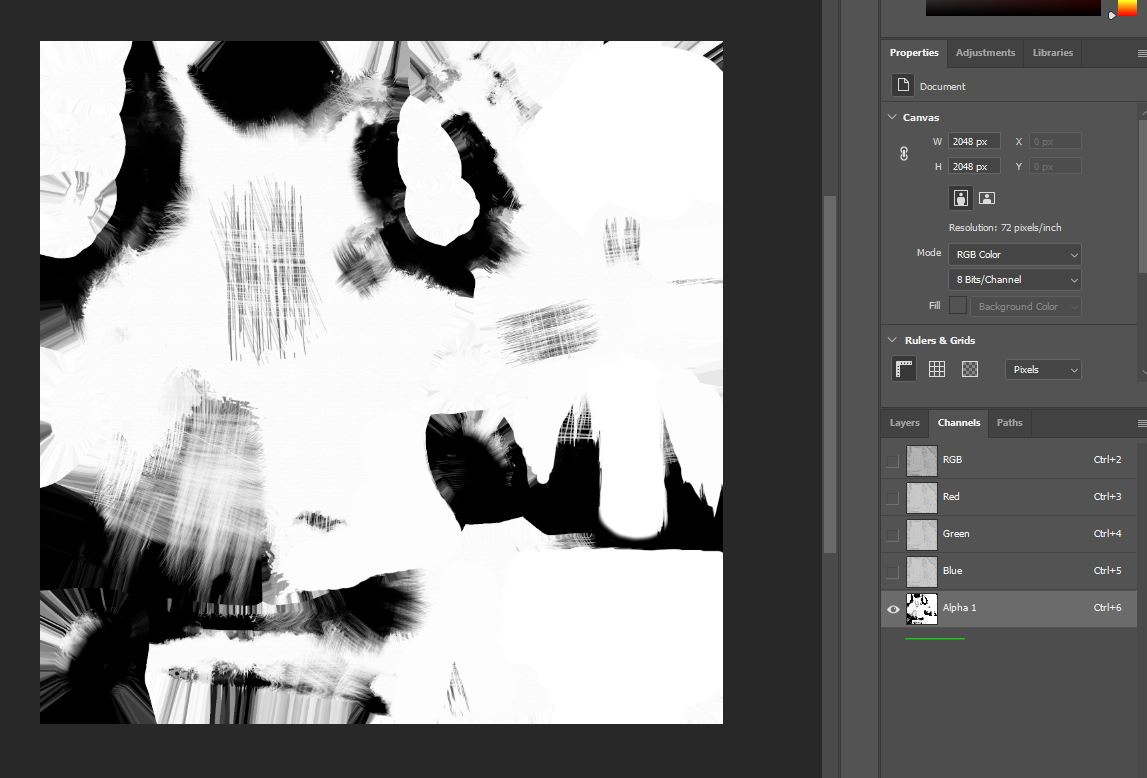
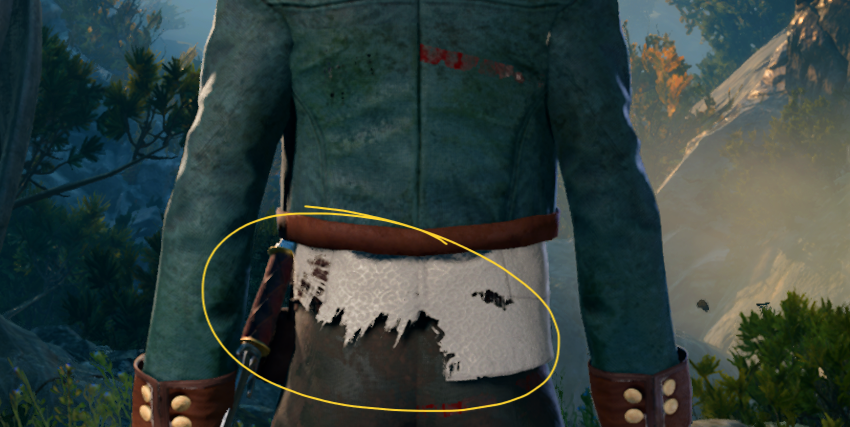
Some shader configs allow you to create completely (or partially) transparent parts on armor/clothing without needing to edit the mesh. A standard one is:Materials\Public\Shared\Assets\Materials\Characters\CHAR_BASE_AlphaTest.lsfAny transparency is added via the Base Color map, by creating a white Alpha channel and painting in parts you want fully transparent with black (grey for partial transparancy). In the game files these files might be called _BMA instead of _BM, but the naming doesn’t matter - they’re just _BM files exported with Alpha active.


Backfaces (Two-sided textures)[edit section | visual editor]
A way to make your model appear double-sided without editing the mesh, is to use a shader config that allows for Backfaces. A standard one is:Materials\Public\Shared\Assets\Materials\Characters\CHAR_BASE_AlphaTest_2S.lsf
You don’t need to do anything special when switching to this shader, the textures used within the materials will now just appear double-sided. Note that this one also allows for transparency, as a non-VT alternative just for _2s exclusively doesn’t exist for us to use. As long as you don’t have an Alpha channel in your Base Color Map it won’t affect your textures.
VertCut[edit section | visual editor]
Shaders with this term in their name allow for using vertex colors to mask parts of clothing. For example, a pair of boots are too long and clip through pants - a VertCut shader will allow you (with an appropriately set up model) to hide the part of the pants the boot overlays and avoid clipping. You can read more about them in general here. A standard one is:Materials\Public\Shared\Assets\Materials\Characters\CHAR_BASE_VertCut.lsf
This one supports alphas, MSKColours, and vertcut:
Public/Shared/Assets/Materials/Characters/CHAR_BASE_AlphaTest_2S_Dither.lsf
What if I want to use x and x?[edit section | visual editor]
Some combinations of the above are also possible, though again, we are limited by the amount of non-VT ones that allow for them. See the page here.
Many more shader configs with specific purposes exist, you can always check within the shader config .lsf file to see what texture maps + parameters it allows.