Ad placeholder
Reithwin Tollhouse

| Reithwin Town | ||||
| Mason's Guild | ||||
| ↑ | ||||
| The Waning Moon | ← | Reithwin Tollhouse | → | Ruined Battlefield |
| ↓ | ||||
| Moonrise Towers | ||||

Overview[edit section | visual editor]
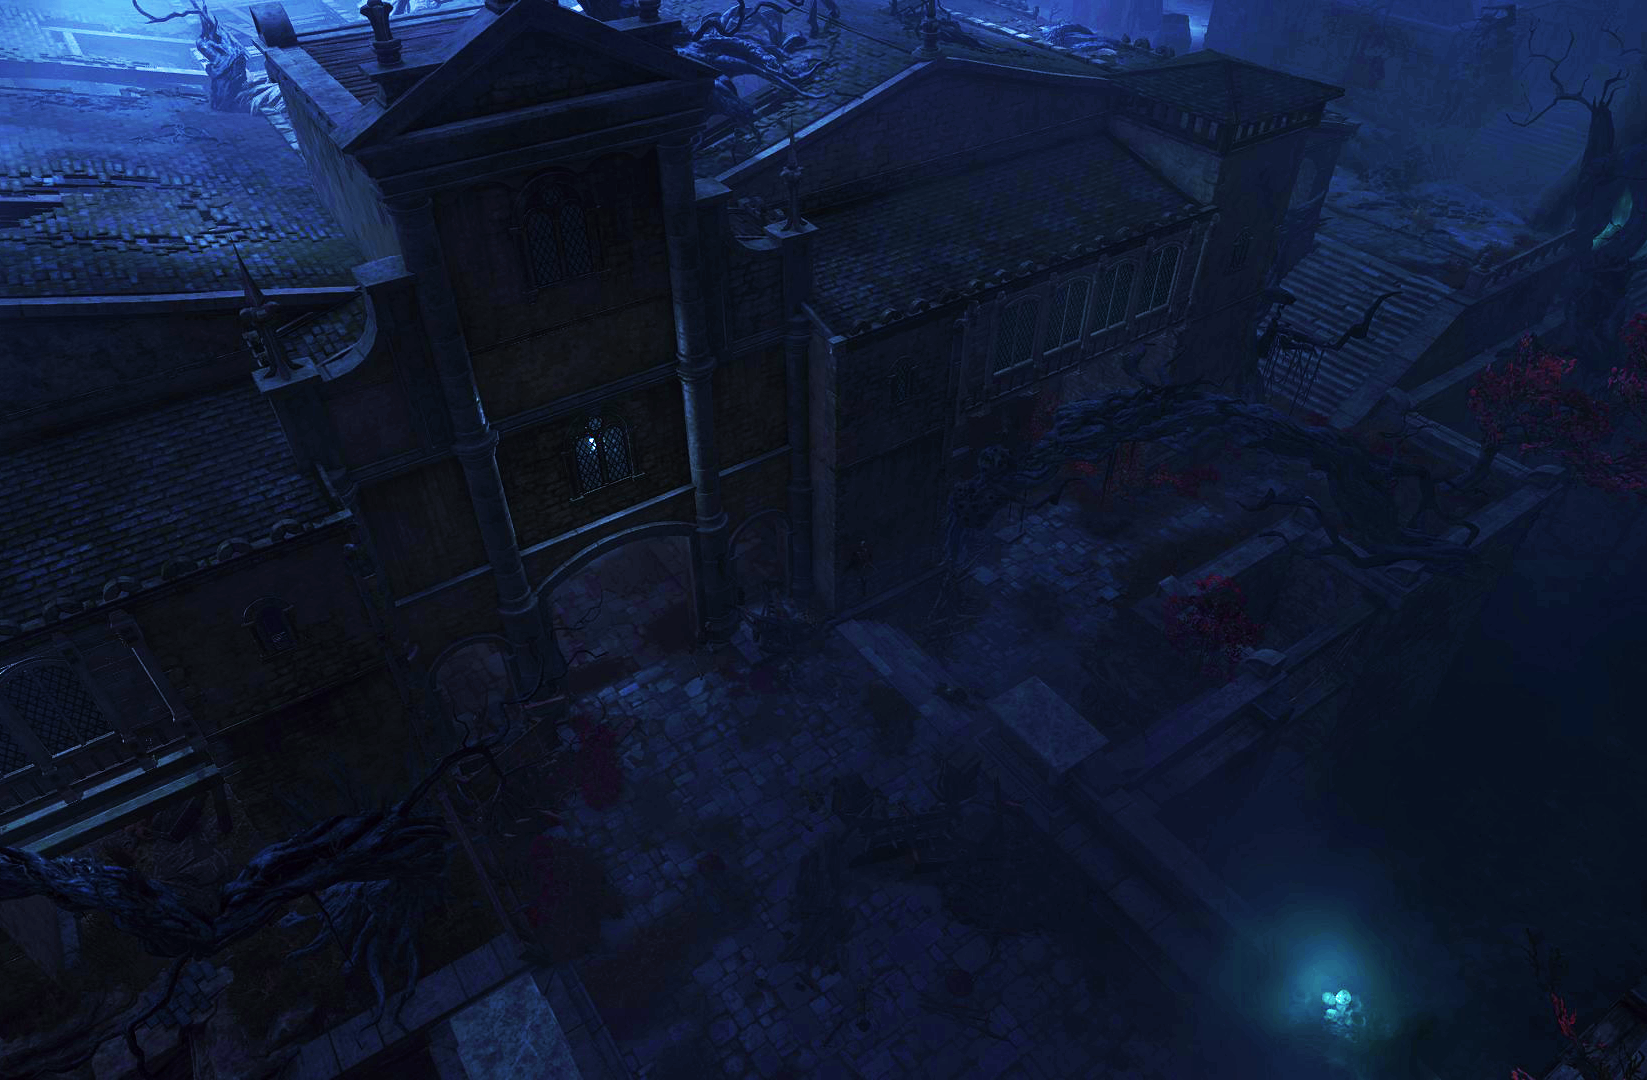
Reithwin Tollhouse occupies the south-eastern corner of the town adjacent to the Ruined Battlefield. This two-storied building also has a large basement, which evens the descent of the ground level to the water end. Of all town buildings, this one looks most suffered from the shadow-cursed vines protruding from earth, partly rupturing and entangling its second floor.
It can be accessed from the stone bridge at X: -59 Y: -80, which is continued into the main street of the Reithwin Town leading from east to west. The tollhouse extends along the southern side of the road and can be entered through double doors at X: -96 Y: -37. A thick arborous vine starting at the same point allows access to the building roof.
A lesser wooden bridge at X: -59 Y: -112 connects the Ruined Battlefield with the tollhouse quay. Next, the party must go upstairs to enter the door at X: -98 Y: -100, which leads directly to the top floor of the building. The gate into the tollhouse basement is at X: -107 Y: -100, further along the riverside, but is not connected with the two upper floors.
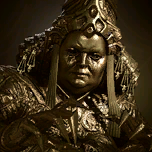
The last acting toll collector 

Ground floor[edit section | visual editor]
The ground floor of the tollhouse does not offer much loot, but still has several points of interest. When approaching the tollhouse, at X: -80 Y: -69 the party can find the Harpers' prayers scratched on the wall, and comment on them.
On the stone bridge leading to the tollhouse one of wooden crates at X: -75 Y: -72 contains a ![]()
Outside the building on a small stone-paved ground at X: -80 Y: -133 a pair of skeletons have some gold and a random potion on them; behind a cart nearby a heavy chest is hidden.
On a pier at X: -74 Y: -100 another heavy chest contains gold and a ![]()
In the backyard at X: -113 Y: -46 is a heap of pets' collars. This is actually only a part of interactable object; the second part is a poster on the message board near The Waning Moon. The party members' comments depend on which of these two halves they have found first.
Inside, the ground floor of the tollhouse is cluttered with numerous barrels, crates and boxes, mostly empty. Among them, the party members comment on three adjacent from Cormyr, Daleland and Thay (the last one contains a single ![]()
Top floor[edit section | visual editor]

This level can be accessed via the door, from the ground floor by going up the half-ruined stairs, or from the roof climbing down the roots in the middle of the building.
The toll collector
Upon approaching her, a dialogue starts automatically. The party can refuse to pay her toll and fight her, or convince her to "retire" and return all the gold she took in excess (the latter functionally a suicide for her). All possible dialogue options to do the latter are listed on Gerringothe's page. However, if the party choose to give her all the gold they have, and the total sum exceeds 5000 ![]()
![]()
![]()
![]()
![]()
If Gerringothe is defeated, she can be looted for the ![]()
![]()
![]()
Toll Collector's Hoard[edit section | visual editor]
Top floor offers several lootable objects:
- A safe containing 514 gold stands at X: -113 Y: -84. Its door is jammed and requires passing a

- At X: -117 Y: -77 is a small room, the doorway entangled with thick vine.[3] When approaching, a passive


- The room at X: -94 Y: -88 has two locked double doors (any of


- In the room at X: -92 Y: -74 are two unlocked traveller's chests with gold and random alchemical ingredients. A wooden barrel aside them contains
- An unlocked opulent chest at X: -83 Y: -60 contains random potions and gold. A safe nearby is locked and requires

- In the Tollhouse Master's Office, a heavy chest contains the

Exploring Reithwin Tollhouse may bring the following inspirations:


Also, the following inspirations can be earned, if not obtained earlier in the game:


Talking to Gerringothe Thorm, revealing her story and defeating her is a necessary component as well for further obtaining the following inspirations:


Roof[edit section | visual editor]
The roof can be accessed by walking up the thick vine starting at X: -96 Y: -37, or by using the ladder from inside the top floor of the building, or climbing up the roots at X: -88 Y: -101 outside on the southern wall.
If climbing onto the roof, a skeleton can be found at X: -96 Y: -89 carrying a ![]()
![]()
![]()
![]()
Basement[edit section | visual editor]
The basement can be accessed only from outside through the double doors on the southern side of the building. It can be opened with aforementioned key carried by the skeleton on the roof, or lockpicked with a 
Along the wall are three large bookcases. Two successive ![]()
Climbing the roots down the breach in the floor lead the party to a deeper cellar with a rustic chest at X: 320 Y: -701.
Waypoints[edit section | visual editor]
This location contains the following waypoint:
Characters and creatures[edit section | visual editor]


Loot[edit section | visual editor]
Related Literature[edit section | visual editor]
Achievements[edit section | visual editor]

Footnotes and References[edit section | visual editor]
- ↑ If the battle occurs, these heaps may not lie afterwards close to each other or to Gerringothe's corpse; they seem to be the remains of her golden armour.
- ↑ If using

- ↑ This vine, unlike others, is interactable and can be destroyed. However, it has 160 HP on Balanced difficulty level and

- ↑ This item can only be obtained from Gerringothe Thorm by paying her at least 5000 gold.