Overgrown Ruins: Difference between revisions
mNo edit summary |
(merge and reformat) |
||
| Line 13: | Line 13: | ||
|east = River Chionthar | |east = River Chionthar | ||
}} | }} | ||
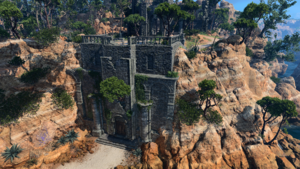
The '''Overgrown Ruins''' is a [[location]] within the [[Wilderness]] | The '''Overgrown Ruins''' is a [[location|location]] within the [[Wilderness]], and are the remnants of what appears to have once been a chapel, though time has eroded many of the clues as to who exactly was revered here.{{ref|The Overgrown Ruin is named after the Waypoint, for the convenience of connecting the related smaller locations.|note}} | ||
{{TOC|limit=3}} | |||
==Overview== | |||
The ruins consist of one exterior location and two interiors: the [[Chapel Entrance]], the [[Refectory]], and the [[Dank Crypt]]. | |||
A group of looters are canvassing the Overgrown Ruins. [[Gimblebock]], [[Quelenna]], [[Taman]], and [[Warryn]] stand guard outside in the Chapel Entrance, while [[Andorn]], [[Barton]], [[Cefrey]], [[Haseid]], [[Mari]] and [[Torgga]] loot the Refectory.{{ref|If the party dropped the Foundation Block through the floor of the Chapel Entrance, the looters inside will automatically be hostile.|note}} | |||
=== Chapel Entrance === | === Chapel Entrance === | ||
{{hatnote|See main article: [[Chapel Entrance]]}} | |||
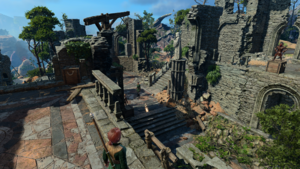
[[File:Chapel Entrance Ambush.png|thumb|The Chapel Entrance, showing the structure of the upper ruin, and looters prepared for an ambush.]] | [[File:Chapel Entrance Ambush.png|thumb|The Chapel Entrance, showing the structure of the upper ruin, and looters prepared for an ambush.]] | ||
The Chapel Entrance is an exterior location in the | The Chapel Entrance is an exterior location in the Wilderness. It covers the upper section of the Overgrown Ruins. Four looters have set up base here, and are arguing whether to continue looting, or to check out the [[Nautiloid Wreck]] to the south. The Chapel Entrance contains a door to the Refectory, and a hidden hatch to the Dank Crypt. | ||
There are also several patches of [[Twisting Vines]], and a loose | There are also several patches of [[Twisting Vines]], and a loose Cracked Stone that may punish those who forget to watch their step. | ||
=== Refectory === | === Refectory === | ||
{{ | [[File:Bedchamber.jpg|thumb|The shrine inside the Refectory]] | ||
The Refectory can be accessed via the Chapel Entrance.{{ref|In early access this area was known as the Bedchamber|note}} If the party failed to convince Andorn, the looter guarding the entry to the ruins, to let them in peacefully, there will be a trap near the entrance door, and the looters inside will be alert, grouped, and ready for combat. | |||
An Ornate Door with no visible lock or handle leads into the Dank Crypt, and can be opened by using a hidden switch behind a statue {{Coords|-174|-362}}. Succeeding at a [[Perception]] check is required to spot the switch. | |||
If the party fails to spot this switch, the party can still access the Dank Crypt by either destroying the door, or by lockpicking the Ancient Door found at the [[Ravaged Beach]]. | |||
=== Dank Crypt === | === Dank Crypt === | ||
{{ | The Dank Crypt (also known as Temple Ruins) is strewn with ancient sarcophagi and largely overgrown. One of the walls has collapsed, revealing a seaside cave that leads back to the [[Roadside Cliffs]]. A large statue of the god [[Jergal]] sits in the lower courtyard. | ||
====Trapped sarcophagus==== | |||
The southern room with a sarcophagus in the middle is heavily trapped. When the sarcophagus is opened, gargoyle heads lining the west and east walls will start firing firebolts into the room. Meanwhile, gas vents will start pouring flammable gas into the room, and [[Grease]] traps will flood the ground with [[Prone (Condition)|slippery]], [[Difficult Terrain]] and additional flammable surfaces. All of these traps require {{Ability check|Perception|15}} to spot. On the middle pillar on the eastern side of the room is a button that will turn off the traps once triggered; it also requires a perception check to spot. | |||
* The gas vents can be blocked by placing crates, vases, and other similar items on top of them. | |||
* The vents, grease traps, and gargoyle heads can also be disarmed using a [[Trap Disarm Toolkit]]. Given the number of traps, the dearth of toolkits the party will likely have at this early stage of the game, and the fact that a toolkit will be consumed and the trap will be triggered if the attempt fails, this can be a risky option. | |||
====Shrine of Jergal==== | |||
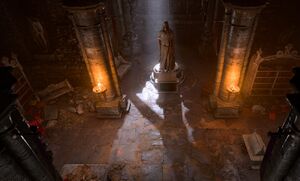
Behind heavy oak doors to the north lies a large, overgrown chamber centered around an imposing, skeletal statue. A successful [[Religion]] check (DC: 15) identifies the statue as Jergal, the divine scribe and former greater deity of death. There is a hidden button to the west of the statue at {{Coords|298|-232}}; a [[Perception]] check (DC: 7) highlights the button, but is not necessary to reveal it. When pressed, a secret door beside the button will open and the skeletons in the room (four [[Entombed Scribe]]s and one [[Entombed Warrior]]) will come to life and attack the party. | |||
* The enemies can be disarmed before triggering the fight by looting their weapons. This is more useful against the warrior, as the scribes will rarely attack with their staves. | |||
* Attempting to manipulate the skeleton's positions by picking up or moving the bodies will instantly trigger combat. | |||
==== Withers ==== | |||
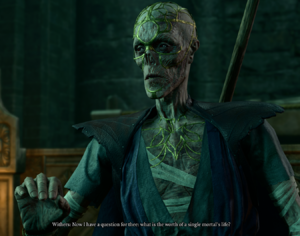
[[File:Withers Rises.png|thumb|Withers, being awoken from his slumber, asks the player a question.]] | |||
[[Withers]] will emerge from a sarcophagus in the secret room, if the sarcophagus is interacted with. He will ask the closest party member a question and then later join the party as a [[Camp follower|follower]] in their camp. Withers will offer resurrection, hireling, and respec services in the camp. | |||
* If the party neglects to visit the Dank Crypt, Withers will eventually show up at camp, regardless. | |||
=== Other information === | |||
* There is a sarcophagus in the southern trapped room {{Coords|-293|-325}} that contains an Engraved Key and [[The Watcher's Guide]]. The key opens the large locked heavy oak doors to the north. | |||
* There is a Heavy Key on the body of an [[Entombed Scribe]] {{Coords|-311|-252}}. This key unlocks the Ancient Door near the trapped sarcophagus that leads to the Ravaged Beach. | |||
*[[The Amulet of Lost Voices]] can be found inside a chest {{Coords|-293|-233}} in the secret room behind the Shrine of Jergal. | |||
* East of the room with the Entombed Scribes, near the water, is a ladder leading above to the Chapel Entrance through a locked trapdoor {{Coords|-252|-270}}. A lever next to the ladder will unlock the trapdoor. | |||
*It is possible to access the Dank Crypt from the outside by lockpicking the same hatch to the east of the Chapel Entrance {{Coords|318|362}}. | |||
=== Characters === | |||
==== Camp followers ==== | |||
* [[Withers]] | |||
====Creatures ==== | |||
* [[Entombed Scribe]] | |||
* [[Entombed Warrior]] | |||
=== | ==== Looters ==== | ||
* | * [[Andorn]] | ||
* | * [[Barton]] (friend){{ref|Barton and Mari appear to be friends – Mari, upon finding Barton dead and looking for their killer: "You killed my friend. Answer to me. Now!"|note|name=friends}} | ||
* | * [[Cefrey]] | ||
* | * [[Gimblebock]] (leader){{ref|Gimblebock appears to be the leader, or one of the leaders, of the operation – Andorn: "Think I'm stupid? Don't know who you are, or what you've done with the boss..."|note}} | ||
* [[Haseid]] | |||
* [[Mari]] (lockpick){{ref|Mari is their lockpick, and has been working on unlocking the crypt door for days – Gimblebock: "And the crypt can wait! Mari and Barton have been trying to break in for days. Now we - Stop!"|note}}<ref name = "friends" group = "note" /> | |||
* [[Quelenna]] | |||
* [[Taman]] | |||
* [[Torgga]] | |||
* [[Warryn]] | |||
== | == Quests == | ||
* [[Explore the Ruins]] | * [[Explore the Ruins]] | ||
== | == Accessing the ruins == | ||
* A Locked Door in the {{Coords|285|375|Chapel Entrance}} can be lockpicked {{SkillCheck|Sleight of Hand|7}} or interacted with to access the [[Refectory]]. | |||
* The Ancient Door on the {{Coords|285|306|Ravaged Beach}} can be opened with {{SkillCheck|Sleight of Hand|20}}. This door leads to the [[Dank Crypt]]. | |||
* The | * The Hatch by the {{Coords|319|367|Chapel Entrance}} can be opened with {{SkillCheck|Sleight of Hand|20}}. This hatch leads to the [[Dank Crypt]]. | ||
* Standing on the Cracked Stone {{Coords|283|340|}} in will drop the player and party down to {{Coords|-160|-315|Refectory}}. Alternatively the player can drop the Foundation Block hanging overhead and break the stone. This will allow them to jump rather than fall down. | |||
== | ==Notable loot== | ||
Notable items obtained in this location, whether looted, purchased, or obtained as a quest reward: | |||
* {{MdRarityItem|The Amulet of Lost Voices}} | |||
* {{MdRarityItem|Book of Dead Gods}} | |||
* {{MdRarityItem|The Watcher's Guide}} | |||
* {{MdRarityItem|Soul Coin}} | |||
== | == Footnotes == | ||
{{reflist|note}} | |||
[[Category:Locations]] | [[Category:Locations]] | ||
[[Category:Act One Locations]] | [[Category:Act One Locations]] | ||
Revision as of 10:43, 25 November 2023
| Wilderness | ||||
| Emerald Grove | ||||
| ↑ | ||||
| Roadside Cliffs | ← | Overgrown Ruins | → | River Chionthar |
| ↓ | ||||
| Ravaged Beach | ||||
The Overgrown Ruins is a location within the Wilderness, and are the remnants of what appears to have once been a chapel, though time has eroded many of the clues as to who exactly was revered here.[note 1]
Overview
The ruins consist of one exterior location and two interiors: the Chapel Entrance, the Refectory, and the Dank Crypt.
A group of looters are canvassing the Overgrown Ruins. Gimblebock, Quelenna, Taman, and Warryn stand guard outside in the Chapel Entrance, while Andorn, Barton, Cefrey, Haseid, Mari and Torgga loot the Refectory.[note 2]
Chapel Entrance
The Chapel Entrance is an exterior location in the Wilderness. It covers the upper section of the Overgrown Ruins. Four looters have set up base here, and are arguing whether to continue looting, or to check out the Nautiloid Wreck to the south. The Chapel Entrance contains a door to the Refectory, and a hidden hatch to the Dank Crypt.
There are also several patches of Twisting Vines, and a loose Cracked Stone that may punish those who forget to watch their step.
Refectory
The Refectory can be accessed via the Chapel Entrance.[note 3] If the party failed to convince Andorn, the looter guarding the entry to the ruins, to let them in peacefully, there will be a trap near the entrance door, and the looters inside will be alert, grouped, and ready for combat.
An Ornate Door with no visible lock or handle leads into the Dank Crypt, and can be opened by using a hidden switch behind a statue X: -174 Y: -362. Succeeding at a Perception check is required to spot the switch.
If the party fails to spot this switch, the party can still access the Dank Crypt by either destroying the door, or by lockpicking the Ancient Door found at the Ravaged Beach.
Dank Crypt
The Dank Crypt (also known as Temple Ruins) is strewn with ancient sarcophagi and largely overgrown. One of the walls has collapsed, revealing a seaside cave that leads back to the Roadside Cliffs. A large statue of the god Jergal sits in the lower courtyard.
Trapped sarcophagus
The southern room with a sarcophagus in the middle is heavily trapped. When the sarcophagus is opened, gargoyle heads lining the west and east walls will start firing firebolts into the room. Meanwhile, gas vents will start pouring flammable gas into the room, and Grease traps will flood the ground with slippery, Difficult Terrain and additional flammable surfaces. All of these traps require ![]() DC 15 Perception check to spot. On the middle pillar on the eastern side of the room is a button that will turn off the traps once triggered; it also requires a perception check to spot.
DC 15 Perception check to spot. On the middle pillar on the eastern side of the room is a button that will turn off the traps once triggered; it also requires a perception check to spot.
- The gas vents can be blocked by placing crates, vases, and other similar items on top of them.
- The vents, grease traps, and gargoyle heads can also be disarmed using a Trap Disarm Toolkit. Given the number of traps, the dearth of toolkits the party will likely have at this early stage of the game, and the fact that a toolkit will be consumed and the trap will be triggered if the attempt fails, this can be a risky option.
Shrine of Jergal
Behind heavy oak doors to the north lies a large, overgrown chamber centered around an imposing, skeletal statue. A successful Religion check (DC: 15) identifies the statue as Jergal, the divine scribe and former greater deity of death. There is a hidden button to the west of the statue at X: 298 Y: -232; a Perception check (DC: 7) highlights the button, but is not necessary to reveal it. When pressed, a secret door beside the button will open and the skeletons in the room (four Entombed Scribes and one Entombed Warrior) will come to life and attack the party.
- The enemies can be disarmed before triggering the fight by looting their weapons. This is more useful against the warrior, as the scribes will rarely attack with their staves.
- Attempting to manipulate the skeleton's positions by picking up or moving the bodies will instantly trigger combat.
Withers
Withers will emerge from a sarcophagus in the secret room, if the sarcophagus is interacted with. He will ask the closest party member a question and then later join the party as a follower in their camp. Withers will offer resurrection, hireling, and respec services in the camp.
- If the party neglects to visit the Dank Crypt, Withers will eventually show up at camp, regardless.
Other information
- There is a sarcophagus in the southern trapped room X: -293 Y: -325 that contains an Engraved Key and The Watcher's Guide. The key opens the large locked heavy oak doors to the north.
- There is a Heavy Key on the body of an Entombed Scribe X: -311 Y: -252. This key unlocks the Ancient Door near the trapped sarcophagus that leads to the Ravaged Beach.
- The Amulet of Lost Voices can be found inside a chest X: -293 Y: -233 in the secret room behind the Shrine of Jergal.
- East of the room with the Entombed Scribes, near the water, is a ladder leading above to the Chapel Entrance through a locked trapdoor X: -252 Y: -270. A lever next to the ladder will unlock the trapdoor.
- It is possible to access the Dank Crypt from the outside by lockpicking the same hatch to the east of the Chapel Entrance X: 318 Y: 362.
Characters
Camp followers
Creatures
Looters
- Andorn
- Barton (friend)[note 4]
- Cefrey
- Gimblebock (leader)[note 5]
- Haseid
- Mari (lockpick)[note 6][note 4]
- Quelenna
- Taman
- Torgga
- Warryn
Quests
Accessing the ruins
- A Locked Door in the Chapel EntranceX: 285 Y: 375 can be lockpicked
 DC 7 Sleight of Hand check or interacted with to access the Refectory.
 - The Ancient Door on the Ravaged BeachX: 285 Y: 306 can be opened with
 DC 20 Sleight of Hand check. This door leads to the Dank Crypt.
 - The Hatch by the Chapel EntranceX: 319 Y: 367 can be opened with
 DC 20 Sleight of Hand check. This hatch leads to the Dank Crypt.
 - Standing on the Cracked Stone X: 283 Y: 340 in will drop the player and party down to RefectoryX: -160 Y: -315. Alternatively the player can drop the Foundation Block hanging overhead and break the stone. This will allow them to jump rather than fall down.
Notable loot
Notable items obtained in this location, whether looted, purchased, or obtained as a quest reward:
Footnotes
- ↑ The Overgrown Ruin is named after the Waypoint, for the convenience of connecting the related smaller locations.
- ↑ If the party dropped the Foundation Block through the floor of the Chapel Entrance, the looters inside will automatically be hostile.
- ↑ In early access this area was known as the Bedchamber
- ↑ 4.0 4.1 Barton and Mari appear to be friends – Mari, upon finding Barton dead and looking for their killer: "You killed my friend. Answer to me. Now!"
- ↑ Gimblebock appears to be the leader, or one of the leaders, of the operation – Andorn: "Think I'm stupid? Don't know who you are, or what you've done with the boss..."
- ↑ Mari is their lockpick, and has been working on unlocking the crypt door for days – Gimblebock: "And the crypt can wait! Mari and Barton have been trying to break in for days. Now we - Stop!"


