Modding:Custom Hair Highlights: Difference between revisions
Jump to navigation
Jump to search
No edit summary |
No edit summary |
||
| Line 1: | Line 1: | ||
<div class="nomobile" column-width: "60em2;> | <div class="nomobile" column-width: "60em2;>{{Modding box}}{{Modding sidebar}} | ||
{ | |||
{| class="wikitable" | {| class="wikitable" | ||
|+ | |+ | ||
| Line 41: | Line 25: | ||
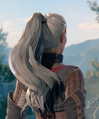
File:VertexPaintTutorialStartResult.png|Before adding vertex paint. | File:VertexPaintTutorialStartResult.png|Before adding vertex paint. | ||
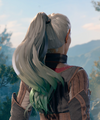
File:VertexPaintTutorialEndResult.png|After adding vertex paint. | File:VertexPaintTutorialEndResult.png|After adding vertex paint. | ||
</gallery> | </gallery>{{Modding navbox}} | ||
[[Category:Hair modding]] | |||
Latest revision as of 00:56, 9 January 2024
| This page is a modding page, and follows its own rules and standards separate from the rest of the wiki. |
| bg3.wiki modding |
|---|
| Modding homepage |
| Modding resources - Meshes, Models, Tools, etc. |
| Modding guides |
| Hair modding |
| Head modding |
| Item modding - Armours, Outfits, Weapons etc. |
| Race/class modding |
| Highlights are controlled by vertex paint in BG3.
Black/Red = Base hair (no highlights) Blue (#0000FF) = highlights Green (#00FF00) = thickness Every shade inbetween determines the intensity of said parameters when applied to strands, including the shades between two parameters. |
|---|
Watch this video starting at 12:15 for an example of how to paint highlights using vertex paint.
You can add highlights to your custom hair using the tools built into Blender.
- Select a portion of your hair mesh. Go up to Object Mode and change to Vertex Paint mode. Make sure your shading is set to Viewport Shading.
- Set your color to black, then open Paint > Set Vertex Colors. This will change the entire mesh vertex color to black, which is equivalent to no highlight.
- Now set your color to hex #0080FF or so (a slightly greenish blue). This is the color we will be using to paint our highlights.
- Paint the blue color roughly where you want the highlights to be.
- Use the Blur tool to blur out the highlights as much as possible.
- Go to Paint > Dirty Vertex Colors. This will smooth the color out a little more and reduce its intensity.
- Repeat for all portions of your hair.
- Export and load into game. You should now have working highlights on your hair. Feel free to go back into Blender and adjust if necessary.

Before adding vertex paint.

After adding vertex paint.