Modding:Hair Mod File Setup
| This page is a modding page, and follows its own rules and standards separate from the rest of the wiki. |
Welcome to the file setup portion of making a hair mod. For an overview of all the steps, see Modding:Creating Hair Mods.
Tools You'll Need[edit section | visual editor]
- BG3 Modders Multitool (required)
- BG3 Mini Tool (optional but helpful)
- Padme's Hair Template (required unless you have a template from somewhere else)
- VSCode or Notepad++ (required)
- UUID Generator Extension in VSCode OR ToolBucket & XML Tools in Notepad++ (found via Plugins > Plugins Admin, then search for it and install.) (optional but helpful)
To generate a UUID in VSCode, just highlight a section of code, right click, and select Generate UUID here. It will replace the selected code with a new UUID.
For the UUID generation in Notepad++, once ToolBucket is installed, you want to press Alt + Shift + G. It will bring up a window as shown below. Keep Include hyphens ticked, and you can also click Don't ask again if you won't use any of the other options. Then click Generate.

If wanting to add more than one hair to your mod, you can use Padme's mini tool linked above for adding new slots to CharacterCreationAppearanceVisuals. You can also use it to edit your .loca file if you desire.
You can choose for your hairs to be autosnapping or non autosnapping.
What are autosnapping and non autosnapping hairs?[edit section | visual editor]
Sometimes you may still need three autosnapping meshes, one for the shorter races, one for the default bodytype and one for the strong bodytype. However we will go through when this is needed further into the tutorial.
Non autosnapping is when the game doesn't snap the hair into place at all. So, you have to create your hair mesh for each race/bodyshape/bodytype that you want it to be usable for. Obviously, this takes more work, but it can often give better/less crunchy results than autosnapping, and it is much easier to manually weight a non-autosnapping hair than an autosnapping hair. For instance, for personal use hairs, you might decide you only want it for one character. Then non autosnapping might be the way to go.Sometimes you may still need three autosnapping meshes, one for the shorter races, one for the default bodytype and one for the strong bodytype. However we will go through when this is needed further into the tutorial.
Non autosnapping is when the game doesn't snap the hair into place at all. So, you have to create your hair mesh for each race/bodyshape/bodytype that you want it to be usable for. Obviously, this takes more work, but it can often give better/less crunchy results than autosnapping, and it is much easier to manually weight a non-autosnapping hair than an autosnapping hair. For instance, for personal use hairs, you might decide you only want it for one character. Then non autosnapping might be the way to go.Following the Template[edit section | visual editor]
Following Padme's template (or using it as a guide to copy parts from the game files), follow along with this tutorial.
If you are only adding an existing hair from the game to CC without wanting to do any edits, you can remove the Generated folder from your copy of the template and instead just link to the game's existing hair in the _merged.
You may have downloaded the template, and now feel overwhelmed by all the files and folders, but it's really not too complicated. There are only four* files that we need to edit: loca.xml, meta.lsx, _merged.lsf.lsx and CharacterCreationAppearanceVisuals.lsx. You'll also need to place your .GR2 in the Generated folder, but more on that later.
- If using the CharacterCreationSharedVisuals method, technically five files including Races.lsx. More on that later!
Alternatively you can follow this video by Bububull for the file setup if you want to use the CharacterCreationAppearanceVisuals method.
Mods/meta.lsx[edit section | visual editor]
Remember to create your meta.lsx for your mod as well, as it is required for almost all pak mods. If using multitool to pack, you can create a Mods folder in your workspace folder and let multitool create the meta.lsx for you. Otherwise, follow this tutorial on how to create your meta.lsx: Creating your Meta.lsx
Localization/English/custom_name_here.loca.xml[edit section | visual editor]
After you've sorted your meta.lsx, let's start with the loca.xml. This is the file that tells your game what text to display for your hair--aka the name of the hair in Character Creation. If this file is broken or doesn't exist, your hair will show up as "Not Found".
Why is it named .loca.xml? This is because if you package the Main folder (also known as your workspace folder) with multitool, it will auto convert the .loca.xml to .loca. This way, you don't have to manually do the conversions yourself. However, if you prefer to do manual conversions, change the extension to .xml only.
You can find the _merged file at: Localization/English/custom_name_here.loca.xml.
Change custom_name_here to a custom name. It's best to add a personalized prefix beforehand so there is no chance of your mod name clashing with another mod. For example, Padme4000 uses her username, but shortened to P4. So for Padme's viking braid hair, her .loca.xml would be called p4_viking_braid.loca.xml
This way, if someone else happens to make a viking braid, the chances of them also naming their hair "p4_viking_braid" are extremely low, and there's no danger of one of the mods overriding the other.

In this screenshot of a .loca file, the first underscored (yellow) part labeled 1 is a handle. This is technically the same as a UUID except it has no - and instead has 3 extra random digits and adds a h at the beginning. The second underscored (pink) part labelled 2 is where we write what we want the game to show when the handle is active. For example when it comes to character creation mods, it is what shows up in character creation. This should be the name or description of your hair, e.g. "P4 Viking Braid".
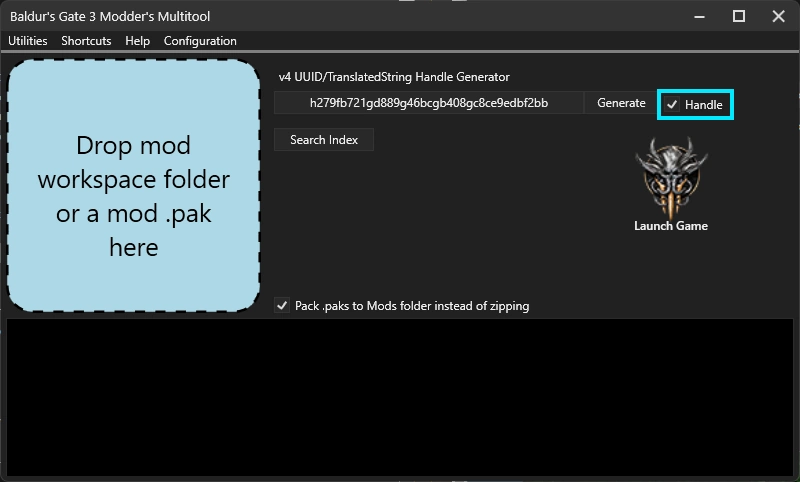
Using Multitool to Generate a Handle[edit section | visual editor]
The easiest way to obtain a handle is to use multitool to generate a handle for you.

Once you have multitool open, make sure to check the box next to Handle. Then you can click Generate for the tool to generate a new handle. Clicking on the box that has the handle inside will copy it to your clipboard so you can go to your file and paste it in.
(Optional) Using mini tool to create/edit the .loca[edit section | visual editor]
Hair _merged.lsf[edit section | visual editor]
Next, let's look at _merged.lsf.lsx. What is this? It's the file where we tell the game where to locate our mesh in our mod, as well as other information it might need.
Why is it called _merged.lsf.lsx? Similar to the .loca file, the multitool will automatically convert our _merged to .lsf file format, which it needs in order to be read by the game. Of course, you can name it _merged.lsx if you want to convert it manually.
You can find the _merged file at: Public\Autosnapping_Template\Content\Assets\Characters\[PAK]_Hair\_merged.lsf.lsx.
Here's an example _merged file:
       <region id="VisualBank">
       <node id="VisualBank">
           <children>
               <node id="Resource">
                   <attribute id="AttachBone" type="FixedString" value="" />
                   <attribute id="AttachmentSkeletonResource" type="FixedString" value="" />
                   <attribute id="BlueprintInstanceResourceID" type="FixedString" value="" />
                   <attribute id="BoundsMax" type="fvec3" value="0.1584038 1.846514 0.167948" />
                   <attribute id="BoundsMin" type="fvec3" value="-0.1540881 1.345605 -0.09591679" />
                   <attribute id="ClothColliderResourceID" type="FixedString" value="" />
                   <attribute id="HairPresetResourceId" type="FixedString" value="" />
                   <attribute id="HairType" type="uint8" value="0" />
                   <attribute id="ID" type="FixedString" value="955faf79-1707-4ea9-87f4-39a5fba49120" />
                   <attribute id="MaterialType" type="uint8" value="0" />
                   <attribute id="Name" type="LSString" value="AT_Hair01" />
                   <attribute id="NeedsSkeletonRemap" type="bool" value="True" />
                   <attribute id="RemapperSlotId" type="FixedString" value="" />
                   <attribute id="ScalpMaterialId" type="FixedString" value="55534266-4ce2-39d1-d2dd-04a8ec90e841" />
                   <attribute id="SkeletonResource" type="FixedString" value="78d8b5f0-726c-232f-a357-3d05c4b3b859" />
                   <attribute id="SkeletonSlot" type="FixedString" value="" />
                   <attribute id="Slot" type="FixedString" value="Hair" />
                   <attribute id="SoftbodyResourceID" type="FixedString" value="" />
                   <attribute id="SourceFile" type="LSString" value="Generated/Public/Autosnapping_Template/[PAK]_Autosnapping_Template/AT_Test.GR2" />
                   <attribute id="SupportsVertexColorMask" type="bool" value="False" />
                   <attribute id="Template" type="FixedString" value="Generated/Public/Autosnapping_Template/[PAK]_Autosnapping_Template/AT_Test.Dummy_Root.0" />
                   <attribute id="_OriginalFileVersion_" type="int64" value="144537400540921856" />
                   <children>
                       <node id="AnimationWaterfall">
                           <attribute id="Object" type="FixedString" value="" />
                       </node>
                       <node id="Base">
                           <children>
                               <node id="Tags">
                                   <attribute id="Object" type="FixedString" value="Hair" />
                               </node>
                           </children>
                       </node>
                       <node id="ClothProxyMapping" />
                       <node id="Objects">
                           <attribute id="LOD" type="uint8" value="0" />
                           <attribute id="MaterialID" type="FixedString" value="89b063ff-7bf3-44a8-7e7d-41b29d0dd469" />
                           <attribute id="ObjectID" type="FixedString" value="AT_Test.AT_Test_Mesh.0" />
                       </node>
Let's go through the lines we want to change. Alternatively, you can copy this whole section from the hair you used as a base/edit for your hair. Most hairs can be found in the file below, however if you can't find it there please use index search of multitool.
Vanilla hairs _merged when unpacked with Multitool. Multitool\UnpackedData\Shared\Public\Shared\Content\Assets\Characters\[PAK]_Hair
If you copied that whole section from the hair you used, you can probably skip a few steps here, but we will still go through them. If a line is skipped, this means you can keep that at the vanilla value and you don't need to change anything.
                   <attribute id="BoundsMax" type="fvec3" value="0.1584038 1.846514 0.167948" />
                   <attribute id="BoundsMin" type="fvec3" value="-0.1540881 1.345605 -0.09591679" />
These lines you want to match the hair you used as a base, especially if you haven't changed the base race it uses.
<attribute id="ID" type="FixedString" value="955faf79-1707-4ea9-87f4-39a5fba49120" />
You want this line to have a unique UUID. Either use the Multitool to generate a new uuid, or use an extension/plugin for your code editing program.
<attribute id="Name" type="LSString" value="AT_Hair01" />
You can give this any name you want in the value section. This is just an internal name. For sanity's sake, it might be best to name this after your loca.xml.
<attribute id="NeedsSkeletonRemap" type="bool" value="True" />
This line is what tells the game whether the hair is autosnapping or not.
- True = Autosnapping
- False = Non Autosnapping
<attribute id="ScalpMaterialId" type="FixedString" value="55534266-4ce2-39d1-d2dd-04a8ec90e841" />
This line determines the scalp material your hair uses. It's basically what your hair would look like if it was cut extremely short. It's often best to use the one your base hair used, but feel free to play around to find the right one. (as of 24.11.23 some hairs in the game files don't have a scalp ID, larian is aware of this bug) You can use this spreadsheet to find the scalp IDs of most vanilla hairs: https://docs.google.com/spreadsheets/d/16cQUxQ7FrGVmIPy5929qae4cCQls4ZWuBX_w08zvv5M/edit
<attribute id="SkeletonResource" type="FixedString" value="78d8b5f0-726c-232f-a357-3d05c4b3b859" />
SkeletonResource is normally blank in the game files. However, if a hair uses physics, it will have a SkeletonResource. You can borrow the physics from a vanilla hair using this. (However if making an autosnapping hair, assigning the skeleton id from the skeleton your hair uses in this line will allow you to skip the conform to original gr2 in lslib, which is normally needed if having more than two parts to your hair mesh.)
<attribute id="SourceFile" type="LSString" value="Generated/Public/Autosnapping_Template/[PAK]_Autosnapping_Template/AT_Test.GR2" />
This is the path to your hair .GR2 in your mod folders.
- Make sure to use / and not \. Windows will automatically insert \ when copying the file path, so be careful.
- Always start the path from your Generated folder.
- Double check that your mesh's extension in the folder is .GR2 and not .gr2. It will not work if the file extension is lowercase.
<attribute id="Template" type="FixedString" value="Generated/Public/Autosnapping_Template/[PAK]_Autosnapping_Template/AT_Test.Dummy_Root.0" />
This path is almost the same as above, so feel free to copy and paste your path from before to this line.
- Do not remove .Dummy_Root.0 from the line.
- This line does not need .GR2 at the end. You are linking to the Dummy_Root in the .GR2.
                       <node id="AnimationWaterfall">
                           <attribute id="Object" type="FixedString" value="" />
                       </node>
                       <node id="Base">
                           <children>
                               <node id="Tags">
                                   <attribute id="Object" type="FixedString" value="Hair" />
                               </node>
                           </children>
                       </node>
This section is another section where you want to be copying from one of the hairs you used to make the hair.
                       <node id="Objects">
                           <attribute id="LOD" type="uint8" value="0" />
                           <attribute id="MaterialID" type="FixedString" value="89b063ff-7bf3-44a8-7e7d-41b29d0dd469" />
                           <attribute id="ObjectID" type="FixedString" value="AT_Test.AT_Test_Mesh.0" />
                       </node>
This section defines the material for the parts that make up our mesh in the GR2. So if you have 3 mesh parts, you want 3 of these sections.
<attribute id="MaterialID" type="FixedString" value="89b063ff-7bf3-44a8-7e7d-41b29d0dd469" />
This defines the MaterialID, or the texture of your hair (straight, wavy, curly, etc). Usually you want the same material as the hair you used for that part. If the different parts are using the same materials, you can keep this the same for each new section you make. See https://bg3.wiki/wiki/Modding:Hair_Meshes for a list of all vanilla hair MaterialIDs.
When making a new section, make sure to also update "_Mesh.0" by increasing the number by 1.
For example:
                       <node id="Objects">
                           <attribute id="LOD" type="uint8" value="0" />
                           <attribute id="MaterialID" type="FixedString" value="89b063ff-7bf3-44a8-7e7d-41b29d0dd469" />
                           <attribute id="ObjectID" type="FixedString" value="AT_Test.AT_Test_Mesh.0" />
                       </node>
                       <node id="Objects">
                           <attribute id="LOD" type="uint8" value="0" />
                           <attribute id="MaterialID" type="FixedString" value="89b063ff-7bf3-44a8-7e7d-41b29d0dd469" />
                           <attribute id="ObjectID" type="FixedString" value="AT_Test.AT_Test_Mesh.1" />
                       </node>
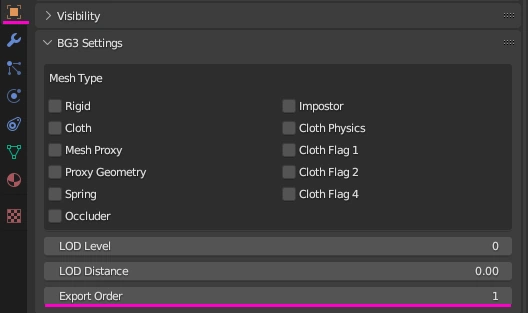
In Blender, when you assigned the export order here:

Where this says 1, that in our merged is that first block so .0
- .0 = Export Order 1
- .1 = Export Order 2
- .2 = Export Order 3
and so on.
If you want to set up a custom texture for your hair, see Creating hair merged.lsf with custom texture
Congrats, we have finished setting up this file!
Character Creation Folder[edit section | visual editor]
Full Release Hair Template/Public/Hair_Template/CharacterCreation is the file path for the template's CharacterCreation Shared/Appearance Visuals .lsx files.
For yours it would be your ModName/Public/YourShared/CharacterCreation.
For autosnapping hairs, we can use either CharacterCreationSharedVisuals.lsx or CharacterCreationAppearanceVisuals.lsx. For non autosnapping, use only CharacterCreationAppearanceVisuals.lsx.
You can use Padme's mini tool to help create the CharacterCreationAppearanceVisuals.lsx file, as well as its slots. Or, alternatively, use the file in this template to do it manually.
Why would we want to use CharacterCreationAppearanceVisuals (CCAV) vs CharacterCreationSharedVisuals (CCSV)? Well, CCSV is a lot easier to set up, file-wise. However, it is incompatible with other mods that edit the same files. Unless you plan on using Compatibility Framework, we recommend sticking with CCAV for both types of hair.
Important note: CharacterCreationAppearanceVisuals and CharacterCreationSharedVisuals should be .lsx format, not .lsf or .lsf.lsx format. If you use .lsf.lsx format, the multitool will convert to .lsf and then the game will not know how to read them.
CharacterCreationAppearanceVisuals[edit section | visual editor]
       <node id="CharacterCreationAppearanceVisual">
         <attribute id="BodyShape" type="uint8" value="0" />
         <attribute id="BodyType" type="uint8" value="1" />
         <attribute id="DisplayName" type="TranslatedString" handle="haf43c4eb5660459ba047936caa9977a9" version="1" />
         <attribute id="RaceUUID" type="guid" value="0eb594cb-8820-4be6-a58d-8be7a1a98fba" />
         <attribute id="SlotName" type="FixedString" value="Hair" />
         <attribute id="UUID" type="guid" value="d6663db9-f572-4f81-b9a2-fcac96149abe" />
         <attribute id="VisualResource" type="guid" value="d1f51daa-5fc0-446e-92d0-318c187d2ece" />
       </node>
Okay, let's break this down into sections:
<attribute id="BodyShape" type="uint8" value="0" />
This line defines which body shape the hair is for.
- 0 = Standard
- 1 = Tall Muscular
- For Half-Orcs, even though they use Tall Muscular bodyshape, this value needs to be 0
<attribute id="BodyType" type="uint8" value="1" />
This line defines whether it is for the masc or fem body assets.
- 0 = Masc
- 1 = Fem
<attribute id="RaceUUID" type="guid" value="0eb594cb-8820-4be6-a58d-8be7a1a98fba" />
The template is currently set up for the race uuid being Human. You will find the other Race UUID's at the bottom of this file on Padme's template or alternatively you can check them [UUID|here].
<attribute id="SlotName" type="FixedString" value="Hair" />
This tells the game you are adding the asset to a hair slot in character creation. This is where you would change the designation if you were making a beard for example.
<attribute id="UUID" type="guid" value="d6663db9-f572-4f81-b9a2-fcac96149abe" />
This must be a unique uuid.
<attribute id="VisualResource" type="guid" value="d1f51daa-5fc0-446e-92d0-318c187d2ece" />
This must match the ID line in the Hairs _merged file that we created.
(Optional) Using Minitool to create your CharacterCreationAppearanceVisuals[edit section | visual editor]
[edit section | visual editor]
Remember that you need your hair to be autosnapping to work properly in this section.
               <node id="CharacterCreationSharedVisual">
                   <attribute id="DisplayName" type="TranslatedString" handle="h163f3e2e9f634634a5e41553265771e4" version="1" />
                   <attribute id="SlotName" type="FixedString" value="Hair"/>
                   <attribute id="UUID" type="guid" value="3ae3e4fc-e792-473a-8853-43520dfc1147"/>
                   <attribute id="VisualResource" type="guid" value="fa926de0-feae-4218-806e-3d037b9d83d3"/>
               </node>
So what is the above? well it's the section we need for each hair asset we make. So let's break down each line.
<attribute id="DisplayName" type="TranslatedString" handle="h163f3e2e9f634634a5e41553265771e4" version="1" />
Remember in the localisation part of the tutorial? When we created a handle and entered a name for it? Well this is the line where we want to copy that handle to.
<attribute id="SlotName" type="FixedString" value="Hair"/>
If making a Beard you can change this value from Hair to Beard otherwise keep it the same.
<attribute id="UUID" type="guid" value="3ae3e4fc-e792-473a-8853-43520dfc1147"/>
You want this uuid to be unique. We will be copying it to our Races.lsx soon
<attribute id="VisualResource" type="guid" value="fa926de0-feae-4218-806e-3d037b9d83d3"/>
So the new UUID we made for our ID line in our merged? This is where you want to copy that uuid to as well.
Congrats this file is now ready. Copy and paste the section if you want to make more than one hair and follow the same principles.
Races.lsx[edit section | visual editor]
So this file is what we need to edit alongside CharacterCreationSharedVisuals in order for our hair to appear as a slot in character creation. When made via this your hair will appear at the bottom of the hairs in character creation.
However this file is sadly incompatible with other mods editing the same sections we need to edit.
This can be resolved either by opting into my Patches for Races.lsx mod or by using the Compatibility Framework instead of the Races.lsx file.
This files sections can get quite big, and while incompatible with other mods can still be in your mod for users only using your mod that might not be using Script Extender or Compatibility Framework. Or when Script extender needs updating after a new patch releases. So I will still go through how to setup this file:
I won't copy the whole section as that would make this part the longest part of the tutorial
               <node id="Race">
                   <attribute id="Description" type="TranslatedString" handle="he3427d53gdd4ag4901g8683g21844f537c8f" version="5"/>
                   <attribute id="DisplayName" type="TranslatedString" handle="h2e43ea54ga31bg467bg8364g327659ea1986" version="1"/>
                   <attribute id="Name" type="FixedString" value="Humanoid"/>
                   <attribute id="UUID" type="guid" value="899d275e-9893-490a-9cd5-be856794929f"/>
                   <children>
So usually the section will start with something like this. This being the commonly used section for Humanoid. Humanoid will add whatever you add to all races including modded races if they are using the humanoid id as their parent.
If copying from the vanilla races.lsx please remember to copy all the lines, do not remove any unless you mean to remove that particular line from the race. Add your entry to the bottom of those nodes.
In my template you can scroll till you reach:
                       Modded Entries Start
                       <node id="Visuals">
                           <attribute id="Object" type="guid" value="449e617f-8356-46e5-b740-9e4b18200441"/>
                       </node>
Modded Entries start being the comment I added.
                       <node id="Visuals">
                           <attribute id="Object" type="guid" value="449e617f-8356-46e5-b740-9e4b18200441"/>
                       </node>
These are the lines we want to add for each new entry. The uuid here is what we want to match to the unique UUID we gave in the CharacterCreationSharedVisuals UUID line:
<attribute id="UUID" type="guid" value="449e617f-8356-46e5-b740-9e4b18200441"/>
This one from the our sharedvisuals file. When you've finished adding the entries you want to add the races.lsx is ready to go.
If you wish to use Modding:Compatibility Framework see that guide on how to use it as an alternative to Races.lsx. However we suggest you use both in order to not rule out your Mac users from using your mods.
When to use three or more meshes for autosnapping hairs[edit section | visual editor]
Do you notice your autosnapping hair looks good on default bodies, but doesn't work quite right for the shorter or taller bodyshapes?
This is where you would make several autosnapping hairs. Each variation needs its own VisualBank entry in your merged.lsf file.
So if your hair has issues on different bodyshapes, you can do what Larian did and make several.
- One made around a dwarven head.
- this would be for Gnomes, Halflings and Dwarves
- One made around the default Elf height.
- this would be for Elves, Drow, Humans, Half Elves/Drow, Githyanki and Tieflings
- One for Taller bodyshapes.
- this would be for Strong Elves, Drow, Humans, Half Elves/Drow, Tieflings and Half Orcs
If you still get issues on Tiefling heads then you might want to use Tiefling masc heads as a base for your default and tall height. You can make as many autosnapping variants as you need, but usually three will be enough.
Once you have these set up and have made the visualbank entries, you can then make the additional edits to your CharacterCreationAppearanceVisuals or CharacterCreationSharedVisuals.
CharacterCreationAppearanceVisuals[edit section | visual editor]
If using CharacterCreationAppearanceVisuals, change the VisualResourceID to the new ones in the correct slots you made previously for testing the mod, as you should have all the vanilla race and bodyshapes available from your first creation of the file.
[edit section | visual editor]
If using CharacterCreationSharedVisuals, you want to make new entries with these options. And in races.lsx instead of using Humanoid/Fey/Fiend/Celestial you want to use the race sections of the races the hairs will work on.
- For the Dwarven height, add to Gnomes, Halflings and Dwarves
- For the default height, add to Elves, Drow, Humans, Half Elves/Drow, Githyanki and Tieflings
- For the taller height, add to Strong Elves, Drow, Humans, Half Elves/Drow, Tieflings and Half Orcs
Troubleshooting[edit section | visual editor]
Here are some common hair issues and how to troubleshoot them.
My hair doesn’t show up at all, there’s not even a slot in Character Creation!
Check your CharacterCreationAppearanceVisuals or CharacterCreationSharedVisuals, as that is where the CC slots are defined.
My hair shows up as a slot, but when I select it, the hair is invisible!
Check your hair _merged file, especially the file paths to your SourceFile and Template. Any inconsistency between this and the actual folders will result in the game not finding your mesh, and thus not loading it. Also note that folders must be separated by /, not \. E.g. Mod/Generated/Mod/Hair.GR2