Modding:Hair Mod Mesh Setup
| This page is a modding page, and follows its own rules and standards separate from the rest of the wiki. |
Welcome to the mesh creation portion of making a hair mod. For an overview of all the steps, see Modding:Creating Hair Mods.
So, you wanna make a mesh for a hair mod for Baldur’s Gate 3. How do you do that, though? This guide will show you how.Because we’ll be using Blender to make the mesh for our hair mod, we recommend at least having a cursory knowledge of how to use Blender before attempting to follow this guide. If you don’t have that, we recommend Blender Guru’s Donut tutorial series. But any tutorial that teaches you the basics of how to move around, shape the mesh, create objects, etc, should be fine.
Open up your Multitool and unpack the Models.pak game files, if you have hard drive space for it. Otherwise, you can just index it. This should contain all of the vanilla hair models we are going to use.
Open Blender 3.6 and install the Collada/GR2 exporter plugin. This will allow you to import and export .GR2s, which is the file type BG3 uses for its models.
We recommend creating a project folder to hold your various hair mod files.
Loading a Mesh[edit section | visual editor]
Let’s load a hair mesh into Blender! Go to the Modding:Hair Meshes page and pick a mesh that you like. Take note of the Asset Name—that’s what it’s called in the game files. Open the Multitool and search the index for this Asset Name. It should have a .GR2 extension, e.g. Hair_GTY_F_GithyankiCut_Short_A_Spring.GR2. Once you find it, copy it to your project folder to make it easier to find. Then go into Blender, go to File, and Import the .GR2.
Here is an example video of installing the plugin and importing a GR2.

You should now see your mesh in Blender! But it looks all white… we should fix that and make it look closer to what it’s going to look like in-game.
To visualize the texture in Blender, follow this tutorial.
Once finished, your hair should now display a texture in Blender.
If you’re not really sure what you’re looking at, BG3’s hair models are composed of pieces called “hair cards” that are essentially just long strips of mesh, or planes, with a hair texture applied. This is a (comparatively) low-poly way of making hair.
If you want to see how the hair looks on a head, you can import a head model into Blender too, using the exact same method you used for the hair. Just make sure the race of the Head Model you choose matches the hair you’re working with—so if you’re editing HAIR_HUM_F_Afro_Long_A, choose a human or humanlike head.
Editing the Mesh in Blender[edit section | visual editor]
Now comes the fun part—playing with the hair in Blender. Make it longer or shorter, remove some parts, add some parts. There’s a lot you can do even without making any custom hair parts from scratch, so get creative!
Mesh Editing FAQ[edit section | visual editor]
Here are some common issues you might run into while editing the hair in Blender:
Will there be issues if I import a second (or more) vanilla hair mesh to add parts of it to my hair? You can definitely do this, and it’s a great way to make a hairstyle look unique. However, make sure all of your meshes are parented to one armature. If your hair meshes use the same material (same hair texture), we recommend combining them for simplicity once you’re done.
My hair is stretching weirdly, or even appearing on the floor in game. You need to apply transforms on the hair mesh and armature using CTRL + A > All Transforms.
Is there an easier way to select an entire part of the hair (such as a ponytail) without manually selecting each vertex? It’s hard for me to do this when the hair gets close to the scalp. Yes! Use the Box or Circle select tool to select as much of the ponytail as you can. Then, to get those pesky roots without grabbing other parts of the hair, press CTRL + +, and continue pressing those keys to Select More of the parts you already have selected.
Can I add custom highlights to my hair if I don’t like the vanilla ones? Yes! This is done using Vertex Paint. See this tutorial for more details.
Can I adjust the UVs/the parts of the texture that my hair cards use? Yes! See this tutorial for more details.
Can I add physics to my hair? Yes, as long as you use one of the vanilla physics skeletons/armatures (so a skeleton from a vanilla hair with physics), as we can't make custom skeletons for hairs at this time. You'll need to weight your hair to the armature so the hair will move with the skeleton. You'll also need the SkeletonResource of the vanilla hair you're using. Then plug the SkeletonResource into this line in your _merged.lsf.lsx file.<attribute id="SkeletonResource" type="FixedString" value="SKELETONRESOURCEHERE" />
None of the vanilla hairs seem to have the part I want. Can I make my own custom hair for BG3? Yes! WIP tutorial here: Creating Custom Hair with Hair Tool
Autosnapping Weights[edit section | visual editor]
Padme has a great video here that explains how to use a vanilla mesh to transfer weights to your new hair. It's recommended to find the vanilla hair that looks most similar to your hair, and use that.
Non-Autosnapping Weights[edit section | visual editor]

If your hair is crunching really badly with autosnap, you might want to re-weight it to be non-autosnap. How do you do that? It's fairly simple: wipe out all of the existing vertex groups on your hair. Create a new vertex group and name it Head_M (mind the capitalization). Select all in edit mode and assign your hair mesh to that vertex group. If your hair is shorter than the character's shoulders, you're done! If it's longer and you want it to move somewhat with the upper body, create another vertex group called Chest_M, and use the gradient tool in Weight Paint mode to weight from the bottom up. Test in game and adjust as necessary. Those two vertex groups are probably all you need for non-autosnapping. Make sure when you're setting up the files later that you turn off autosnapping in there, too, otherwise your hair won't behave properly. Remember that turning off autosnap means you have to manually refit the hair for every body type that you want it to be available for... which is a pain.
Exporting the Mesh[edit section | visual editor]
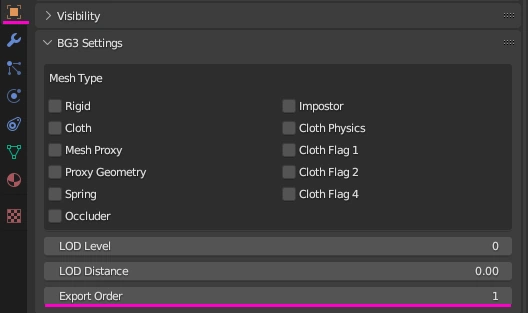
If using the GR2 plugin, you want to first make sure you have your export order set up, which you can find in the Object Properties tab:

Set the LOD Level and LOD Distance to 0. For the first part of your mesh set the export order to 1. Increase the export order number for every part you have. So part 1 is Export Order 1, part 2 is Export Order 2, etc... Blender will throw an error if you don't have these in order.
Once you have all that set up, if you haven't already sometime in your process, select the armature and all your meshes, and apply transforms with Ctrl + A > Apply Transforms.
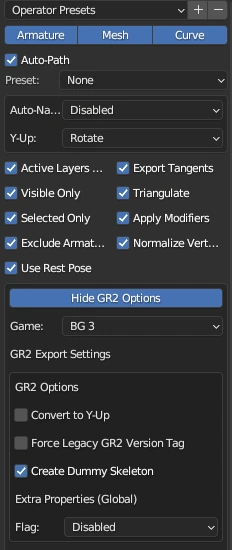
Now you can export the mesh(es). These are the export settings to use when exporting with the GR2 plugin:

The settings below this cutoff remain as they are by default. If you don't apply transforms, turn back on the Convert to Y-Up.
Conforming with LSLib[edit section | visual editor]
After exporting the mesh from Blender, there's one more step you need to follow: conforming to a vanilla skeleton with LSLib. Why? We're not totally sure, but we do know that hair gets very wacky in game if you don't do this.
Export your mesh from Blender as a .dae file, then load up LSLib. Make sure your settings are the same in all of the red highlighted areas (note some of them may not be selectable until you Import a file). The pink highlighted path should be the path to your .dae file, and the orange highlighted path should be the same, only with the file extension changed to .GR2 (uppercase!)

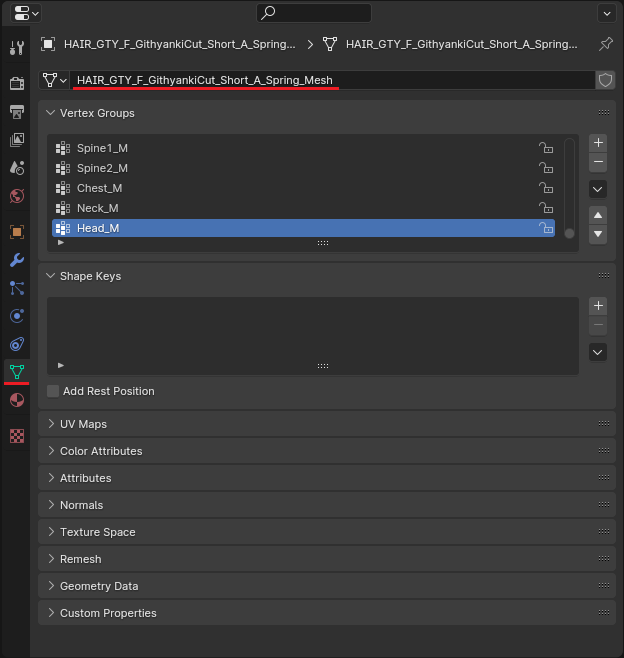
The green highlighted path should lead to a vanilla hair that you want to conform to. In general, pick a hair that's a similar overall shape to your hair. Whatever that hair is called, you need to rename your hair in the Object Data Properties in Blender to match the same name--otherwise, LSLib will throw an error when you try to conform.
For example: If the vanilla mesh you are conforming to is HAIR_GTY_F_GithyankiCut_Short_A_Spring, then the name you need to change your hair to is HAIR_GTY_F_GithyankiCut_Short_A_Spring_Mesh.

Change the name highlighted in red to the name of the vanilla mesh. Do this for all of your hair parts (it's okay if Blender automatically appends numbers to the end). Re-export, load into LSLib as .dae, and it should now let you conform to the same vanilla mesh, as it now has matching object property names.
Done with editing the mesh in Blender? Follow this tutorial to set up the files for inclusion into the game!