Modding:Modding class icons: Difference between revisions
m (Direct class icon support no longer supported in ImprovedUI) |
|||
| Line 27: | Line 27: | ||
==== Option 2: Direct ( | ==== Option 2: Direct (No longer supported) ==== | ||
This requires directly adding an entry into ImprovedUI Assets, and would then be included in an ImprovedUI Assets update. | This requires directly adding an entry into ImprovedUI Assets, and would then be included in an ImprovedUI Assets update. | ||
Latest revision as of 23:02, 21 June 2024
| This page is a modding page, and follows its own rules and standards separate from the rest of the wiki. |
| bg3.wiki modding |
|---|
| Modding homepage |
| Modding resources - Meshes, Models, Tools, etc. |
| Modding guides |
| Hair modding |
| Head modding |
| Item modding - Armours, Outfits, Weapons etc. |
| Race/class modding |
Existing Class Icons[edit | edit source]
For reference, you can find Class/Subclass Icons in game.pak, under the folder Public\Game\GUI\Assets\ClassIcons. There are two versions of the icon, the one here is shown in the top right of the Character Creation Screen, or the character sheet/spellbook screens ingame. The second smaller version is located in the "Hotbar" folder, and is shown when selecting the Class/Subclass in the Character Creation Screen, or in the left-hand side of the hotbar.
Creating New Class Icons[edit | edit source]
You can create/edit DDS files using the following tools:
Photoshop - https://www.adobe.com/products/photoshop.html
Texture Tools Exporter (free) - https://developer.nvidia.com/nvidia-texture-tools-exporter
GIMP (free alternative) - https://www.gimp.org
Paint.net (free alternative) - https://www.dotpdn.com/downloads/pdn.html
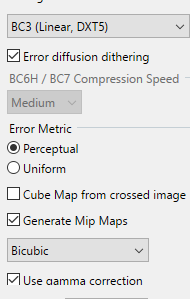
Settings to export DDS with (as shown using Paint.net):
Adding Class Icons to ImprovedUI[edit | edit source]
For successful appearance of class icons, first install ImprovedUI and ImprovedUI - Assets, both available on Nexus. Then place your DDS files into your mod folder, as directed below.
Option 1: Dynamic (Easy)[edit | edit source]
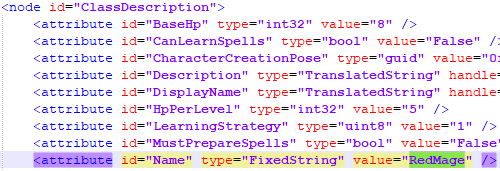
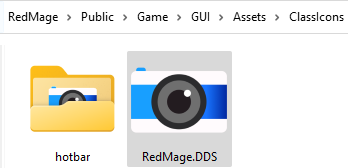
Store the .DDS icons in your mod using the same folder structure as Larian (Public\Game\GUI\Assets\ClassIcons). Name the icon with the same name as you have called the class in your classdescriptions.lsx file. Using an all-capitals file extension (DDS, not dds) is mandatory for functionality. To prevent conflicts, I recommend using unique names here, such as mod author prefix, and Classname_Subclassname:
Option 2: Direct (No longer supported)[edit | edit source]
This requires directly adding an entry into ImprovedUI Assets, and would then be included in an ImprovedUI Assets update.
To properly support these, your icons would need to be stored in a slightly different folder, to make it obvious which mod each entry comes from. The icon would need to be stored in (Public\Game\GUI\Assets\MODNAME\ClassIcons)
You can unpack a supported mod for reference - List of supported mods
In GitHub, you would need to create a fork of ImprovedUI - https://github.com/TheRealDjmr/BG3ImprovedUI
Steps how to fork an existing repo (requires a GitHub account) - https://docs.github.com/en/get-started/quickstart/fork-a-repo
The only file that needs to be amended in your fork is IUI_ClassIcons
This file has been heavily commented to assist with this process. For each "EDIT HERE" section, an entry can be added for your classes/subclasses.
Your entry would need to follow this format:<!--<DataTrigger Binding="{Binding IDString}" Value="CLASSNAME">
<Setter Property="Source" Value="pack://application:,,,/GustavNoesisGUI;component/Assets/MODNAME/ClassIcons/NAMEOFDDSFILEFORTHECLASSICON.png"/>
</DataTrigger>-->


