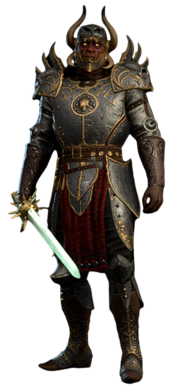
Sarevok Anchev/combat
| Sarevok Anchev | |||||||||||||
|---|---|---|---|---|---|---|---|---|---|---|---|---|---|
| Medium Humanoid | |||||||||||||
| Level 16 Human | |||||||||||||
| Stats | |||||||||||||
| Armour Class | 20 | ||||||||||||
| Hit points |
| ||||||||||||
| Movement speed | 9 m (30 ft) | ||||||||||||
| Weight | kg (160 lb) | ||||||||||||
| Initiative | +5 | ||||||||||||
| Ability scores | |||||||||||||
| |||||||||||||
| Proficiency bonus | +4 | ||||||||||||
| Saving throws |
| ||||||||||||
| Conditions | |||||||||||||
Tactician | +10 to your next saving throw against being Incapacitated. | ||||||||||||
| Features | |||||||||||||
| Take 2 less damage from physical sources. | |||||||||||||
| Make an additional free attack after an unarmed or melee attack. | |||||||||||||
| On a hit, inflict Bleeding on targets that have full Hit Points. | |||||||||||||
| On a failed saving throw, roll again and use the new result instead. | |||||||||||||
Honour | React to being hit with a weapon attack or Deathbringer's Assult. | ||||||||||||
| Make a melee attack against an enemy moving out of range. | |||||||||||||
| Cannot be surprised. | |||||||||||||
| Cannot be disarmed. | |||||||||||||
| Overview | Combat |
This page focuses on Sarevok Anchev's behavior during combat encounters.
This page is a list of information, rather than a guide. Please refer to separate pages for full combat guides.
Attacks and Abilities
Honour Mode
Common
- Jump
- Opportunity Attack
Main Hand Attack
- Sarevok seems to have access to at least two melee attacks per action. If he is affected by "Haste", this can mean Sarevok is capable of firing off four[Needs Verification] melee attacks in a single turn -- enough to allow his special ability on the next turn.
Conditions
![]() Legendary Resistance: IncapacitationTTactician
Legendary Resistance: IncapacitationTTactician
- This is a stacking condition. Sarevok gains 1 stack when he successfully deals damage to another character in Melee range.
- Description reads: "After performing four attacks, Sarevok will have embodied Bhaal enough to use Deathbringer Assault."
- This condition and all stacks are cleared when Sarevok gains the condition "Deathbringer's Legacy."
- Sarevok gains this condition for 1 turn, after reaching 4 stacks of Murderous Strikes.
- Description reads: "Sarevok is able to use Deathbringer Assault until the end of his next turn."
From allies
The following conditions are commonly applied onto Sarevok, from allied characters such as Summons.
 Sanctuary (from Echo of Amelyssan)
 Warding Bond (from Echo of Amelyssan)
Immunities
Immunities include conditions that, cannot be afflicted onto this character. Conditions that are not explicit "Immune to" messages can still go in this section, but please provide more detail about what combat actions are prevented.
Sarevok cannot be affected by any or all of the following Conditions:
Vulnerabilities
Vulnerabilities include specific conditions that can be afflicted onto Sarevok, even if the chance of successfully afflicting this condition is very low.
Sarevok can be affected by all of the following conditions:
Allies
- Echo of Amelyssan
- While alive, this echo may cast and on Sarevok.
- Upon death of this echo, Sarevok gains
 Absorbed Essence: Amelyssan and each of Sarevok's attacks will heal him for 2-24 hit points.
- Echo of Illasera
- While alive, this echo may cast on Sarevok.
- Upon death of this echo, Sarevok gains
 Absorbed Essence: Illasera and is permanently
  Hastened and cannot be affected by paralysis, restraints, or other attempts to reduce his movement speed.
- Echo of Sendai
- While alive, this echo may cast , , and sometimes on the party.
- Upon death of this echo, Sarevok gains
 Absorbed Essence: Sendai and his armour class is increased by 6.
- Echo of Abazigal (Only if Sarevok is attacked after the player has become the Unholy Assassin)
- Upon death of this echo, Sarevok gains
 Absorbed Essence: Abazigal which causes Sarevok to deal maximum damage with all his attacks.
- Upon death of this echo, Sarevok gains
- That Which Guards, That Which Lurks, and That Which Watches (Only if the door is open and combat gets too close to them)
- These 3 Death Knights will automatically die once Sarevok does.
- 12x Tribunal Ghost (Only if combat is initiated in the sacrifice chamber)
Encounters
Sarevok can be fought at the Murder Tribunal in the Lower City Sewers. He is joined by echoes of Sendai, Illasera, and Amelyssan, as well as other conditional allies.
If the player convinces Dolor to take up arms against the Murder Tribunal, Sarevok will cast Power Word Kill on Dolor, instantly killing him.[url 1]
This fight revolves around the powerful buffs that the various Echoes can provide Sarevok. Each of them will give him incredibly powerful permanent buffs once they die but allowing them to live will result in them casting other spells such as , , and which make the fight more difficult. Indeed, will often result in the death of Echo of Amelyssan no matter whom the party tries to kill first. It is generally advisable to avoid killing Echo of Sendai and Echo of Illasera for as long as possible, since their on-death effects make Sarevok much harder to kill and allow him to attack more often.
Sarevok is at his most dangerous during long and protracted fights in which the Echoes die off, but is much easier to manage if the party has enough burst damage and high initiative to kill him quickly. Once he dies, the Echoes and other conditional enemies can be killed quickly without fear of their on-death buffs.
This fight can also be "cheesed". Once the party has either presented the hand of a victim they killed or passed the ![]() DC 20 Deception check to convince Sarevok that they are worthy of becoming an Unholy Assassin, he will stand up to walk into the sacrificial chamber next door and the Echoes will teleport into the room ahead of him. Attacking him at this moment leaves him extremely vulnerable because the Echoes will be too far to come to his aid.
DC 20 Deception check to convince Sarevok that they are worthy of becoming an Unholy Assassin, he will stand up to walk into the sacrificial chamber next door and the Echoes will teleport into the room ahead of him. Attacking him at this moment leaves him extremely vulnerable because the Echoes will be too far to come to his aid.


