Ad placeholder
House of Hope: Difference between revisions
(Changed "Using the door will summon Hope" to "Approaching the door...") |
|||
| (156 intermediate revisions by 59 users not shown) | |||
| Line 1: | Line 1: | ||
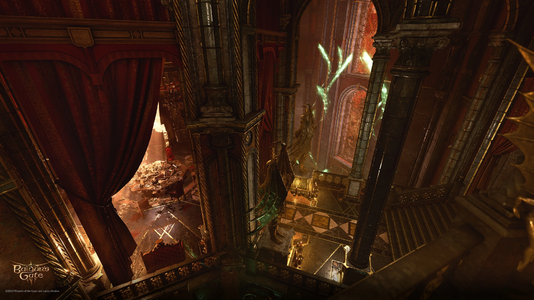
{{Location page | |||
== | | prefix = The | ||
To access the House of Hope, | | name = House of Hope | ||
* | | alt name = | ||
* | | image = edward-vanderghote-houseofhope-01.webp | ||
* | | image description = Central chamber | ||
| act = three | |||
| summary = It can be accessed through a portal after performing the required ritual in the [[Devil's Fee]], [[Baldur's Gate]] during [[Act Three]]. This is {{CharLink|Raphael|Raphael's}} home, and prison to many [[Eternal Debtor]]s who made the mistake of contracting him. | |||
| region = Avernus | |||
}} | |||
{{TOC|limit=3}} | |||
== Entering == | |||
=== Haggle with Helsik === | |||
To access the House of Hope, the party must travel to the [[Devil's Fee]] in the northern-central part of the {{Coords|-37|-10|Lower City}}. From the Lower City Centre Wall waypoint, head north up the path and go inside the gate towards the large house. Inside you will talk to the proprietor, {{CharLink|Helsik}}, who will provide the components to open a portal if the party meets one of the following conditions: | |||
* Paying 20,000 gold to Helsik | |||
* Succeeding a DC 25 Intimidation check and paying 10,000 gold, | |||
* [[Warlock]]s can succeed a DC 25 Persuasion check with advantage to lower the price to 10,000. | |||
* Passing a DC 20 [[Persuasion]] check to gain access in exchange for the {{SmRarityItem|Gauntlets of Hill Giant Strength}} from the House of Hope. {{ref|Since Patch #7, Helsik no longer sells the {{SmRarityItem|Gauntlets of Hill Giant Strength}} if they are given to her for the quest {{Quest|Acquire the Gauntlets for Helsik}}, but they still can be pickpocketed.}} | |||
Helsik will then provide the party with the {{SmRarityItem|Grimoire Bound in Imp Skin}}{{ref|The hints of the {{SmRarityItem|Grimoire Bound in Imp Skin}} can be deciphered as follows: | |||
* "Place that which has no eyes but used to see at the western point of the circle" -> Place the skull on the westernmost point of the circle, the one facing the altar Helsik's diary is on. | |||
* "Two spaces lie opposite that point. 'Pon the left - place what is cut but cannot bleed" -> At the opposite direction from which you placed the skull there are two points; on the left one as you face them (i.e. the northern of the two points to the east), place the diamond. | |||
* "To the right - that which smells but cannot sniff." -> Place the Incense on the right of where you placed the diamond (i.e. the southern of the two points to the east). | |||
* "Besides the dead remains - the aspect of the Avariced lord sits clockwise so." -> Place the Coin of Mammon next to the skull clockwise (i.e. on the point to the north-west). | |||
* "Then the circle's centre shall receive the internal marvel of infernal marble." -> Place the infernal marble in the centre. | |||
* "Finally - and I mean no disrespect - ''go to hell''" -> Self-explanatory: "Enter the House of Hope".}}, a {{SmRarityItem|Ritual Pouch}} containing required items, and instructions on how to perform the ritual itself. The grimoire provides hints to complete the ritual. | |||
The Ritual Pouch and the Grimoire Bound in Imp Skin can also be pick-pocketed from Helsik. If the items were stolen, Helsik will comment on the party's thievery after completing the House of Hope, but won't be hostile and still happily trade. However, if the items are stolen by one party member while another party member is attempting to purchase them Helsik will kick the party out of the shop and cast {{SAI|Arcane Lock}} on the main entrance; re-entering the shop will cause her to become immediately hostile. | |||
The party has to head upstairs and put the items from the bag on the right places of the rituial circle. The note, {{SmRarityItem|Opening a Hell Gate}}, explains the steps involved. | |||
Duplicates of five of the ritual ingredients, but not the grimoire or the instructions, are found upstairs in Helsik's room: the skull on the wooden casket in the middle of the room next to a row of books on the left side of the double door, incense on the small table next to the southern balcony door; infernal marble in the opulent chest beside the door to the bedroom; a diamond in the gilded chest near the desk by the window; and a Coin of Mammon in the gilded chest on the bedside cabinet. | |||
At the top of the stairs is a Ward trap that casts a {{SAI|Fireball}} spell when stepped on. On its right is a Ward shaped as an Imp that recites; "Gravelled tongue, sanded throat. Hard to swallow... hurts to ''breathe''...". Placing any water or wine{{ref|There is a bottle of {{SmRarityItem|Stagswift Tonic}} and {{SmRarityItem|Frostkiss Ale}} below a Stuffed Deep Rothé head on the stairway.}} will disarm the trap, replying "Too wet. Too cold. No fun. Begone!". If the Grimoire, the Ritual Pouch containing required items, and the instructions are bought from Helsik, the trap will be disarmed. | |||
=== Opening the portal === | |||
[[File:Bg3-helsik-ritual-map.jpg|thumb|Skull away from door]] | |||
Putting the items on the correct places and using the portal will transport the party to the House of Hope. The order of placing these items doesn't matter as long as they are put on their correct places: | |||
* Placing the skull on the star point near the altar | |||
* Placing the coin of Mammon on the next point to the right (if your character is facing the altar) | |||
* Skipping a point and place the diamond on the next point after that | |||
* Placing the incense on the point following the diamond | |||
* Placing the Infernal Marble in the centre of the star | |||
Entering the House of Hope causes Raphael to disappear from [[Sharess' Caress]], thus becoming inaccessible until the confrontation. | |||
== Exiting == | |||
The House of Hope is exited through the same portal the party used to enter. This portal remains open for the rest of the game and allows free passage between the House and Baldur's Gate except when the alarm is raised. Once the alarm has been triggered, attempting to use the portal will instead cause [[Raphael/Combat|Raphael to appear and engage in combat]] with the party. During the confrontation with Raphael the portal is closed. | |||
=== Raising the Alarm === | |||
The alarm is only raised when one of the following conditions is met: | |||
* The party has been spotted by someone while not disguising themselves with {{SmRarityItem|Debtor's Attire}}. | |||
* The party has attacked any of the debtors. | |||
* The party has stolen the {{SmRarityItem|Orphic Hammer}}. | |||
* The party has destroyed the {{SmRarityItem|Soul-Sworn Contract|override_icon=Soul-Sworn Contract.png|override_rarity=1}}. | |||
* The party has stolen the {{SmRarityItem|Amulet of Greater Health}} and triggered the pressure plate. | |||
* The party has stolen the {{SmRarityItem|Gauntlets of Hill Giant Strength}} and triggered the pressure plate. | |||
* The party has freed {{CharLink|Hope}}. | |||
WARNING: If raising the alarm and attempting to exit while Raphael is still in the possession of the player character's Soul-Sworn Contract, then there will be an instant, automatic Game Over! | |||
== Overview == | |||
=== Foyer === | |||
[[File:House of Hope Foyer.jpg|thumb|The foyer, with the portal present.]] | |||
The portal exits into the House's foyer, which has a large door and four [[Pillar of Souls]]. Approaching the door will summon {{CharLink|Hope}}, who will introduce herself and give the party four sets of {{SmRarityItem|Debtor's Attire}}, which will disguise them from the [[Eternal Debtor]]s while in the house. | |||
=== Feast Hall === | |||
[[File:House of Hope Feast Hall.jpg|thumb|View of the Feast Hall and all its mess.]] | |||
The next room north of the foyer is the feast hall, where Raphael transported the party during his first introduction. Gone are the lavish displays of food and ordered furniture, the party now can see the reality of Raphael's illusory temptations as they truly are; rotting food, disorder and wandering, trapped souls. | |||
Cleaning the hall is a lone {{CharLink|Infernal Mason}}, who introduces himself as the architect who built [[Moonrise Towers]]. | |||
=== Main Corridor === | |||
The semicircular Main Corridor can be accessed from the east and west exits from the Feast Hall. It connects all rooms of the House and is populated by several Eternal Debtors. In the Main Corridor various container can be found which contain a Debtor's Attire. The Prison Hatchway, which leads to Hope's prison, is located on the east end of the corridor. | |||
=== Chamber of Egress === | |||
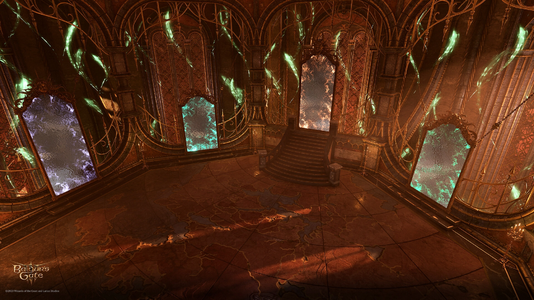
[[File:House of Hope Chamber of Egress.jpg|thumb|The Chamber of Egress with all the portals.]] | |||
East of the feast hall is a large room filled with portals leading different locations. The portals are closed, but can be interacted with to hear a brief line about each destination. The player character and origins each have different comments on it. | |||
Scrubbing the floor of the room is its keeper, {{CharLink|Nubaldin}}, who can be persuaded into revealing Hope's physical location and give additional information regarding {{CharLink|Enver Gortash}}. | |||
=== Eastern Balcony === | |||
North of the Chamber of Egress is a balcony where one can go outside the House. Outside, just north of the balcony is a Passageway to Hope's prison. Also on the outside, by jumping on rock platforms one can reach the Boudoir. | |||
=== Boudoir === | |||
[[File:House of Hope Boudoir.jpg|thumb|The boudoir, looking from the pool.]] | |||
In the centre of the Main Corridor is the entrance to the boudoir; the northernmost room in the House. Access to the boudoir requires either the {{SmRarityItem|Boudoir Invitation}} from The Archivist in the archive, or traversal across the platforms from the Eastern Balcony. | |||
In the first section of the room are some locked opulent chests, one contains a {{SmRarityItem|Potion of Angelic Slumber}}. A pool sits in the centre of the room, with some restoration faucets that will restore the party's resources as if they took a long rest (does not work during fighting or after having beaten Raphael). The faucets do not restore the party's ability to take additional short rests, but they do restore a bard's related {{SAI|Song of Rest}} ability. After defeating Raphael the restoration faucets will no longer function. | |||
Further back, the party will find {{CharLink|Haarlep}} lazing about. When approached, a conversation will automatically start; the party can convince Haarlep into giving up the password for the shield protecting the {{SmRarityItem|Orphic Hammer}} / {{SmRarityItem|Soul-Sworn Contract|override_icon=Soul-Sworn Contract.png|override_rarity=1}}, or fight him. A large portrait west of the bed can also be moved to reveal Raphael's Safe, and opened with a key from Haarlep or lockpicked, to find {{SmRarityItem|Raphael's Notes}} which contains the password. | |||
=== Raphael's Vault === | |||
The entrance to Raphael's Vault is directly south of the entrance to the Boudoir. To enter, the party must first succeed in a [[DC]] 10 [[Perception]] [[Ability Check|check]] to spot the infernal gem, then interact with the infernal gem by passing a DC 10 [[Wisdom]] check, followed by a DC 20 [[Arcana]] check. Inside is the {{SmRarityItem|Helldusk Helmet}}, {{SmRarityItem|Staff of Spellpower}}, and {{SmRarityItem|Contract: Mol|Mol's contract}} if she survived [[Act One]]. | |||
=== Western Balcony === | |||
The Western Balcony is located north of the Archive. Here, the [[Eternal Rat]] can be found. | |||
=== Archive === | |||
[[File:House of Hope Archive.jpg|thumb|View of the Archive, looking straight at the Orphic Hammer]] | |||
The westernmost room of the Main Corridor is the Archive. Opposite the entrance is a lever which opens a shortcut back to the feast hall. | |||
Inside the Archive are several books with information related to the House and to the {{IconLink|size=20|Crown of Karsus Faded.png|Crown of Karsus}}. More notably, there are three pedestals with rare equipment, and the {{CharLink|Archivist}} who is keeping an eye on them. | |||
The pedestals each have a pressure plate (which can be disarmed) that alerts the House if the item is removed. The northern pedestal holds the {{SmRarityItem|Gauntlets of Hill Giant Strength}}, the southern the {{SmRarityItem|Amulet of Greater Health}}, and to the west is, depending on the party's choices when dealing with Raphael in [[Sharess' Caress]], either the {{SmRarityItem|Orphic Hammer}} or {{SmRarityItem|Soul-Sworn Contract|override_icon=Soul-Sworn Contract.png|override_rarity=1}}, which can only be accessed by removing the shield with a password. | |||
If the party takes the Orphic Hammer, or an item is stolen from a dais without disarming its trap, the Debtors throughout the House will become hostile, and two [[Hell Sphere]]s will separately appear at various points in the main corridor when the party reaches them. See also: [[#Exiting|Exiting]]. | |||
=== Hope's prison === | |||
[[File:House of Hope Hope's Prison.jpg|thumb|A view of Hope in her prison, chained up to two red rocks.]] | |||
At the eastern end of the Main Corridor near the Chamber of Egress is the Prison Hatchway, which leads down beneath the House and into Hope's prison. The prison can also be reached through the Passageway which is found outside, just north of the Eastern Balcony. Hope herself is at the centre of the room, bound by two unbreakable chains held by rocks which can be broken with the Orphic Hammer. | |||
There are also two [[Spectator]]s, one of which drops the {{SmRarityItem|Burnished Ring}}, and five [[Vengeful Imp]]s. | |||
=== Characters === | |||
{{div col}} | |||
* {{MdCharLink|Archivist}} | |||
* {{MdCharLink|Haarlep}} | |||
* {{MdCharLink|Hope}} | |||
* {{MdCharLink|Infernal Mason}} | |||
* {{MdCharLink|Korrilla}} | |||
* {{MdCharLink|Nubaldin}} | |||
* {{MdCharLink|Raphael}} | |||
* {{MdCharLink|Yurgir}} | |||
{{div col end}} | |||
=== Creatures === | |||
{{div col}} | |||
* {{MdCharLink|Cambion}} | |||
* {{MdCharLink|Eternal Debtor|icon=Portrait Raphael.png}} | |||
* {{MdCharLink|Spectator}} | |||
* {{MdCharLink|Vengeful Cambion}} | |||
* {{MdCharLink|Vengeful Imp}} | |||
* {{MdCharLink|Vengeful Merregon}} | |||
{{div col end}} | |||
* | === Related locations === | ||
* | * {{Loc|Devil's Fee}} | ||
* | === Related quests === | ||
* | {{div col}} | ||
* | * {{Quest|Acquire the Gauntlets for Helsik}} | ||
* {{Quest|Deal with the Devil}} | |||
* {{Quest|Find Mol}} | |||
* {{Quest|Free Orpheus}} | |||
* {{Quest|Help Kith'rak Voss}} | |||
* {{Quest|Save Hope}} | |||
* {{Quest|The Githyanki Warrior}} | |||
{{div col end}} | |||
== Notable loot == | |||
== | Notable items obtained in this location, whether looted, or obtained as a quest reward: | ||
=== Boudoir === | |||
* {{MdRarityItem|Helldusk Gloves}}, acquired by defeating [[Haarlep]] | |||
* {{MdRarityItem|Potion of Angelic Slumber}}, x3: one inside a locked Opulent Chest ([[DC]] 15) in the boudoir, two more inside a locked Gilded Chest (DC 15) in the hallway between boudoir and archive. | |||
=== Archive === | |||
When stealing from daises in Archive, the House will become hostile unless their pressure plate is disarmed first. This requires DC 15 Perception check to unveil followed by a DC 20 Sleight of Hand check to disarm. | |||
* {{MdRarityItem|Amulet of Greater Health}}, stolen from a dais | |||
* {{MdRarityItem|Gauntlets of Hill Giant Strength}}, stolen from a dais | |||
* {{MdRarityItem|Orphic Hammer}}, stolen from a dais, must have the necessary words in order to turn off the shield (if no contract with Raphael was made in Sharess' Caress) | |||
* {{SmRarityItem|Soul-Sworn Contract|override_icon=Soul-Sworn Contract.png|override_rarity=1}}, found on a dais, must have the necessary words in order to turn off the shield. Can not be obtained, only destroyed. (if a contract with Raphael was made in Sharess' Caress) | |||
=== Raphael's vault === | |||
* {{MdRarityItem|Contract: Mol}} (if Mol survived Act One) | |||
* {{MdRarityItem|Helldusk Helmet}} | |||
* {{MdRarityItem|Staff of Spellpower}} | |||
=== Hope's prison === | |||
* {{MdRarityItem|Burnished Ring}}, acquired after defeating Spectator | |||
=== Foyer === | |||
* {{MdRarityItem|Gloves of Soul Catching}}, reward from Hope after saving her | |||
* {{MdRarityItem|Helldusk Armour}}, acquired after defeating the final encounter of the area | |||
== Gallery == | |||
<gallery heights="200"> | |||
edward-vanderghote-houseofhope-04.webp|Top view | |||
edward-vanderghote-houseofhope-05.webp|The portals | |||
edward-vanderghote-houseofhope-02.webp|The hatch to Hope's prison | |||
</gallery> | |||
== Notes and references == | |||
{{notebegin}} | |||
== | {{notelist}} | ||
{{reflist}} | |||
{{noteend}} | |||
{{House of Hope}} | |||
[[Category:Locations]] | [[Category:Locations]] | ||
[[Category: | [[Category:Act Three Locations]] | ||
Latest revision as of 13:12, 12 November 2024

Entering[edit | edit source]
Haggle with Helsik[edit | edit source]
To access the House of Hope, the party must travel to the Devil's Fee in the northern-central part of the Lower City X: -37 Y: -10. From the Lower City Centre Wall waypoint, head north up the path and go inside the gate towards the large house. Inside you will talk to the proprietor, Helsik, who will provide the components to open a portal if the party meets one of the following conditions:
- Paying 20,000 gold to Helsik
- Succeeding a DC 25 Intimidation check and paying 10,000 gold,
- Warlocks can succeed a DC 25 Persuasion check with advantage to lower the price to 10,000.
- Passing a DC 20 Persuasion check to gain access in exchange for the
 Gauntlets of Hill Giant Strength from the House of Hope. [1]
Helsik will then provide the party with the ![]() Grimoire Bound in Imp Skin[2], a
Grimoire Bound in Imp Skin[2], a ![]() Ritual Pouch containing required items, and instructions on how to perform the ritual itself. The grimoire provides hints to complete the ritual.
Ritual Pouch containing required items, and instructions on how to perform the ritual itself. The grimoire provides hints to complete the ritual.
The Ritual Pouch and the Grimoire Bound in Imp Skin can also be pick-pocketed from Helsik. If the items were stolen, Helsik will comment on the party's thievery after completing the House of Hope, but won't be hostile and still happily trade. However, if the items are stolen by one party member while another party member is attempting to purchase them Helsik will kick the party out of the shop and cast ![]() on the main entrance; re-entering the shop will cause her to become immediately hostile.
on the main entrance; re-entering the shop will cause her to become immediately hostile.
The party has to head upstairs and put the items from the bag on the right places of the rituial circle. The note, ![]() Opening a Hell Gate, explains the steps involved.
Opening a Hell Gate, explains the steps involved.
Duplicates of five of the ritual ingredients, but not the grimoire or the instructions, are found upstairs in Helsik's room: the skull on the wooden casket in the middle of the room next to a row of books on the left side of the double door, incense on the small table next to the southern balcony door; infernal marble in the opulent chest beside the door to the bedroom; a diamond in the gilded chest near the desk by the window; and a Coin of Mammon in the gilded chest on the bedside cabinet.
At the top of the stairs is a Ward trap that casts a ![]() spell when stepped on. On its right is a Ward shaped as an Imp that recites; "Gravelled tongue, sanded throat. Hard to swallow... hurts to breathe...". Placing any water or wine[3] will disarm the trap, replying "Too wet. Too cold. No fun. Begone!". If the Grimoire, the Ritual Pouch containing required items, and the instructions are bought from Helsik, the trap will be disarmed.
spell when stepped on. On its right is a Ward shaped as an Imp that recites; "Gravelled tongue, sanded throat. Hard to swallow... hurts to breathe...". Placing any water or wine[3] will disarm the trap, replying "Too wet. Too cold. No fun. Begone!". If the Grimoire, the Ritual Pouch containing required items, and the instructions are bought from Helsik, the trap will be disarmed.
Opening the portal[edit | edit source]

Putting the items on the correct places and using the portal will transport the party to the House of Hope. The order of placing these items doesn't matter as long as they are put on their correct places:
- Placing the skull on the star point near the altar
- Placing the coin of Mammon on the next point to the right (if your character is facing the altar)
- Skipping a point and place the diamond on the next point after that
- Placing the incense on the point following the diamond
- Placing the Infernal Marble in the centre of the star
Entering the House of Hope causes Raphael to disappear from Sharess' Caress, thus becoming inaccessible until the confrontation.
Exiting[edit | edit source]
The House of Hope is exited through the same portal the party used to enter. This portal remains open for the rest of the game and allows free passage between the House and Baldur's Gate except when the alarm is raised. Once the alarm has been triggered, attempting to use the portal will instead cause Raphael to appear and engage in combat with the party. During the confrontation with Raphael the portal is closed.
Raising the Alarm[edit | edit source]
The alarm is only raised when one of the following conditions is met:
- The party has been spotted by someone while not disguising themselves with
 Debtor's Attire.
 - The party has attacked any of the debtors.
- The party has stolen the
 Orphic Hammer.
 - The party has destroyed the
 Soul-Sworn Contract.
 - The party has stolen the
 Amulet of Greater Health and triggered the pressure plate.
 - The party has stolen the Gauntlets of Hill Giant Strength and triggered the pressure plate.
- The party has freed Hope.
WARNING: If raising the alarm and attempting to exit while Raphael is still in the possession of the player character's Soul-Sworn Contract, then there will be an instant, automatic Game Over!
Overview[edit | edit source]
Foyer[edit | edit source]

The portal exits into the House's foyer, which has a large door and four Pillar of Souls. Approaching the door will summon Hope, who will introduce herself and give the party four sets of ![]() Debtor's Attire, which will disguise them from the Eternal Debtors while in the house.
Debtor's Attire, which will disguise them from the Eternal Debtors while in the house.
Feast Hall[edit | edit source]

The next room north of the foyer is the feast hall, where Raphael transported the party during his first introduction. Gone are the lavish displays of food and ordered furniture, the party now can see the reality of Raphael's illusory temptations as they truly are; rotting food, disorder and wandering, trapped souls.
Cleaning the hall is a lone Infernal Mason, who introduces himself as the architect who built Moonrise Towers.
Main Corridor[edit | edit source]
The semicircular Main Corridor can be accessed from the east and west exits from the Feast Hall. It connects all rooms of the House and is populated by several Eternal Debtors. In the Main Corridor various container can be found which contain a Debtor's Attire. The Prison Hatchway, which leads to Hope's prison, is located on the east end of the corridor.
Chamber of Egress[edit | edit source]

East of the feast hall is a large room filled with portals leading different locations. The portals are closed, but can be interacted with to hear a brief line about each destination. The player character and origins each have different comments on it.
Scrubbing the floor of the room is its keeper, Nubaldin, who can be persuaded into revealing Hope's physical location and give additional information regarding Enver Gortash.
Eastern Balcony[edit | edit source]
North of the Chamber of Egress is a balcony where one can go outside the House. Outside, just north of the balcony is a Passageway to Hope's prison. Also on the outside, by jumping on rock platforms one can reach the Boudoir.
Boudoir[edit | edit source]

In the centre of the Main Corridor is the entrance to the boudoir; the northernmost room in the House. Access to the boudoir requires either the ![]() Boudoir Invitation from The Archivist in the archive, or traversal across the platforms from the Eastern Balcony.
Boudoir Invitation from The Archivist in the archive, or traversal across the platforms from the Eastern Balcony.
In the first section of the room are some locked opulent chests, one contains a ![]() Potion of Angelic Slumber. A pool sits in the centre of the room, with some restoration faucets that will restore the party's resources as if they took a long rest (does not work during fighting or after having beaten Raphael). The faucets do not restore the party's ability to take additional short rests, but they do restore a bard's related
Potion of Angelic Slumber. A pool sits in the centre of the room, with some restoration faucets that will restore the party's resources as if they took a long rest (does not work during fighting or after having beaten Raphael). The faucets do not restore the party's ability to take additional short rests, but they do restore a bard's related ![]() ability. After defeating Raphael the restoration faucets will no longer function.
ability. After defeating Raphael the restoration faucets will no longer function.
Further back, the party will find Haarlep lazing about. When approached, a conversation will automatically start; the party can convince Haarlep into giving up the password for the shield protecting the ![]() Orphic Hammer /
Orphic Hammer / ![]() Soul-Sworn Contract, or fight him. A large portrait west of the bed can also be moved to reveal Raphael's Safe, and opened with a key from Haarlep or lockpicked, to find
Soul-Sworn Contract, or fight him. A large portrait west of the bed can also be moved to reveal Raphael's Safe, and opened with a key from Haarlep or lockpicked, to find ![]() Raphael's Notes which contains the password.
Raphael's Notes which contains the password.
Raphael's Vault[edit | edit source]
The entrance to Raphael's Vault is directly south of the entrance to the Boudoir. To enter, the party must first succeed in a DC 10 Perception check to spot the infernal gem, then interact with the infernal gem by passing a DC 10 Wisdom check, followed by a DC 20 Arcana check. Inside is the ![]() Helldusk Helmet,
Helldusk Helmet, ![]() Staff of Spellpower, and
Staff of Spellpower, and ![]() Mol's contract if she survived Act One.
Mol's contract if she survived Act One.
Western Balcony[edit | edit source]
The Western Balcony is located north of the Archive. Here, the Eternal Rat can be found.
Archive[edit | edit source]

The westernmost room of the Main Corridor is the Archive. Opposite the entrance is a lever which opens a shortcut back to the feast hall.
Inside the Archive are several books with information related to the House and to the ![]() . More notably, there are three pedestals with rare equipment, and the Archivist who is keeping an eye on them.
. More notably, there are three pedestals with rare equipment, and the Archivist who is keeping an eye on them.
The pedestals each have a pressure plate (which can be disarmed) that alerts the House if the item is removed. The northern pedestal holds the ![]() Gauntlets of Hill Giant Strength, the southern the
Gauntlets of Hill Giant Strength, the southern the ![]() Amulet of Greater Health, and to the west is, depending on the party's choices when dealing with Raphael in Sharess' Caress, either the
Amulet of Greater Health, and to the west is, depending on the party's choices when dealing with Raphael in Sharess' Caress, either the ![]() Orphic Hammer or
Orphic Hammer or ![]() Soul-Sworn Contract, which can only be accessed by removing the shield with a password.
Soul-Sworn Contract, which can only be accessed by removing the shield with a password.
If the party takes the Orphic Hammer, or an item is stolen from a dais without disarming its trap, the Debtors throughout the House will become hostile, and two Hell Spheres will separately appear at various points in the main corridor when the party reaches them. See also: Exiting.
Hope's prison[edit | edit source]

At the eastern end of the Main Corridor near the Chamber of Egress is the Prison Hatchway, which leads down beneath the House and into Hope's prison. The prison can also be reached through the Passageway which is found outside, just north of the Eastern Balcony. Hope herself is at the centre of the room, bound by two unbreakable chains held by rocks which can be broken with the Orphic Hammer.
There are also two Spectators, one of which drops the ![]() Burnished Ring, and five Vengeful Imps.
Burnished Ring, and five Vengeful Imps.
Characters[edit | edit source]
Creatures[edit | edit source]
Related locations[edit | edit source]
Related quests[edit | edit source]
Notable loot[edit | edit source]
Notable items obtained in this location, whether looted, or obtained as a quest reward:
Boudoir[edit | edit source]
 Helldusk Gloves, acquired by defeating Haarlep
 Potion of Angelic Slumber, x3: one inside a locked Opulent Chest (DC 15) in the boudoir, two more inside a locked Gilded Chest (DC 15) in the hallway between boudoir and archive.
Archive[edit | edit source]
When stealing from daises in Archive, the House will become hostile unless their pressure plate is disarmed first. This requires DC 15 Perception check to unveil followed by a DC 20 Sleight of Hand check to disarm.
 Amulet of Greater Health, stolen from a dais
 Gauntlets of Hill Giant Strength, stolen from a dais
 Orphic Hammer, stolen from a dais, must have the necessary words in order to turn off the shield (if no contract with Raphael was made in Sharess' Caress)
- Soul-Sworn Contract, found on a dais, must have the necessary words in order to turn off the shield. Can not be obtained, only destroyed. (if a contract with Raphael was made in Sharess' Caress)
Raphael's vault[edit | edit source]
 Contract: Mol (if Mol survived Act One)
 Helldusk Helmet
 Staff of Spellpower
Hope's prison[edit | edit source]
 Burnished Ring, acquired after defeating Spectator
Foyer[edit | edit source]
 Gloves of Soul Catching, reward from Hope after saving her
 Helldusk Armour, acquired after defeating the final encounter of the area
Gallery[edit | edit source]
Top view
The portals
The hatch to Hope's prison


Notes and references[edit | edit source]
- ↑ Since Patch #7, Helsik no longer sells the Gauntlets of Hill Giant Strength if they are given to her for the quest
 , but they still can be pickpocketed.
- ↑ The hints of the
 Grimoire Bound in Imp Skin can be deciphered as follows:
- "Place that which has no eyes but used to see at the western point of the circle" -> Place the skull on the westernmost point of the circle, the one facing the altar Helsik's diary is on.
- "Two spaces lie opposite that point. 'Pon the left - place what is cut but cannot bleed" -> At the opposite direction from which you placed the skull there are two points; on the left one as you face them (i.e. the northern of the two points to the east), place the diamond.
- "To the right - that which smells but cannot sniff." -> Place the Incense on the right of where you placed the diamond (i.e. the southern of the two points to the east).
- "Besides the dead remains - the aspect of the Avariced lord sits clockwise so." -> Place the Coin of Mammon next to the skull clockwise (i.e. on the point to the north-west).
- "Then the circle's centre shall receive the internal marvel of infernal marble." -> Place the infernal marble in the centre.
- "Finally - and I mean no disrespect - go to hell" -> Self-explanatory: "Enter the House of Hope".
- ↑ There is a bottle of
 Stagswift Tonic and Frostkiss Ale below a Stuffed Deep Rothé head on the stairway.