"We found out that the Astral Prism is a prison for the githyanki prince Orpheus. The mind flayer that calls itself the Emperor has been using Orpheus' powers to suppress the influence of the Absolute. Whether we decide to trust the Emperor or not, we should find out if there's a way to free Orpheus from his chains."
Investigate Sharess' Caress.
"Kith'rak Voss, a githyanki knight, planned to meet someone at Sharess' Caress who knows how to free Orpheus. We should look for answers there."
Obtain the Orphic Hammer.
"We learned that the key to freeing Orpheus from his chains in the Astral Prism is the Orphic Hammer. It's in Raphael's possession, so tracking down his lavish abode in the Hells, the House of Hope, may be our best bet."
Find the diabolist Helsik.
"Yurgir, the orthon we saved in the Gauntlet of Shar, visited our camp and told us to look for a diabolist called Helsik in the Lower City. She can help us get to Raphael's lavish abode in the Hells, the House of Hope."
"We learned that a diabolist called Helsik helped Gortash open a portal to the Hells. We should track her down in the Lower City - she might be able to help us."
"We found a shop called The Devil's Fee, run by a diabolist called Helsik. We should ask her if she can help us reach Raphael's House of Hope."
Reach the House of Hope.
"Helsik agreed to help us get to Raphael's House of Hope in the Hells. She gave us an old grimoire that outlines the steps for a ritual to open a portal. We should follow the instructions."
"We found an old grimoire that outlines the steps for a ritual to open a portal. This sounds like the way to get to Raphael's House of Hope in the Hells. We should follow the instructions."
"We successfully opened a portal to the Hells. We should go in when we're ready."
Obtain the Orphic Hammer.
"We entered Raphael's House of Hope. We should look around for the Orphic Hammer."
"We entered Raphael's House of Hope and learned that the key to freeing Orpheus from his chains is the Orphic Hammer. We should search for it here."
Investigate the Archive.
"We met a spirit by the name of Hope. She told us that the Orphic Hammer is in the Archive. We should look for it there."
"We found a note in Raphael's Boudoir containing a password that can be used in the Archive: 'Give me my heart's desire.' We should get to the Archive."
Find a way to deactivate the magic field.
"We found the Orphic Hammer, but it is protected by a magical barrier. There must be a way to disable it."
Explore the Boudoir.
"The Archivist granted us access to Raphael's Boudoir. We should take this opportunity while we have it."
"We learned of Raphael's boudoir. We should find a way to gain access to it - it may hold answers."
Steal the Orphic Hammer.
"We found a note in Raphael's Boudoir containing a password that can be used in the Archive: 'Give me my heart's desire.' We should get back to the Orphic Hammer in the Archive."
"We found the Orphic Hammer, but it is protected by a magical barrier. Perhaps the phrase from the note we found in the Boudoir will lift it."
"We successfully disabled the magical barrier protecting the Orphic Hammer. We can take it from its pedestal, but our theft is unlikely to go unnoticed."
"We defeated Raphael. We can look around for the Orphic Hammer now."
Flee the House of Hope.
"We took the Orphic Hammer, but an alarm has notified Raphael. We should leave the House of Hope - or our efforts will have been for nothing."
Defeat Raphael.
"Raphael caught us before we could leave the House of Hope with the Orphic Hammer. We have no choice but to defend ourselves."
Wait for the opportunity to free Orpheus.
"We signed the contract with Raphael and he gave us the Orphic Hammer. We should wait for our next opportunity to enter the Astral Prism and free Orpheus."
"We defeated Raphael and can leave the House of Hope. We should wait for our next opportunity to enter the Astral Prism and free Orpheus."
"We defeated Raphael and stole the Orphic Hammer. We should wait for our next opportunity to enter the Astral Prism and free Orpheus."
Free Orpheus.
"We returned to the Astral Plane. Now's our chance to break Orpheus free of his chains with the Orphic Hammer."
"We returned to the Astral Plane, but without any means to break Orpheus free of his chains. There has to be someone willing to help us."
"Just when all hope to free Orpheus seemed lost, Raphael appeared and offered to give us the Orphic Hammer if we give him the Crown of Karsus after our triumph over the Netherbrain. We signed the contract and he handed us the Hammer. It's time to free Orpheus."
"When all hope to free Orpheus seemed lost, Raphael appeared and gave us the Orphic Hammer. He reminded us of our deal: he'll come to collect the Crown of Karsus after our triumph over the Netherbrain. It's time to free Orpheus."
Quest Complete
"We freed Orpheus from his chains. In doing so, we betrayed the Emperor, leaving it no choice but to join the Netherbrain."
"We returned to the Astral Plane, but with Raphael gone and the Orphic Hammer lost, we have no means to free Orpheus. His fate may look different to what we had planned."
"We agreed to assimilate Orpheus, ending his life but gaining his powers of protection. We're ready to face the Netherbrain."
Mamzell Amira is on the ground floor of Sharess' Caress, right by the front entrance. When the party speak with her, she can be asked what she has to offer. Amira mentions that a devil is in residence - Raphael. At the bar, Korrilla is also around, informing the party that Raphael wishes to speak with them.
At the top floor is, among others, a room called the Devil's Den, and Raphael can be found inside it. If Kith'rak Voss is alive, he is also inside trying to deal with Raphael, but the latter sends him away. Raphael does, however, have a proposition for the party; he is in possession of the Orphic Hammer - a tool which can break the cage that holds Orpheus. In return, he wants the Crown of Karsus, which is being used to control the Elder Brain, once the party defeat it.
Raphael's proposal can either be rejected or accepted. If it is rejected, he states that he will remain at Sharess' Caress for some time in case the party change their mind. If the deal is accepted, he creates a Soul-Sworn Contract and the party instantly feel a pang of regret, starting Escape the Deal.
If having completed Break Yurgir's Contract without killing him in Act Two, then he appears at camp to offer advice. He tips the party off to Helsik in the Lower City.
The party can also stumble upon Helsik while exploring the Lower City and then entering the Devil's Fee. Helsik initially sells a number of magical items without revealing her true work. The party can learn about it by walking around in the shop. Several items there trigger Arcana checks which, if succeeded, reveal they are genuine artifacts from hell. These items are a Monster's Skull at X: -43 Y: 3, another Monster's Skull at X: -47 Y: 2, and infernal gems at X: -25 Y: 5. If Karlach is in the party, she recognizes the artifacts as infernal without needing check. After these artifacts are discovered, the party can pass a DC 18 PersuasionCheck to ask Helsik if she is a diabolist:
[PERSUASION] Are you perchance a diabolist? (DC 18) (if only 1 Arcana check was passed)
Your hoard of genuine infernal items is impressive - show me the really good stuff. (if 2 or more Arcana checks were passed)
Curios don't interest me. I'm interested in the Hells themselves - a place called the House of Hope in particular. (if two or more Arcana checks were passed, or if the party read Scrapbook of Letters or Note from Director Gortash)
Ever met an orthon? I have - he told me you're a diabolist. (if Yurgir came to camp and was talked to)
Did you help Lord Gortash retrieve some hellish curios by any chance?
I know you're a diabolist who worked for Gortash. What did you do for him? (if the party read Note from Helsik)
I found some interesting reading material downstairs. You're a diabolist, it seems. (if the party read The Enigmatic Art of Hemomancy in the basement)
Helsik then tells the party that they can ask questions for the right amount of coin. The party can then respond with one of the following options:
Here's 100 gold.
How about 1000 gold?
[PERSUASION] It's customary for any salesperson to offer a free sample. (DC 15) (except Rogue/Warlock)
[ROGUE] [PERSUASION] You know, any saleswoman worth her salt offers a free sample. (DC 10)
[WARLOCK] [PERSUASION] I'm also of the pact-bound persuasion - don't suppose I can have a free sample? (DC 10)
[FIEND] [PERSUASION] I'm something of a diabolist myself - perhaps you could spare a little free knowledge? (DC 10 )
She finally introduces herself as a diabolist, and the party can then ask her whether she helped Enver Gortash to steal the Crown of Karsus, and if she opened a portal to Mephistopheles' vaults in the Hells for him to pull off the heist.
Alternatively, if the party break into the upstairs part of the shop, several items in locked chests as well as her diary on the table are items from hell which enable the party to ask about her diabolism. If the party try to access the upstairs area, they should do carefully because of the trap on the landing which periodically casts Fireball when triggered. This trap can be disarmed by placing any water or wine into the imp's head on the right side. Another way to access the rooms upstairs is by entering through one of the building's balconies.
Helsik recognizes the Dark Urge, handing them the Gibus of the Worshipful Servant which Sceleritas Fel left at the Devil's Fee. This completely skips the usual requirements to unlock the House of Hope dialogue. She says that she can tell the Urge more about their past for the price of gold, and 100 or 1000 gold convinces her to reveal she helped the Urge and Gortash steal the Crown of Karsus.
The party can inquire Helsik about being a diabolist, which results in her revealing that her true business is not in information or hellish curiosities. She is Mammon's Picklock, Latchkeeper of the Nine Hells. She breaks people into the Hells, for a cost (20,000 gold), unless the party can haggle her down:
[FIEND] [WARLOCK] [PERSUASION] I serve a creature not unlike Lord Mammon - surely you can lower the price. (DC 25)
[WARLOCK] [PERSUASION] Look, we both know your patron doesn't need that much. Lower the price. (DC 25)
[INTIMIDATION] You'll halve that price or I'll halve you. (DC 25)
[BARBARIAN] [INTIMIDATION] Cut the price or I cut you into little pieces. CHOOSE. (DC 25 )
[PERSUASION] Waive the fee and I'll add one of Raphael's artefacts to your collection. (DC 20)
[ROGUE] [PERSUASION] I'm a skilled thief - give me free passage and I'll bring you back a 'souvenir'. (DC 20 )
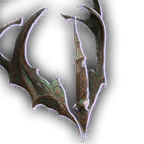
If striking a deal with Helsik, she gives the party all the tools needed to open a portal to Hell. This includes a Grimoire Bound in Imp Skin and a Ritual Pouch with all the necessary items. The party must move upstairs in the Devil's Fee to find a circle in blood. Then the ritual items must be placed in the correct areas as described in the Grimoire Bound in Imp Skin. Starting from the point closest to Helsik's diary and going clockwise:
Skull X: -35 Y: 6
Coin of MammonX: -34 Y: 8
Empty spot
Diamond X: -30 Y: 7
Incense X: -29 Y: 4
Empty spot
Empty spot
Then, the party must drop the Infernal Marble in the center of the circle and a portal to hell opens.
Once inside the House of Hope, a projection of a strange dwarf appears to greet the party. She believes the party are in great danger, and she herself is dealing with her jailers, but she can be convinced to stick around. Asking her who she is reveals she is Hope, and she is trapped and chained in the prison of the House of Hope. If the party ask her a question, she answers, and a sound of chains can be heard. Hope asks the party to speak quietly to continue:
[INTELLIGENCE] Focus on speaking as quietly and calmly as possible. (DC 10)
[CHARISMA] Prepare to speak in your finest stage whisper. (DC 10)
[WISDOM] Formulate your questions using as few words as possible. (DC 10)
[BARD] [PERFORMANCE] Speak soft as the breeze-caught melody. (DC 10)
[ROGUE] [STEALTH] Make your words soft as the assassin's footfall. (DC 10)
[MONK] [INSIGHT] Speak quietly, and with reserve. (DC 10)
[BARBARIAN] [PERFORMANCE] Try really hard not to roar your words. (DC 10 )
[RANGER] [STEALTH] Whisper as you would in the depths of a hunt. (DC 10)
[WIZARD] [HISTORY] Assume the familiar quietude of a student in a grand library. (DC 10)
[CLERIC] [RELIGION] Whisper as you would in most intimate prayer. (DC 10)
[DRUID] [NATURE] Emulate the quiet of a peaceful glade. (DC 10)
[FIGHTER] [HISTORY] Recall the hush before the roar of battle. (DC 10)
[WILD MAGIC] [PERFORMANCE] Remember that time you turned into a table - you were really quiet then. (DC 10)
[DRACONIC BLOODLINE] [PERFORMANCE] Embody the silence of the slumbering wyrm. (DC 10)
[SORCERER] [PERFORMANCE] Be like the eye of a storm - quiet among the chaos. (DC 10)
[OATHBREAKER] [PERFORMANCE] Recall the silence in your soul after your oath was broken. (DC 10)
[OATH OF THE ANCIENTS] [PERFORMANCE] Be quiet as whispered words in a solitary glade. (DC 10)
[OATH OF DEVOTION] [PERFORMANCE] Speak as the whispered promise - soft, but assured. (DC 10)
[OATH OF VENGEANCE] [PERFORMANCE] Speak as the words of revenge whispered in a dying sinner's ear. (DC 10)
If passing the check, Hope explains that only the Orphic Hammer can release her from her chains, and the party must get past the Debtors and sneak to the Archive to get the Hammer. To aid the party, she gives them a Debtor's Disguise so they can move about the House undetected. Choosing to save Hope leads to the quest Save Hope.
If failing the check, she disappears early without giving the party a disguise.
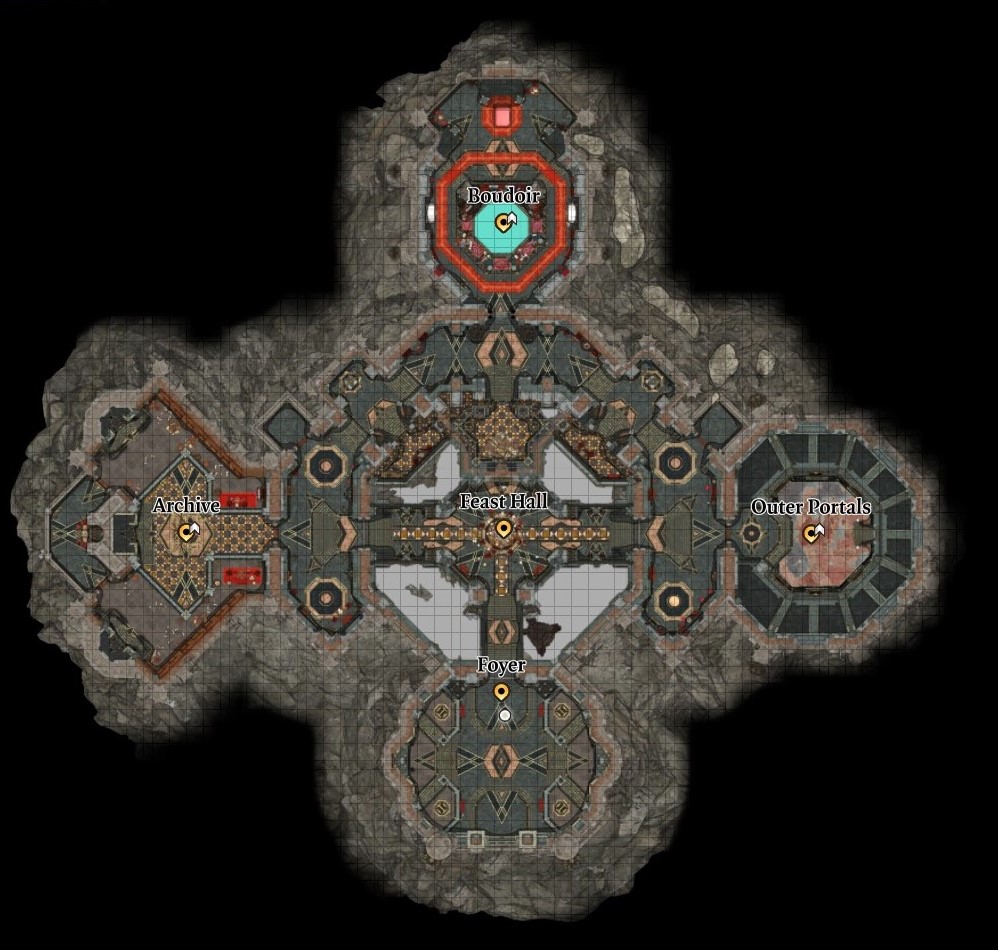
The Archivist welcomes "Verillius" to the Archive.
Before entering the Archives, Hope appears once again to warn the party about the Archivist. She says the party must exploit his weakness to get by. Before she can fully explain, the party must pass an ability check to keep speaking quietly to her:
[CHARISMA] Concentrate on speaking softly and without emotion. (DC 15)
[INTELLIGENCE] Think two steps ahead, plotting out your queries in advance. (DC 15)
[WISDOM] Focus your efforts on formulating concise questions. (DC 15)
After passing the check, if asked how to deal with the Archivist, she says he fears authority figures. With a DC 20 PersuasionCheck, she says he particularly fears Verillius Receptor, a High Inquisitor of Zariel who has official permission to audit Raphael's collection. Verillius' true form is so ghastly and mind-scarring that she takes on guises when she comes to visit. The party can exploit this by pretending to be Verillius. If Hope fails to get out the name, then a successful use of Detect Thoughts (DC 10) can be used on the Archivist to reveal the name as well.
Once inside, it is necessary to pass a DC 15 DeceptionCheck to get the Archivist to believe the ruse. Unfortunately, the Archivist cannot give access to the Orphic Hammer, as it is surrounded by an impervious sphere. The sphere requires a magic code which only Raphael has. Instead, he refers the party to wait in the Boudoir until Raphael has returned. The Archivist can also relinquish the pass to the Boudoir by being DC intimidated IntimidationCheck, or by pickpocketing him.
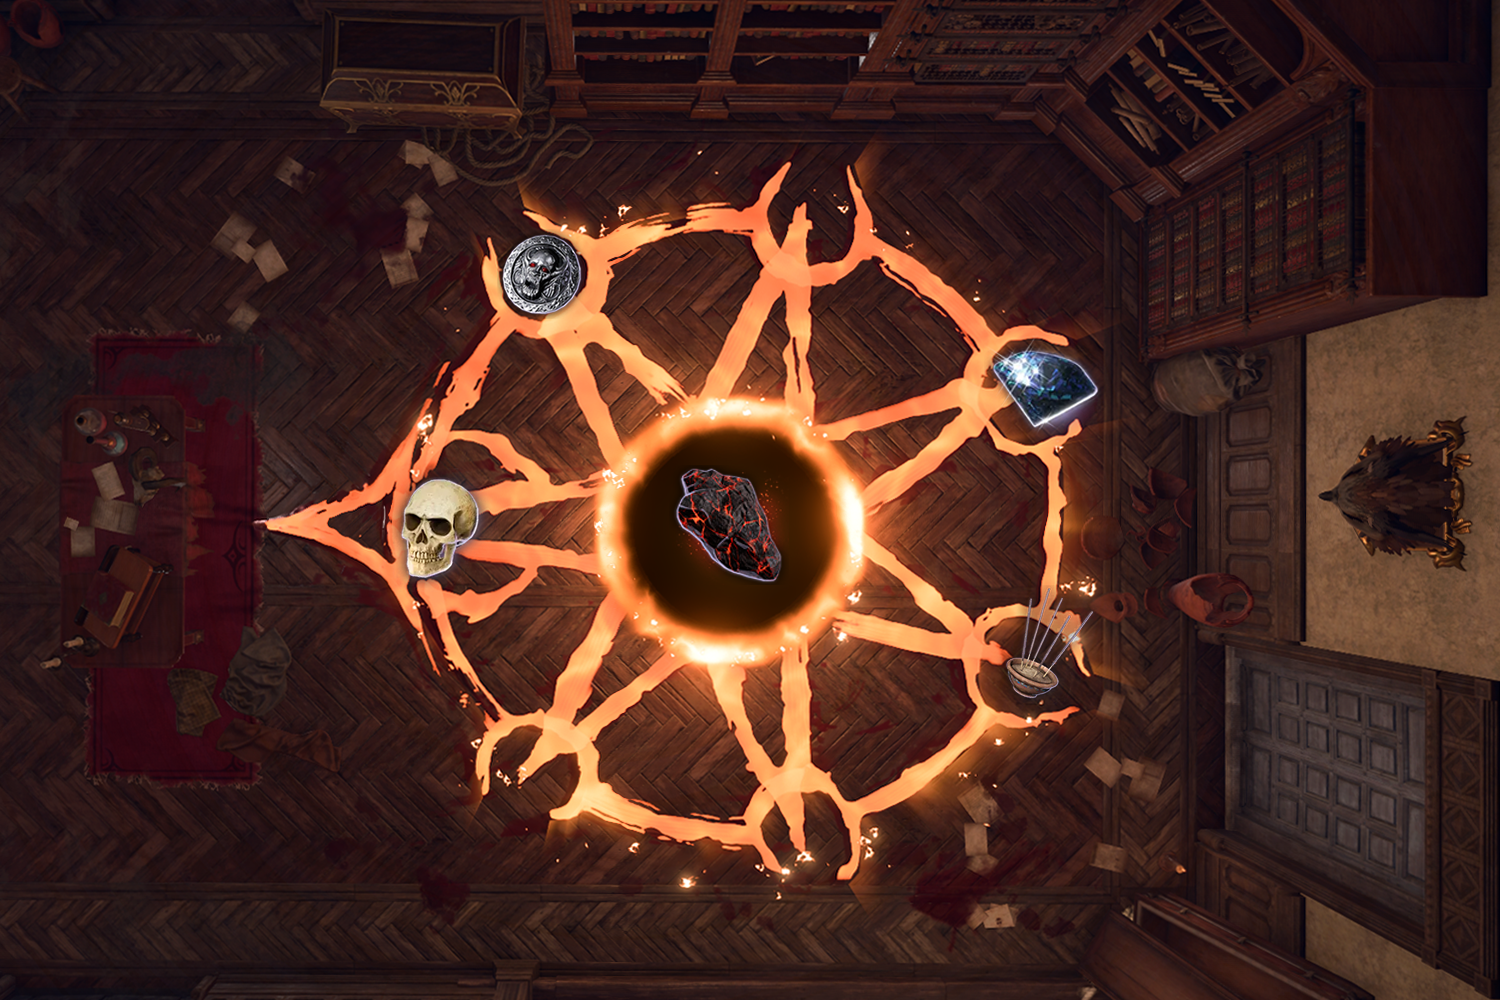
If the Archivist is not successfully deceived or intimidated, information on how to enter the Boudoir can be found in the Outer Portals room at X: -6441 Y: 2920. Nubaldin is cleaning up the room. Speaking to him results in his explaining that he once ran the prisons, but was moved to the Outer Portals room after failing to prevent Gortash from escaping. If having killed Enver Gortash, telling Nubaldin about it delights him. As a reward, Nubaldin explains a secret trick to get into the Boudoir - going next door to the balcony at X: -6446 Y: 2936 and jumping off the stones to enter the balcony of the Boudoir.
Jumping on the rocks here leads to the Boudoir's balcony.
Upon entering the Boudoir, the party are confronted by an incubus named Haarlep, who has changed their shape into a perfect copy of Raphael. Haarlep asks why the party are there, but is already aware that they seek the Orphic Hammer. Haarlep helps the party out if they agree to "play a game" with them. Agreeing to play the "game" results in the interacting party member taking off their clothes while Haarlep seduces them to give over their mind and body. The interacting party member can insist to only giving their body, to which Haarlep agrees and tells the interacting party member that they will always know when an orgasm is experienced by Harleep in their form. Otherwise, giving over both mind and body results in a Game Over.
If refusing to play, Haarlep becomes hostile. Additionally, succeeding in a DC 25 ConstitutionCheck during the "game" also makes Harleep hostile. Defeating Haarlep makes them drop the location of Raphael's safe, as well as the Helldusk Gloves. The safe contains the magic phrase needed to steal the hammer.
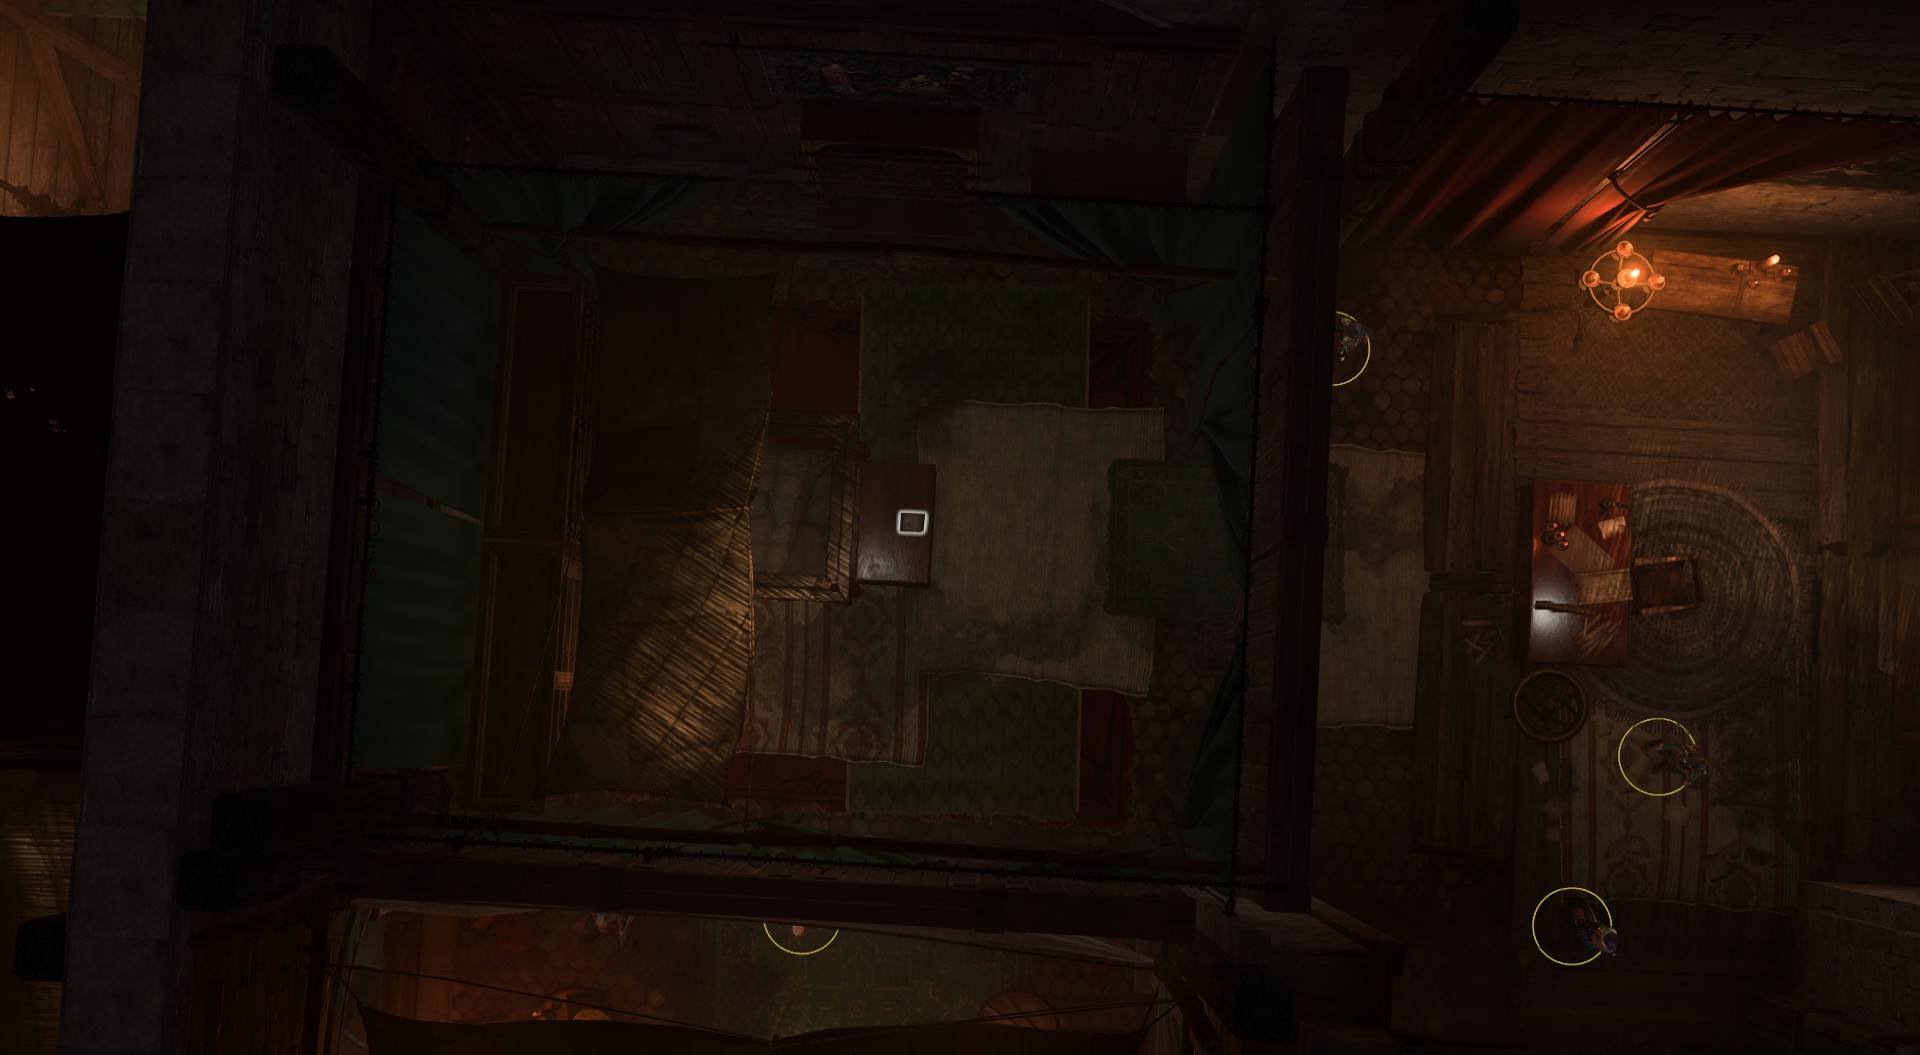
The location of Raphael's safe.
Raphael's magic phrase can be pilfered without interacting with Haarlep. The party can use Greater Invisibility, Supreme Sneak, or other skills to move towards the giant painting west of the bed. A successful Perception check reveals the painting is rigged with a trap. The party must disarm it ( DC 20 Sleight of HandCheck), then press the button below the painting, lockpick the safe ( DC 25 Sleight of HandCheck), take its content, and sneak off before Haarlep notices anything.
The Archivist instantly becomes aware if the Orphic Hammer is stolen. He states that the dinner bell has rung for Raphael and the party are the main course. Hope appears one last time to state everything will be on fire once they leave the Archives. She pleads with the party one last time to come to the prison and smash her chains.
Smash the crystals with the Orphic Hammer to free Hope.
After leaving the Archive, the residents of the House of Hope turn hostile, including the Debtors and several Hell Spheres. On the way to the prison, the party can stop in the Boudoir and use the rejuvenation faucet at X: -6482 Y: 2977 to heal.
If returning to the entrance where the portal is located, Raphael, Yurgir, and Korrilla are there waiting. Raphael, enraged, states that the deal is over and none of the party members are getting out alive. Yurgir can be convinced to switch sides with an Intimidation or Persuasion check:
[INTIMIDATION] Fight with me, Yurgir, or I'll strike you down again. (DC 25) (if already defeated in Act Two)
[PERSUASION] Join the winning side - Raphael doesn't stand a chance against me. (DC 30)
Yurgir automatically switches sides if he helped the party to find the House of Hope in the first place.
After defeating Raphael, it is possible to leave the House of Hope with the Orphic Hammer.
The party can show Kith'rak Voss the Hammer once it is obtained, as part of Help Kith'rak Voss. This can be done immediately in Sharess' Caress if Raphael's deal was taken, or in the Lower City Sewers near the Undercity Ruins waypoint if Raphael's deals was not taken. Voss is immensely grateful to the party and gifts them with a Silver Sword of the Astral Plane, then moves on to prepare to take on the Elder Brain.
The party must bide their time until they are ready to undertake Confront the Elder Brain. After obtaining all the Netherstones, it is revealed that the Elder Brain dwells within the Morphic Pool underneath the city. North of the Temple of Bhaal waypoint is a boat which takes the party to the Brain. The Brain has evolved into a Netherbrain and there are a number of increasing difficult ability checks to fight against it. However, the Netherbrain is too powerful, and the Emperor steps in to save the party by bringing everyone inside the Astral Prism.
There, the Emperor states that only a mind flayer can hope to take down the Netherbrain in its current form and that the mind flayer must consume the power of Prince Orpheus in order to succeed. Being a mind flayer himself, the Emperor says that he can do this, and asks the Netherstones be relinquished to him.
If selecting "I don't believe a word you just said.", followed by "I will never trust you.", then the Emperor becomes enraged and states that he has no other choice but to reassimilate into the Netherbrain. He leaves the party in the Astral Realm. If possessing the Orphic Hammer, the party can equip it and attack the crystals binding Orpheus.
Alternatively the party can directly attack Orpheus' chains, without talking to the Emperor before. The result is the same; the Emperor leaves to reassimilate into the Netherbrain.
There is also the possibility of the party not retrieving the Orphic Hammer and spurning the Emperor. In this case, Raphael appears within the Astral Prism and offers one last deal: The party must sign a contract for the Orphic Hammer in exchange for the Crown of Karsus, or the world ends. Failing to uphold the bargain means the party's souls are forfeit, while refusing to sign turns the party into mind flayers who are assimilated by the Netherbrain, causing a Game Over. Thus the party is forced to Fulfill the Deal.
Once Orpheus is freed, he confronts the party on their choices, saying the party should have let his honor guard kill them so they could have avoided this whole situation. He also confronts the party if they stole the Githyanki egg in Steal a Githyanki Egg. However, he agrees to stand down and work with the party.


.png)


