Origin characters can be played as the main character, otherwise, they can be recruited as a companion early on.
| Ferocious Warrior | |||||||
| Lae'zel | |||||||
|---|---|---|---|---|---|---|---|

| |||||||
| Stats | |||||||
| Level 1 | |||||||
| |||||||
| Githyanki | |||||||
| Humanoid | |||||||
| 12 | |||||||
| 16 | |||||||
| 9m / 30ft | |||||||
| Medium | |||||||
| 50kg / 100lbs | |||||||
| +2 | |||||||
| +1 | |||||||
| Character information | |||||||
| Class | Fighter | ||||||
| Background | Soldier | ||||||
| Location | Nautiloid, Wilderness | ||||||
| In-game | |||||||

| |||||||
Gameplay
As a Fighter, Lae'zel should be at the forefront of most combat situations. At level 1, she comes with the two-handed Fighting Style Great Weapon Fighting. She is capable of withstanding heavy damage and dealing heavy damage back to enemies in return. A Githyanki, she has access to several very useful mobility spells as she levels, including Mage Hand, Enhance Leap, and eventually Misty Step. At level 3, Lae'zel gains a Fighter subclass which allows her to broaden her list of martial abilities or diverge into something different, such as enhancing her combat abilities with spellcasting.
Proficiencies
Equipment
Saving Throws
Skills
Spells Known
Cantrips Known
 Mage Hand (from Githyanki)
Recruitment
Main recruitment
Lae'zel can be recruited in Chapter One.
- Lae'zel is first encountered on the Nautiloid during the Prologue. While escaping from the nautiloid, she joins the party as a temporary companion. She leaves the party after successfully escaping.
- Lae'zel is encountered again a second time in the Wilderness. She has been captured in a wooden cage by two Tieflings, Damays and Nymessa. If the player is able to free her, she can be invited to join the party.
Alternative recruitment opportunities
- If she dies during the Tutorial level, her body will be found at the beach starting area. Using a scroll of Revivify on her will bring her back to live and players can recruit her.
- If players progress further to the Grove and trigger the scene at the gates, she will break out of her cage and disappear, killing Damays and Nymessa if they are still alive. She can then be found later on and be recruitable again.
- After breaking out of the cage, or if players refused her joining up with them until this point, she will show up when players encounter the Githyanki near the Mountain Pass. Players have another chance to recruit her there if she doesn't turn hostile during the encounter. If she does during it as an ally or neutral, she can be resurrected and still join.
- If players miss all the recruitment opportunities above, or refuse her in them, she can be found again one final time near the first waypoint in the region where the Crèche is located for a final recruitment opportunity.
Recruitment cut off point
![]() Spoiler warning! This section reveals details about the story of Baldur's Gate 3.
Spoiler warning! This section reveals details about the story of Baldur's Gate 3.
- If players proceed inside the Crèche without recruiting Laezel either in party or in camp, she will be missing from the mountain pass. If players proceed to the shadowcursed lands, they will find her as an undead there, permanently dead. She went the wrong way when trying to find the Crèche.
Background
Lae'zel is a Githyanki Warrior from Crèche K'liir, a githyanki enclave on an asteroid near Selûne, the moon of Faerûn. Before the events of Baldur's Gate 3, Lae'zel was captured by Mind Flayers. After being abducted, she is encountered by the player on the Nautiloid. They join forces in order to commandeer the Nautiloids transponder and escape.
Personality
Lae'zel is depicted as xenophobic, arrogant, and quick to anger. She is proud of Githyanki, and frequently makes comments to the party detailing Githyanki customs and the nature of her people. In her mission to remove her Mind Flayer parasite, she does not hesitate to intimidate or harm those who would step in her way. She also approves of evil-aligned actions from the player, such as betraying Astarion to a vampire hunter. She is fiercely loyal to Vlaakith, the queen of all Githyanki.
Interactions
Approval
Lae'zel favors direct approaches and is not interested in wasting any time in finding a solution to the Tadpole infection.
The following story and dialogue choices will cause Lae'zel to gain approval.
![]() Spoiler warning! This section reveals details about the story of Baldur's Gate 3.
Spoiler warning! This section reveals details about the story of Baldur's Gate 3.
Act 1
- Choose the 'Attack' dialogue option when speaking to Taman and Gimblebock
- Ask her about the tadpole, then tell her you will find a cure
- Use the 'Fighter' option to knock out Aradin
- Tell Zevlor that you have other things to do
- Let her make Zorru bow
- Tell she's good at interrogations
- Show the Tiefling Guex how to fight by passing an Athletics Check
- Tell the Tielfling kids they are likely going to die when trying to motivate them.
- Ask her if she's sure the Creche is the only way for a cure, then tell her that their information is valuable
- Swear to take the Wyvern Poison
- Decline the devil's offer to remove the tadpole
- Tell Edowin's siblings to avenge their brother
- Crush the tadpole that leaves True Soul Edowin
- Deliver the final blow to the goblin Fezzerk
- Drink from the well outside Auntie Ethel's house
- Deceive the goblins, say 'you can't be serious', then fling poo at them
- Say 'Boo' to Volo as he performs
- Demand that Crusher kiss your foot
- Take Shadowheart to the Chicken Chase in the Goblin Camp, and tell her not to be hasty
- Torture Liam for the goblins
- Speak to the artist and call him a slave
- Let Lae'zel speak to the Githyanki Patrol
- Pass the Deception Check when speaking to the Githyanki Patrol
- Later in camp, after meeting the Githyanki Patrol, persuade her to calm down
- Agree to kill the one-horned Tiefling for Paladin Anders
- Tell the merchant Cyrel that you'll take the supplies
- Tell BOOOAL he is a fake god, tell him you are going to kill him and take his power
- Attack Lady Esther after hearing her offer to seal a Githyanki egg.
- Let Lae'zel speak for the group when you enter the Gith Creche and questioned by Gish Far'Aag.
- Show Gish Far'aag the Mysterious Artefact to gain entry into the Creche.
Disapproval
The following story and dialogue choices will cause Lae'zel to lose approval.
![]() Spoiler warning! This section reveals details about the story of Baldur's Gate 3.
Spoiler warning! This section reveals details about the story of Baldur's Gate 3.
Act 1
- In camp on the first night, after speaking with her first, talk to Shadowheart and say you agree with her.
- Persuade Kagha to free Arabella.
- Purchase the artist at the Zhentarim Hideout.
- When Shadowheart has odd magical flare-up, choose to change the subject and ignore it.
- Tell Andrick and Brynna that you came from the wreck.
- Take the [Half-Drow] option when encountering the githyanki search party to say that you speak for her, interrupting her.
- Let Astarion kill the Gur monster hunter Gandrel while she is in the party.
Romance
The following section explains Lae'zel's romance.
![]() Spoiler warning! This section reveals details about the story of Baldur's Gate 3.
Spoiler warning! This section reveals details about the story of Baldur's Gate 3.
During the Party, regardless of side or approval, Lae'zel's first important romance scene can happen. She will commend the player's martial prowess and offer intercourse - no strings attached. If the player agrees, they will later encounter her inside the altar room, naked. Lae'zel will then demand the player to submit, where they can either comply or success an Intimidation roll to make Lae'zel submit instead. A rough sexual scene will then happen.
Regardless of who takes charge, the player will wake up next morning - in pain. Lae'zel will insist it was just for pleasure and might or might not lay with the player again.
Trivia
- Lae'zel is voiced by Devora Wilde.
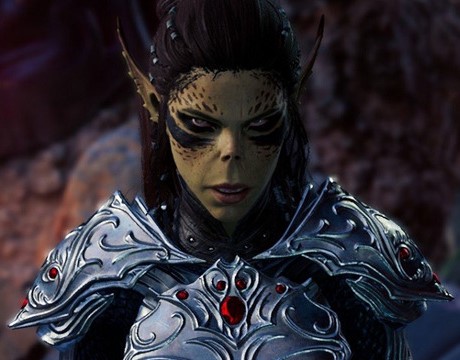
Gallery
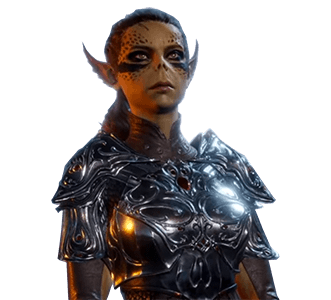
Lae-zel's appearence pre-release.

Lae'zel during the intro cinematic.
Lae'zel during Early Access.
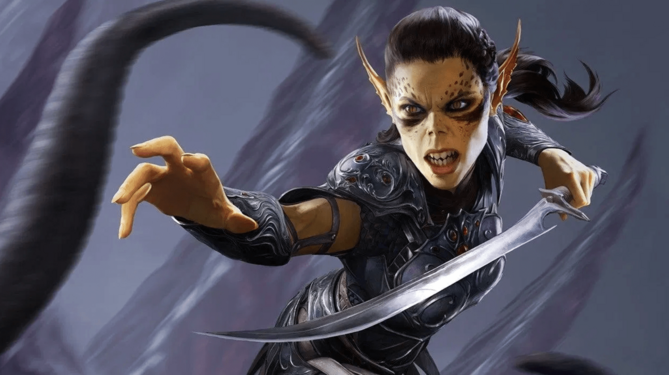
Lae'zel promotional art.
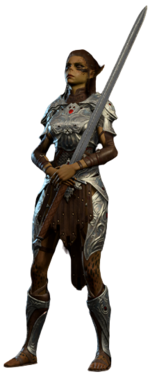
EA model


External Links
 Lae'zel on the Forgotten Realms Wiki