Ad placeholder
Necrotic Laboratory: Difference between revisions
m (→Brain Puzzle) |
|||
| (33 intermediate revisions by 6 users not shown) | |||
| Line 1: | Line 1: | ||
{{ | {{Location page | ||
| prefix = The | |||
| name = Necrotic Laboratory | |||
| alt name = | |||
| image = Necrotic Laboratory.png | |||
| image description = Necromancer's hexagram in the centre of the lab | |||
| act = two | |||
| summary = It is part of the [[Mind Flayer Colony]] located in the south-east (entrance {{coords|715|-50}}) and connected directly to its other part, [[Morgue]]. | |||
| region prefix = the | |||
| region = Shadow-Cursed Lands | |||
| north = | |||
| west = | |||
| east = | |||
| south = | |||
}} | |||
==General details== | ==General details== | ||
Upon entering the area, a battle with a large number of undead will commence, including: 1× [[Death Shepherd]] (lv.6), 4× [[Winged Horror]] (lv.3), 4× [[Greater Zombie]] (lv.7), and 6× [[Zombie]] (lv.3). During the battle, the Death Shepherd will cast | Upon entering the area, a battle with a large number of undead will commence, including: 1× [[Death Shepherd]] (lv.6), 4× [[Winged Horror]] (lv.3), 4× [[Greater Zombie]] (lv.7), and 6× [[Zombie]] (lv.3). During the battle, the Death Shepherd will cast {{SAI|No Rest for the Wicked}} spell, rising two [[Reconstituted Duellist]]s, a [[Reconstituted Marksman]] and a [[Reconstituted Arcanist]] (one of those at a time). | ||
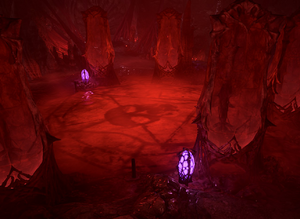
In the centre of the Necrotic Laboratory resides a huge hexagram with a [[Profane Womb]] at each apex. | In the centre of the Necrotic Laboratory resides a huge hexagram with a [[Profane Womb]] at each apex. | ||
Should the | Should the party help Balthazar reach the [[Nightsong]] in the [[Gauntlet of Shar]] and let the necromancer take her away, all party members will fall unconscious in the [[Shadowfell]] and wake up in these containers. They bestow the Profane Womb-Bound Condition, which [[Silence]]s the victim and keeps it in place. | ||
==Brain Puzzle== | ==Brain Puzzle== | ||
[[File:Mind Puzzle (initial set).png|300px|thumb|right|Initial set of the mind puzzle]] | [[File:Mind Puzzle (initial set).png|300px|thumb|right|Initial set of the mind puzzle]] | ||
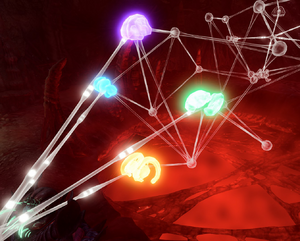
In the far southeast corner of the laboratory stands a neural button. Activating it brings forth a imaginary projection with a [[Brain Mapping Puzzle]], consisting of four mental faculties (Emotion, Speech, Memory, and Reason). To solve this puzzle | In the far southeast corner of the laboratory stands a neural button. Activating it brings forth a imaginary projection with a [[Brain Mapping Puzzle]], consisting of four mental faculties (Emotion, Speech, Memory, and Reason). To solve this puzzle each faculty must be connected to its matching copy on the far side of the puzzle by selecting intervening nodes, avoiding overlaps. Successfully solving the puzzle will grant the 'Brain Blast!' [[File:Inspiration Icon.png|24px|link=]]Inspirational Event to characters with [[Sage]] background. | ||
[[File:Grand Design Relief.png|300px|thumb|right|Desecrated Relief]] | [[File:Grand Design Relief.png|300px|thumb|right|Desecrated Relief]] | ||
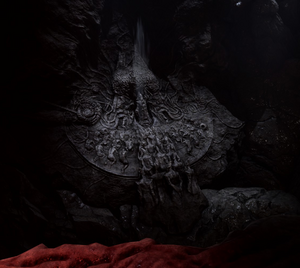
Behind the puzzle projection is a locked | Behind the puzzle projection is a locked Flesh-Wrought door. It cannot be opened neither by lockpicking nor by using {{SAI|Knock}}. Only solving the brain puzzle unlocks it. Once opened, it reveals a Desecrated Relief, that can be activated. Looking at the relief will prompt several patchy, descriptive phrases, projected into the character's mind by the [[Absolute]]. Afterwards, the [[Dream Guardian]] will comment on it, telling that the relief is a depiction of the ''Grand Design'' - a worldwide concept, implementation of which is the supreme desire of all illithids and all [[Elder Brain]]s{{ref|More on Elder Brains and Grand Design {{reflist}} | ||
{{FRWiki|Elder brain|long}}, {{FRWiki|Grand Design|long}}}}. | {{FRWiki|Elder brain|long}}, {{FRWiki|Grand Design|long}}}}. | ||
Nearby, in the heap of skulls ({{coords|750|-138}}), the | Nearby, in the heap of skulls ({{coords|750|-138}}), the party can find the {{SmRarityItem|Blade of Oppressed Souls}} and a brain jar with the {{SmRarityItem|Waking Mind}}. Beside the jar lies a skeleton with the {{SmRarityItem|Circlet of Mental Anguish}} and {{SmRarityItem|Braindrain Gloves}} on it. | ||
==Balthazar's in-colony study== | ==Balthazar's in-colony study== | ||
To the west of the hexagram is located a small study with a desk and the [[Mind-Archive Interface]] nearby({{coords|699|-117}}). This device allows | To the west of the hexagram is located a small study with a desk and the [[Mind-Archive Interface]] nearby({{coords|699|-117}}). This device allows to talk to brains in green jars found scattered across the colony, through the {{CharLink|Slack-Skinned Head}} installed on it. A journal with Balthazar's notes left on the desk tells that this interface is an invention of [[Enver Gortash]]. | ||
There are eight brain jars available to find and use in the Mind-Archive Interface. Six of them ([[True Mind]], [[Willing Mind]], [[Waking Mind]], [[Butchered Mind]], [[Closed Mind]] and [[Fresh Mind]]) can be found in the colony itself, while two others ([[Dark Mind]] and [[Slave Mind]]) can be picked up on the [[Nautiloid]] in the [[Prologue]]. | |||
Of all those, the only truly useful is the Waking Mind. If spoken to, it appears to be the brain of a [[Githzerai]] [[Monk]], preserved by mind flayers long ago as a trophy and a delicacy. It can grant a permanent buff to the party member who spoke to it: {{Cond|Githzerai Mind Barrier}}, in exchange for the promise to purge it afterwards. | |||
All other brains will only give dialogue, though some cast a bit of light upon Balthazar's and Gortash's cooperative experiments in creating magically enhanced tadpoles and honing their impact on infested victims. | |||
Also on the desk lay Mol's {{SmRarityItem|Eyepatch}} and a {{SmRarityItem|Resonance Stone}}. Picking up the Eyepatch updates the {{Quest|Find Mol}} quest. The Resonance Stone radiates magical energy that provides all characters within 9 meters with Steeped in Bliss condition. {{SmRarityItem|Prayer for Forgiveness}} laying nearby gives some hints concerning the history of the [[Dark Urge]] origin. | |||
The last notable items on the desk are two {{SmRarityItem|Rune Slate|Rune Slates}}, each requires a {{Ability check|Arcana|14}} to be read. Unlike slates found on the Nautiloid, here the inscribed text does not appear as a Narrator line, but written on a grey-coloured paper list (similar to a book layout). Both slates tell about the fall of the Illithid Empire and the fate of the Elder Brain managing the colony.{{ref|The texts of the slates appear without any regard to success on said check (''possible bug?''{{verify}}), though banter lines of different characters befit the roll results.}} | |||
== Notens and References == | |||
{{notebegin}} | |||
{{Reflist}} | |||
{{noteend}} | |||
{{Mind Flayer Colony}} | |||
[[Category:Locations]] | |||
[[Category:Act Two Locations]] | |||
Latest revision as of 21:28, 19 September 2024
General details[edit | edit source]
Upon entering the area, a battle with a large number of undead will commence, including: 1× Death Shepherd (lv.6), 4× Winged Horror (lv.3), 4× Greater Zombie (lv.7), and 6× Zombie (lv.3). During the battle, the Death Shepherd will cast spell, rising two Reconstituted Duellists, a Reconstituted Marksman and a Reconstituted Arcanist (one of those at a time).
In the centre of the Necrotic Laboratory resides a huge hexagram with a Profane Womb at each apex. Should the party help Balthazar reach the Nightsong in the Gauntlet of Shar and let the necromancer take her away, all party members will fall unconscious in the Shadowfell and wake up in these containers. They bestow the Profane Womb-Bound Condition, which Silences the victim and keeps it in place.
Brain Puzzle[edit | edit source]
In the far southeast corner of the laboratory stands a neural button. Activating it brings forth a imaginary projection with a Brain Mapping Puzzle, consisting of four mental faculties (Emotion, Speech, Memory, and Reason). To solve this puzzle each faculty must be connected to its matching copy on the far side of the puzzle by selecting intervening nodes, avoiding overlaps. Successfully solving the puzzle will grant the 'Brain Blast!' ![]() Inspirational Event to characters with Sage background.
Inspirational Event to characters with Sage background.
Behind the puzzle projection is a locked Flesh-Wrought door. It cannot be opened neither by lockpicking nor by using . Only solving the brain puzzle unlocks it. Once opened, it reveals a Desecrated Relief, that can be activated. Looking at the relief will prompt several patchy, descriptive phrases, projected into the character's mind by the Absolute. Afterwards, the Dream Guardian will comment on it, telling that the relief is a depiction of the Grand Design - a worldwide concept, implementation of which is the supreme desire of all illithids and all Elder Brains[1].
Nearby, in the heap of skulls (X: 750 Y: -138), the party can find the ![]() Blade of Oppressed Souls and a brain jar with the
Blade of Oppressed Souls and a brain jar with the ![]() Waking Mind. Beside the jar lies a skeleton with the
Waking Mind. Beside the jar lies a skeleton with the ![]() Circlet of Mental Anguish and
Circlet of Mental Anguish and ![]() Braindrain Gloves on it.
Braindrain Gloves on it.
Balthazar's in-colony study[edit | edit source]
To the west of the hexagram is located a small study with a desk and the Mind-Archive Interface nearby(X: 699 Y: -117). This device allows to talk to brains in green jars found scattered across the colony, through the Slack-Skinned Head installed on it. A journal with Balthazar's notes left on the desk tells that this interface is an invention of Enver Gortash.
There are eight brain jars available to find and use in the Mind-Archive Interface. Six of them (True Mind, Willing Mind, Waking Mind, Butchered Mind, Closed Mind and Fresh Mind) can be found in the colony itself, while two others (Dark Mind and Slave Mind) can be picked up on the Nautiloid in the Prologue.
Of all those, the only truly useful is the Waking Mind. If spoken to, it appears to be the brain of a Githzerai Monk, preserved by mind flayers long ago as a trophy and a delicacy. It can grant a permanent buff to the party member who spoke to it: , in exchange for the promise to purge it afterwards.
All other brains will only give dialogue, though some cast a bit of light upon Balthazar's and Gortash's cooperative experiments in creating magically enhanced tadpoles and honing their impact on infested victims.
Also on the desk lay Mol's Eyepatch and a ![]() Resonance Stone. Picking up the Eyepatch updates the quest. The Resonance Stone radiates magical energy that provides all characters within 9 meters with Steeped in Bliss condition.
Resonance Stone. Picking up the Eyepatch updates the quest. The Resonance Stone radiates magical energy that provides all characters within 9 meters with Steeped in Bliss condition. ![]() Prayer for Forgiveness laying nearby gives some hints concerning the history of the Dark Urge origin.
Prayer for Forgiveness laying nearby gives some hints concerning the history of the Dark Urge origin.
The last notable items on the desk are two ![]() Rune Slates, each requires a
Rune Slates, each requires a ![]() DC 14 Arcana check to be read. Unlike slates found on the Nautiloid, here the inscribed text does not appear as a Narrator line, but written on a grey-coloured paper list (similar to a book layout). Both slates tell about the fall of the Illithid Empire and the fate of the Elder Brain managing the colony.[2]
DC 14 Arcana check to be read. Unlike slates found on the Nautiloid, here the inscribed text does not appear as a Narrator line, but written on a grey-coloured paper list (similar to a book layout). Both slates tell about the fall of the Illithid Empire and the fate of the Elder Brain managing the colony.[2]
Notens and References[edit | edit source]
- ↑ More on Elder Brains and Grand Design
 Elder brain on the Forgotten Realms Wiki,
  Grand Design on the Forgotten Realms Wiki
- ↑ The texts of the slates appear without any regard to success on said check (possible bug?[Needs Verification]), though banter lines of different characters befit the roll results.


