Ad placeholder
Overgrown Ruins: Difference between revisions
(just checked on honour mode) |
|||
| Line 27: | Line 27: | ||
* The Ancient Door on the {{Coords|285|306|Ravaged Beach}} can be opened with {{SkillCheck|Sleight of Hand|20}}. This door leads to the [[Dank Crypt]]. | * The Ancient Door on the {{Coords|285|306|Ravaged Beach}} can be opened with {{SkillCheck|Sleight of Hand|20}}. This door leads to the [[Dank Crypt]]. | ||
* The Hatch by the {{Coords|319|367|Chapel Entrance}} can be opened with {{SkillCheck|Sleight of Hand|20}}. This hatch leads to the [[Dank Crypt]]. | * The Hatch by the {{Coords|319|367|Chapel Entrance}} can be opened with {{SkillCheck|Sleight of Hand|20}}. This hatch leads to the [[Dank Crypt]]. | ||
* The Foundation Block hanging overhead the cracked stone at {{Coords|283|340|}} | * The Foundation Block hanging overhead the cracked stone at {{Coords|283|340|}} can be dropped by attacking it. It will then break the stone. This will allow the party to jump down into the [[Refectory]]. | ||
=== Chapel Entrance === | === Chapel Entrance === | ||
| Line 52: | Line 52: | ||
* The gas vents can be blocked by placing crates, vases, and other similar items on top of them. | * The gas vents can be blocked by placing crates, vases, and other similar items on top of them. | ||
* The vents, grease traps, and gargoyle heads can also be disarmed using a {{SmRarityItem|Trap Disarm Toolkit}}. Given the number of traps, the dearth of toolkits the party will likely have at this early stage of the game, and the fact that a toolkit will be consumed and the trap will be triggered if the attempt fails, this can be a risky option. | * The vents, grease traps, and gargoyle heads can also be disarmed using a {{SmRarityItem|Trap Disarm Toolkit}}. Given the number of traps, the dearth of toolkits the party will likely have at this early stage of the game, and the fact that a toolkit will be consumed and the trap will be triggered if the attempt fails, this can be a risky option. | ||
* The sarcophagus itself can also be disarmed; since this is the only trigger for all of the traps in the room, this is usually a wiser choice than trying to disarm each trap individually. | |||
There is a sarcophagus in the same room {{Coords|-293|-325}} that contains an Engraved Key and {{SmRarityItem|The Watcher's Guide}}. The key opens the large locked heavy oak doors to the north. | There is a sarcophagus in the same room {{Coords|-293|-325}} that contains an Engraved Key and {{SmRarityItem|The Watcher's Guide}}. The key opens the large locked heavy oak doors to the north. | ||
| Line 57: | Line 58: | ||
====Shrine of Jergal==== | ====Shrine of Jergal==== | ||
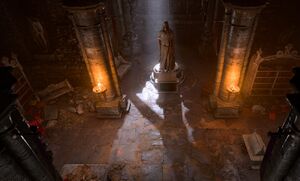
Behind heavy oak doors to the north lies a large, overgrown chamber centered around an imposing, skeletal statue. A {{Ability Check|Religion|15}} identifies the statue as Jergal, the divine scribe and former greater deity of death. There is a hidden button to the west of the statue at {{Coords|298|-232}}; a {{Ability Check|Perception|7}} highlights the button, but is not necessary to reveal it. When pressed, a secret door beside the button will open and the skeletons in the room (four [[Entombed Scribe]]s and one [[Entombed Warrior]]) will come to life and attack the party. | Behind heavy oak doors to the north lies a large, overgrown chamber centered around an imposing, skeletal statue. A {{Ability Check|Religion|15}} identifies the statue as Jergal, the divine scribe and former greater deity of death. There is a hidden button to the west of the statue at {{Coords|298|-232}}; a {{Ability Check|Perception|7}} highlights the button, but is not necessary to reveal it. When pressed, a secret door beside the button will open and the skeletons in the room (four [[Entombed Scribe]]s and one [[Entombed Warrior]]) will come to life and attack the party. | ||
* The enemies can be disarmed before triggering the fight by looting their weapons. This is more useful against the warrior, as the scribes will rarely attack with their staves | * The enemies can be disarmed before triggering the fight by looting their weapons. This is more useful against the warrior, as the scribes will rarely attack with their staves. | ||
* Attempting to manipulate the skeleton's positions by picking up or moving the bodies will instantly trigger combat | * Lighting the candles and braziers throughout the room before the fight will prevent the enemies from capitalizing on the dim light (they all have [[Darkvision]], while some party members may not). Spells such as {{SAI|Fire Bolt}} can be used to light the ones out of reach near the ceiling. | ||
* Attempting to manipulate the skeleton's positions by picking up or moving the bodies will instantly trigger combat. | |||
In a small room west of the shrine can be found a {{SmRarityItem|Soul Coin}} in a sarcophagus. Reading the book {{SmRarityItem|Book of Dead Gods}} requires a successful Arcana or Intelligence Check (if wizard) or Wisdom (if Cleric or Paladin), followed by a Religion ([[DC]] 10) and Investigation ([[DC]] 10) check; succeeding earns the [[File:Inspiration Icon.png|21x21px|link=]][[Inspiration|Inspirational Events]] ''Secrets of the Sundering'' ([[Sage]] background) and ''Divinity Undone'' ([[Acolyte]] background). | In a small room west of the shrine can be found a {{SmRarityItem|Soul Coin}} in a sarcophagus. Reading the book {{SmRarityItem|Book of Dead Gods}} requires a successful Arcana or Intelligence Check (if wizard) or Wisdom (if Cleric or Paladin), followed by a Religion ([[DC]] 10) and Investigation ([[DC]] 10) check; succeeding earns the [[File:Inspiration Icon.png|21x21px|link=]][[Inspiration|Inspirational Events]] ''Secrets of the Sundering'' ([[Sage]] background) and ''Divinity Undone'' ([[Acolyte]] background). A {{SmRarityItem|Scroll of Ray of Enfeeblement}} will fall out of the book upon either succeeding or failing the Religion check. | ||
East of the the shrine near the water, is a ladder leading above to the Chapel Entrance through a locked trapdoor {{Coords|-252|-270}}. A lever next to the ladder will unlock the trapdoor that leads to the hidden hatch on the cliffs at {{Coords|318|362}}. | East of the the shrine near the water, is a ladder leading above to the Chapel Entrance through a locked trapdoor {{Coords|-252|-270}}. A lever next to the ladder will unlock the trapdoor that leads to the hidden hatch on the cliffs at {{Coords|318|362}}. | ||
| Line 68: | Line 70: | ||
==== Withers ==== | ==== Withers ==== | ||
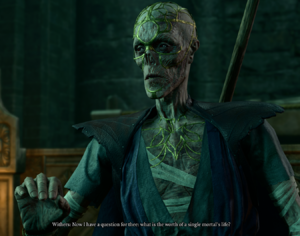
[[File:Withers Rises.png|thumb|Withers, being awoken from his slumber, asks a question.]] | [[File:Withers Rises.png|thumb|Withers, being awoken from his slumber, asks a question.]] | ||
{{CharLink|Withers}} will emerge from a sarcophagus in the secret room, if the sarcophagus is interacted with. He will ask the | {{CharLink|Withers}} will emerge from a sarcophagus in the secret room, if the sarcophagus is interacted with. He will ask the interacting party member a question and then later join the party as a [[Camp follower|follower]] in their camp. Withers will offer resurrection, hireling, and respec services in the camp. Meeting Withers for the first time earns the [[File:Inspiration Icon.png|21x21px|link=]][[Inspiration|Inspirational Event]] ''Unfamiliar Unfamiliarity'' ([[Haunted One]] background). If not visiting the Dank Crypt, Withers will eventually show up at camp, regardless. | ||
{{SmRarityItem|The Amulet of Lost Voices}} can be found inside a chest {{Coords|-293|-233}} in the secret room behind the Shrine of Jergal. | {{SmRarityItem|The Amulet of Lost Voices}} can be found inside a chest {{Coords|-293|-233}} in the secret room behind the Shrine of Jergal. | ||
Revision as of 04:51, 16 October 2024
| Wilderness | ||||
| Emerald Grove | ||||
| ↑ | ||||
| Roadside Cliffs | ← | Overgrown Ruins | → | River Chionthar |
| ↓ | ||||
| Ravaged Beach | ||||
Overview
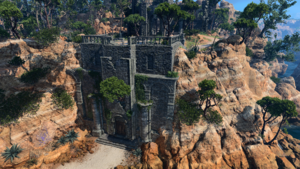
The ruins consist of the exterior location – the Chapel Entrance – and the interior locations Refectory and Dank Crypt.
A group of looters are canvassing the Overgrown Ruins. Gimblebock, Quelenna, Taman, and Warryn stand guard outside in the Chapel Entrance, while Andorn, Barton, Cefrey, Haseid, Mari and Torgga loot the Refectory.[1]
Entering this area will grant the party 10 Experience if at character level 2, 30 XP at level 3, and 40 XP at level 4.
Accessing the ruins
There are four different ways to enter the ruins:
- A Locked Door in the Chapel EntranceX: 285 Y: 375 can be lockpicked
 DC 7 Sleight of Hand check or interacted with to access the Refectory.
 - The Ancient Door on the Ravaged BeachX: 285 Y: 306 can be opened with
 DC 20 Sleight of Hand check. This door leads to the Dank Crypt.
 - The Hatch by the Chapel EntranceX: 319 Y: 367 can be opened with
 DC 20 Sleight of Hand check. This hatch leads to the Dank Crypt.
 - The Foundation Block hanging overhead the cracked stone at X: 283 Y: 340 can be dropped by attacking it. It will then break the stone. This will allow the party to jump down into the Refectory.
Chapel Entrance
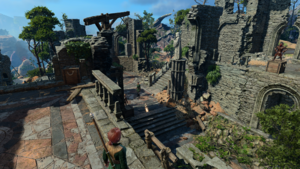
The Chapel Entrance is an exterior location in the Wilderness. It covers the upper section of the Overgrown Ruins. Four looters have set up base here, and are arguing whether to continue looting, or to check out the Nautiloid Wreck to the south. The Chapel Entrance contains a door to the Refectory, and a hidden hatch to the Dank Crypt.
There are also several patches of Twisting Vines, and a loose Cracked Stone that may punish those who forget to watch their step.
Refectory
The Refectory can be accessed via the Chapel Entrance.[2] If the party failed to convince Andorn, the looter guarding the entry to the ruins, to let them in peacefully, there will be a trap near the entrance door, and the looters inside will be alert, grouped, and ready for combat.
An Ornate Door with no visible lock or handle leads into the Dank Crypt, and can be opened by using a hidden switch behind a statue X: -174 Y: -362. Succeeding at a Perception check is required to spot the switch. If the party fails to spot this switch, Dank Crypt can still be accessed by either destroying the door, or by lockpicking the Ancient Door found at the Ravaged Beach. Alternatively, when approaching Refectory from the Dank Crypt, this ornate door can be opened by lighting up the two candles adorning it.
If the Digital Deluxe Upgrade was purchased, the ![]() Portrait of Fane can be found on the wall in the entrance chamber.
Portrait of Fane can be found on the wall in the entrance chamber.
Dank Crypt
The Dank Crypt (also known as Temple Ruins) is strewn with ancient sarcophagi and largely overgrown. One of the walls has collapsed, revealing a seaside cave that leads back to the Roadside Cliffs. A large statue of the god Jergal sits in the lower courtyard.
Trapped sarcophagus
The southern room with a sarcophagus in the middle is heavily trapped. When the sarcophagus is opened, gargoyle heads lining the west and east walls will start firing firebolts into the room. Meanwhile, gas vents will start pouring flammable gas into the room, and Grease traps will flood the ground with slippery, Difficult Terrain and additional flammable surfaces. All of these traps require ![]() DC 15 Perception check to spot. On the middle pillar on the eastern side of the room is a button that will turn off the traps, but only after they have been triggered; it does not require a perception check to spot.
DC 15 Perception check to spot. On the middle pillar on the eastern side of the room is a button that will turn off the traps, but only after they have been triggered; it does not require a perception check to spot.
- The gas vents can be blocked by placing crates, vases, and other similar items on top of them.
- The vents, grease traps, and gargoyle heads can also be disarmed using a
 Trap Disarm Toolkit. Given the number of traps, the dearth of toolkits the party will likely have at this early stage of the game, and the fact that a toolkit will be consumed and the trap will be triggered if the attempt fails, this can be a risky option.
 - The sarcophagus itself can also be disarmed; since this is the only trigger for all of the traps in the room, this is usually a wiser choice than trying to disarm each trap individually.
There is a sarcophagus in the same room X: -293 Y: -325 that contains an Engraved Key and ![]() The Watcher's Guide. The key opens the large locked heavy oak doors to the north.
The Watcher's Guide. The key opens the large locked heavy oak doors to the north.
Shrine of Jergal
Behind heavy oak doors to the north lies a large, overgrown chamber centered around an imposing, skeletal statue. A ![]() DC 15 Religion check identifies the statue as Jergal, the divine scribe and former greater deity of death. There is a hidden button to the west of the statue at X: 298 Y: -232; a
DC 15 Religion check identifies the statue as Jergal, the divine scribe and former greater deity of death. There is a hidden button to the west of the statue at X: 298 Y: -232; a ![]() DC 7 Perception check highlights the button, but is not necessary to reveal it. When pressed, a secret door beside the button will open and the skeletons in the room (four Entombed Scribes and one Entombed Warrior) will come to life and attack the party.
DC 7 Perception check highlights the button, but is not necessary to reveal it. When pressed, a secret door beside the button will open and the skeletons in the room (four Entombed Scribes and one Entombed Warrior) will come to life and attack the party.
- The enemies can be disarmed before triggering the fight by looting their weapons. This is more useful against the warrior, as the scribes will rarely attack with their staves.
- Lighting the candles and braziers throughout the room before the fight will prevent the enemies from capitalizing on the dim light (they all have Darkvision, while some party members may not). Spells such as can be used to light the ones out of reach near the ceiling.
- Attempting to manipulate the skeleton's positions by picking up or moving the bodies will instantly trigger combat.
In a small room west of the shrine can be found a ![]() Soul Coin in a sarcophagus. Reading the book
Soul Coin in a sarcophagus. Reading the book ![]() Book of Dead Gods requires a successful Arcana or Intelligence Check (if wizard) or Wisdom (if Cleric or Paladin), followed by a Religion (DC 10) and Investigation (DC 10) check; succeeding earns the
Book of Dead Gods requires a successful Arcana or Intelligence Check (if wizard) or Wisdom (if Cleric or Paladin), followed by a Religion (DC 10) and Investigation (DC 10) check; succeeding earns the ![]() Inspirational Events Secrets of the Sundering (Sage background) and Divinity Undone (Acolyte background). A
Inspirational Events Secrets of the Sundering (Sage background) and Divinity Undone (Acolyte background). A ![]() Scroll of Ray of Enfeeblement will fall out of the book upon either succeeding or failing the Religion check.
Scroll of Ray of Enfeeblement will fall out of the book upon either succeeding or failing the Religion check.
East of the the shrine near the water, is a ladder leading above to the Chapel Entrance through a locked trapdoor X: -252 Y: -270. A lever next to the ladder will unlock the trapdoor that leads to the hidden hatch on the cliffs at X: 318 Y: 362.
On the body of one of the Entombed Scribes X: -311 Y: -252 a ![]() Heavy Key can be found. This key unlocks the Ancient Door near the trapped sarcophagus that leads to the Ravaged Beach.
Heavy Key can be found. This key unlocks the Ancient Door near the trapped sarcophagus that leads to the Ravaged Beach.
Withers
Withers will emerge from a sarcophagus in the secret room, if the sarcophagus is interacted with. He will ask the interacting party member a question and then later join the party as a follower in their camp. Withers will offer resurrection, hireling, and respec services in the camp. Meeting Withers for the first time earns the ![]() Inspirational Event Unfamiliar Unfamiliarity (Haunted One background). If not visiting the Dank Crypt, Withers will eventually show up at camp, regardless.
Inspirational Event Unfamiliar Unfamiliarity (Haunted One background). If not visiting the Dank Crypt, Withers will eventually show up at camp, regardless.
![]() The Amulet of Lost Voices can be found inside a chest X: -293 Y: -233 in the secret room behind the Shrine of Jergal.
The Amulet of Lost Voices can be found inside a chest X: -293 Y: -233 in the secret room behind the Shrine of Jergal.
Other information
- There is a sarcophagus in the southern trapped room X: -293 Y: -325 that contains an Engraved Key and
 The Watcher's Guide. The key opens the large locked heavy oak doors to the north.
 - There is a Heavy Key on the body of an Entombed Scribe X: -311 Y: -252. This key unlocks the Ancient Door near the trapped sarcophagus that leads to the Ravaged Beach.
 The Amulet of Lost Voices can be found inside a chest X: -293 Y: -233 in the secret room behind the Shrine of Jergal.
- East of the room with the Entombed Scribes, near the water, is a ladder leading above to the Chapel Entrance through a locked trapdoor X: -252 Y: -270. A lever next to the ladder will unlock the trapdoor.
- It is possible to access the Dank Crypt from the outside by lockpicking the same hatch to the east of the Chapel Entrance X: 318 Y: 362.
Characters
Camp followers
Looters
Creatures
Related quests
Notable loot
Notable items obtained in this location, whether looted, purchased, or obtained as a quest reward:
 Ancient Scroll - in a vase at X: -189 Y: -313
 Book of Dead Gods
 Heavy Key - on an entombed scribe at X: -310 Y: -252
 Portrait of Fane - on the wall at X: -182 Y: -296[3]
 Scroll of Protection from Evil and Good - in a gilded chest at X: -281 Y: -301
 Soul Coin - in a sarcophagus at X: -324 Y: -274
 Soul Coin - in a sarcophagus near the south exit
 Soul Coin - in Withers's sarcophagus at X: -293 Y: -226
 The Amulet of Lost Voices
 The Watcher's Guide
Notes
- ↑ If the party dropped the Foundation Block through the floor of the Chapel Entrance, the looters inside will automatically be hostile.
- ↑ In early access this area was known as the Bedchamber
- ↑ Only available if the Digital Deluxe Upgrade was purchased


