Ad placeholder
Abandoned Refuge: Difference between revisions
Llamageddon (talk | contribs) (→Connected Locations: Moved The Admantine Forge to 'sub-locations', to indicate this location surrounds that one.) |
HiddenDragon (talk | contribs) mNo edit summary |
||
| (42 intermediate revisions by 10 users not shown) | |||
| Line 1: | Line 1: | ||
{{ | {{Location page | ||
| prefix = The | |||
| | | name = Abandoned Refuge | ||
| | | alt name prefix = the | ||
| alt name = Ancient Forge | |||
| image = Screen Forgotten Temple West from Abandoned Refuge.jpg | |||
| image description = The view, looking West, upon entering the [[Ancient Temple]] area | |||
| act = one | |||
| summary = It is south of and adjacent to [[Grymforge]], and home to the [[Adamantine Forge]] and serves as a connecting landmass between the former and the latter, and overlooks [[Ancient Temple]]. | |||
| region prefix = the | |||
| region = Underdark | |||
| north = Grymforge | |||
| west = | |||
| east = | |||
| south = Adamantine Forge | |||
}} | }} | ||
[[File:Screen | == Overview == | ||
[[File:Screen Abandoned Refuge Mithral Vein East.jpg|thumb|Looking East, towards a [[Mithral Ore|Mithral]] vein, near [[The Adamantine Forge]]]] | |||
The terrain of the Abandoned Refuge consists of crumbling architecture interspersed with caverns and lava flows, which frequently require jumping, or similar measures, to navigate. In this area, the player may discover two Mithral veins, from which they can extract {{SmRarityItem|Mithral Ore}}. This can be used in the adjoining [[The Adamantine Forge (Location)|Adamantine Forge]] location. | |||
== | === Regional locations === | ||
*[[Ancient Temple]]: An inaccessible location overlooking a temple complex.{{note|This is the [[Gauntlet of Shar]], which can be reached after travelling to the [[Shadow-Cursed Lands]] in Act Two.}} | |||
*[[Grymforge]]: The access location. | |||
=== The Adamantine Forge === | |||
{{hatnote|Main article: [[Adamantine Forge]]}} | |||
South-east of the Ancient Forge waypoint and down a set of broken stairs is the Adamantine Forge. The forge can be used to create armour or a weapon by loading it with a piece of {{SmRarityItem|Mithral Ore}} and a mould. There are only two pieces of ore available, so only two items total can be crafted. | |||
== Points of interest == | |||
=== Mithral veins === | |||
[[File:Screen Abandoned Refuge Crumbling Island.jpg|thumb|The Crumbling Island, lake of bubbling lava, and patrolling [[Lava Elemental]]]] | |||
* North East of the Adamantine Forge, across some lava, against the cavern wall. {{Coords|-556|277}} | |||
* North West of '''Abandoned Refuge''', across some lava, next to a cliff. ([[Ancient Temple]]) {{Coords|-642|253}} | |||
=== Landmarks === | |||
* A Crumbling Island: West of ''The Adamantine Forge'', in the middle of a small lake of bubbling lava. {{Coords|-672|223}} | |||
**{{RarityItem|Adamantine Chest}} containing {{RarityItem|Sentient Amulet (Rare)}}. | |||
** The perimeter is patrolled by a non-hostile [[Lava Elemental]]. | |||
== Waypoints == | == Waypoints == | ||
* | The Abandoned Refuge contains the following waypoint: | ||
* {{WpCo|Underdark - Ancient Forge|-612|294}} | |||
== Related quests == | |||
*{{Quest|Help the Cursed Monk}} | |||
*{{Quest|Talk to the Sentient Amulet}} | |||
*{{Quest|The Adamantine Forge (Quest)|The Adamantine Forge}} | |||
== | == Notable characters == | ||
[[ | Numbers are based on [[Difficulty#Balanced|Balanced]] difficulty. | ||
* | * {{MdCharLink|Animated Armour}} x4 | ||
* | * {{MdCharLink|Lava Elemental}} x1 | ||
* {{MdCharLink|Magma Mephit}} x9 | |||
=== | == Notable loot == | ||
=== Quest items=== | |||
* | {{div col}} | ||
* {{MdRarityItem|Mithral Ore}} x2 | |||
* {{MdRarityItem|Sentient Amulet}} | |||
{{div col end}} | |||
== | === Moulds === | ||
* | {{div col}} | ||
* {{MdRarityItem|Mace Mould}} | |||
* {{MdRarityItem|Longsword Mould}} | |||
* {{MdRarityItem|Scale Mail Mould}} | |||
* {{MdRarityItem|Scimitar Mould}} | |||
* {{MdRarityItem|Shield Mould}} | |||
* {{MdRarityItem|Splint Mould}} | |||
{{div col end}} | |||
== | === Other notable === | ||
{{div col}} | |||
* {{MdRarityItem|Dark Justiciar Mail}} | |||
* | * {{MdRarityItem|Dark Justiciar Mask}} | ||
* {{MdRarityItem|Elixir of Arcane Cultivation}} | |||
* {{MdRarityItem|Elixir of Fire Resistance}} | |||
* {{MdRarityItem|Merregon Halberd}} x2, - near skeletons on lesser basalt islands, close to cave walls ({{Coords|-600|199}}, {{Coords|-646|217}}) | |||
{{div col end}} | |||
== | == Gallery == | ||
<gallery> | |||
Screen Map Abandoned Refuge.jpg|A map view of Abandoned Refuge and The Adamantine Forge. | |||
</gallery> | |||
== | == Notes == | ||
{{notelist}} | |||
{{Grymforge}} | |||
[[Category:Locations]] | [[Category:Locations]] | ||
[[Category: | [[Category:Act One Locations]] | ||
Latest revision as of 08:52, 18 August 2024

| Underdark | ||||
| Grymforge | ||||
| ↑ | ||||
| Abandoned Refuge | ||||
| ↓ | ||||
| Adamantine Forge | ||||
Overview[edit | edit source]

The terrain of the Abandoned Refuge consists of crumbling architecture interspersed with caverns and lava flows, which frequently require jumping, or similar measures, to navigate. In this area, the player may discover two Mithral veins, from which they can extract ![]() Mithral Ore. This can be used in the adjoining Adamantine Forge location.
Mithral Ore. This can be used in the adjoining Adamantine Forge location.
Regional locations[edit | edit source]
- Ancient Temple: An inaccessible location overlooking a temple complex.[note 1]
- Grymforge: The access location.
The Adamantine Forge[edit | edit source]
South-east of the Ancient Forge waypoint and down a set of broken stairs is the Adamantine Forge. The forge can be used to create armour or a weapon by loading it with a piece of ![]() Mithral Ore and a mould. There are only two pieces of ore available, so only two items total can be crafted.
Mithral Ore and a mould. There are only two pieces of ore available, so only two items total can be crafted.
Points of interest[edit | edit source]
Mithral veins[edit | edit source]

- North East of the Adamantine Forge, across some lava, against the cavern wall. X: -556 Y: 277
- North West of Abandoned Refuge, across some lava, next to a cliff. (Ancient Temple) X: -642 Y: 253
Landmarks[edit | edit source]
- A Crumbling Island: West of The Adamantine Forge, in the middle of a small lake of bubbling lava. X: -672 Y: 223
 Adamantine Chest containing
  Sentient Amulet (Rare).
- The perimeter is patrolled by a non-hostile Lava Elemental.
Waypoints[edit | edit source]
The Abandoned Refuge contains the following waypoint:
 Underdark - Ancient Forge X: -612 Y: 294
Related quests[edit | edit source]
Notable characters[edit | edit source]
Numbers are based on Balanced difficulty.
- Animated Armour x4
- Lava Elemental x1
- Magma Mephit x9
Notable loot[edit | edit source]
Quest items[edit | edit source]
Moulds[edit | edit source]
Other notable[edit | edit source]
 Dark Justiciar Mail
 Dark Justiciar Mask
 Elixir of Arcane Cultivation
 Elixir of Fire Resistance
 Merregon Halberd x2, - near skeletons on lesser basalt islands, close to cave walls (X: -600 Y: 199, X: -646 Y: 217)
Gallery[edit | edit source]
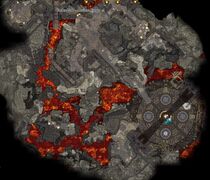
A map view of Abandoned Refuge and The Adamantine Forge.

Notes[edit | edit source]
- ↑ This is the Gauntlet of Shar, which can be reached after travelling to the Shadow-Cursed Lands in Act Two.