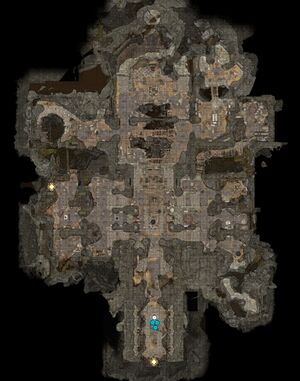
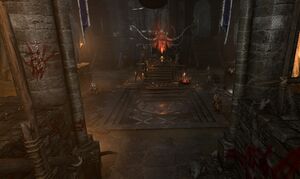
The Shattered Sanctum (also known as The Temple of Selûne) is a location within the Wilderness in Act One. It is the interior area of the Goblin Camp, and leads to the Defiled Temple and Worg Pens.
War Drums scattered throughout the ruined temple will turn the entire population hostile, if played.
| Wilderness | ||||
| Worg Pens | ||||
| ↑ | ||||
| Defiled Temple | ← | Shattered Sanctum | ||
| ↓ | ||||
| Goblin Camp | ||||
Spoiler warning: The following content contains unhidden spoilers. Read at your own risk. |
Connected locations
 Goblin Camp
- Through Heavy Oak Doors X: 297 Y: -85
- Through Collapsed Corridor X: 312 Y: -31 (Wall in goblin camp must be broken first)
 Defiled Temple
- Through Priestess's ChambersX: 253 Y: -7
- Through Cave Mouth X: 283 Y: 15
 Worg Pens X: 342 Y: 31
Overview
Entryway
The main entrance from the Goblin Camp leads directly into here. With six goblins guarding here, there is no way to get by them outside of using Invisibility. Approaching will lead to you being questioned by Warrior Trinzas, who can be bypassed through a variety of skill checks, or by being a Drow (or as a Drow). If you have also progressed Save the Goblin Sazza, Sazza will help you bypass this point.
Centre
Branding station
On of the largest sections of the Sanctum where Priestess Gut brands new devotees to the Absolute. Here you can meet the cult leader to get the Brand of the Absolute. If the priestess becomes indisposed for one reason or another, Warlock Greez can brand members of the party.
Spider pit
Just north of Gut's shrine is a large spider pit, where the goblins toss in prisoners. If the party ventures into the pit using the lever-operated Iron Gate (X: 298 Y: 0), they can talk to the pit's denizens Larger Giant Spider and Smaller Giant Spider. The spiders can be convinced to spare the party and instead attack the goblins.
A cave passage within the pit connects to the prison cell in the Defiled Temple.
West
Zhent storeroom
Starting from the southeastern corner, you will find Roah Moonglow, a Zhentarim trader alongside some of her partners. She is a useful Trader who can reappear in Act Two at Moonrise Towers. Behind her is a storeroom holding the cult's large supply of Firewine and Smokepowder Barrels. There are six of each, more than enough for setting up an explosive trap. Besides fighting past the guards, one can jump down from the rafters above; alternatively small-sized characters can fit through a Rocky Crevice (X: 255 Y: -42) from the Defiled Temple (Temple coordinates:X: 422 Y: 17). Miscellaneous crates in the room can also be searched for grenades and weapon coatings, and a locked chest (![]() DC 18 Sleight of Hand check) can be picked for several hundred gold.
DC 18 Sleight of Hand check) can be picked for several hundred gold.
Gut's room
Further north is Gut's workroom, where she'll lead a party member as part of her trap. If you don't want to drink her potion, she can be safely killed here so long as she doesn't get the chance to . One way to guarantee this is to literally stymie her screams by casting . There is also a way into the locked storeroom through the rafters here, reachable by someone with decent Strength or mobility spells such as Enhance Leap.
East
"Pigeon" cage
Gribbo keeps her "pigeon" Volo locked up in a cage at X: 332 Y: -9. The party can trick Gribbo into negotiating his release with an ability check. When Volo is freed, he will immediately head to the party's campsite.
North of this room is the rickety wooden walkway leading to the Worg Pens. An iron ladder on the west side of this room connects of Minthara's room.
Loviatar's lounge
In a chamber on the east side of the initiation hall is a shrine dedicated to Loviatar, occupied by her servant Abdirak. Abdirak can give the player character the permanent bonus , provided they subject themselves to his sadomasochistic religious ritual and successfully pass a series of ability checks.
Torture rack
Liam, the unfortunate straggler from Aradin's adventuring party, is tied to the torture rack at X: 336 Y: -34. He can be spoken to privately by intimidating or manipulating Torturer Spike into shirking his duties. Spike and Lookout Gresh will go next door, into Abdirak's room, if convinced to stop torturing Liam. Alternatively, the party can choose to torture Liam, and if successful he will reveal the location of the Grove. Spike will then report the information to Minthara, and the party can then talk to Liam and choose to free him.
North
Ragzlin's throne
Dror Ragzlin's throne room lies at the north side of the temple. In it, the hobgoblin warlord communes with a Mind Flayer corpse. Taking part in this ritual will reveal much about the Cult of the Absolute, but requires ability checks to avoid incriminating yourself as their enemy. The room is layered with a web of shadowed rafters to allow for easy high-ground ambushing.
A glittering pile of loot and treasure lies at the far north end of the room, behind a locked iron gate (![]() DC 18 Sleight of hand check or use
DC 18 Sleight of hand check or use ![]() Dror Ragzlin's Key).
Dror Ragzlin's Key).
Minthara's war room
The ruthless Drow True Soul Minthara and the goblin bosses Zurga, Skrut, and Rozzak reside in the room directly to the east of the throne room. The room is split by a rickety wooden bridge, held up by destructible wooden supports, and patrolled by a Scrying Eye that broadcasts activity to the Cult of the Absolute's shadowy leadership. Talking to Minthara will give the party the option to reveal the location of the Emerald Grove and launch a raid, either to defeat the goblin forces away from their home turf, or to crush the druids and tieflings in earnest.
Be warned that if the party saved Sazza earlier, she will reveal the location of the druid grove automatically, provided the party doesn't kill her through the dialogue with Minthara or use a specific dialogue option (I will have nothing to do with this then I have to do something first, which will also unlock the opportunity to save both Sazza and Minthara). Once the grove's location has been revealed, one way or another, the raid will take place after the next long rest. If the party kill or knock out Minthara and kill Dror Ragzlin and Gut all before a long rest then the raid won't happen anymore.
An iron ladder on the east side of the room connects to the Worg Pens antechamber.
Notable characters
Related quests
Notable loot
Notable items obtained in this location, whether looted, purchased, or obtained as a quest reward:
| Item | Location |
|---|---|
| Looted from Priestess Gut | |
| Looted from Priestess Gut | |
| Looted from the treasure crates at X: 297 Y: 68 | |
| Rewarded for completing Save the Goblin Sazza, upon speaking to Minthara | |
| Looted from Minthara | |
| Looted from Dror Ragzlin | |
| Looted from the treasure crates at X: 297 Y: 68 | |
| Standing up by the torture rack at X: 336 Y: -34 | |
| Looted from Abdirak at X: 338 Y: -22 | |
| On a table beside Abdirak at X: 337 Y: -26 | |
| On a table beside Abdirak at X: 337 Y: -26 | |
| On a skeleton in a sarcophagus at X: 338 Y: 15[1] | |
| Looted from Minthara | |
| Looted from the treasure crates at X: 297 Y: 68 | |
| In a Gilded Chest at X: 339 Y: 41 | |
| Looted from Minthara |
Footnotes
- ↑ Can be easily missed, as this skeleton is not highlighted when showing item labels.


