Ad placeholder
Defeat the Goblins

Defeat the Goblins is a sub-Quest of the Druid Grove's main quest Save the Refugees in Act One. It can be initiated by speaking with Zevlor after Kagha asks the party to aid them.
Objectives[edit section | visual editor]
Objectives and journal entries may vary pending story decisions and outcomes.
Walkthrough[edit section | visual editor]

This quest can be obtained by speaking to Kagha in the Inner Sanctum of the Druid Grove. Kagha blames the outlanders for bringing trouble to the Grove and wants them gone. Seeing how the party defeated the goblin raiders at the Grove's entrance, Kagha believes they could work as hired swords. She orders the party to offer their services to the tieflings so that they leave, and states they have until the end of the Rite of Thorns to do so.
Speak to Zevlor in the Secluded Chamber in the Hollow. Choosing "Leaving the grove is the best option. How can I help?" lets Zevlor explain that while he and his refugees want to leave, the roads are infested with goblins. It would be a death sentence for them to go back on the roads. He explains that defeating the goblin leaders would cause enough disarray for the tieflings to safely leave. This starts the journey to the Goblin Camp to defeat the leaders.
Entering the Goblin Camp[edit section | visual editor]
There are various check-point encounters on the path to the proper Goblin Camp. There are several different options to approach these encounters, including but not limited to:
- Carrying out a frontal attack
- This approach may lead to turning the entire camp hostile if an alarm drum is successfully sounded.
- Using a mixture of diplomacy checks, such as Intimidation and Deception
- Alternatively, a player character can brute force through all diplomacy checks by utilizing Illithid Persuasion.
- Drow, or characters disguised as one via the Disguise Self spell, also have special dialogue options that help bypassing diplomacy checks.
- Avoiding the check-points through Stealth or finding an alternative path (i.e. approaching the camp from the North-West)
- Saving Sazza in Save the Goblin Sazza and allowing her to smooth the way through
If successfully bypassing the check-points and entering the camp proper, it is possible to freely partake in the camp activities, converse with the celebrating Goblins, and take on various side quests (more information on the Goblin Camp page). Specifically for this quest, the party must continue and venture into the interior of the temple.
The Shattered Sanctum[edit section | visual editor]

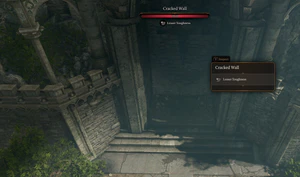
There are three entrances into the Shattered Sanctum - the Heavy Oak Doors at X: 105 Y: 454, the Passageway at X: 51 Y: 476, and the Cracked Wall on the 2nd level of the camp at X: -106 Y: 481.
The Heavy Oak Doors:
- This entrance is guarded by Warrior Trinzas, who can be persuaded through diplomacy, Tadpole Powers, or Drow special dialogue like the previous check-points.
- Violence is always a viable alternative, however, there is a risk the fighting draws the attention of other goblins in the area, leading to the alarms being sounded and the goblins turning hostile.
The Passageway:
- The path to this entrance is "guarded" by three Blast Mines (two charged with Poison Cloud and one with Explosion). Entering by this way places the party at the southeast corner of the Shattered Sanctum.
The Cracked Wall:
- The wall is an object with 22 Hit Points, Sturdy, and immunity to all damage types except piercing (resistant), and force (vulnerable).
- This makes force-damage items/spells/abilities that can clear the 10 damage threshold - like Smokepowder Bombs or Eldritch Blast - ideal for breaking this wall.
- There are sleeping guards situation close to the wall. If using the Silence spell on the explosion or the guards to cover the noise, a confrontation can be avoided.
There is a fourth entrance to the temple from the Selûnite Outpost in the Underdark, but it is inaccessible externally, and requires to be opened from inside of the Shattered Sanctum first via the Stone Discs or the wall lever. Also the gate to the Selûnite Outpost cannot be opened from the outside. However, it is possible to enter through a window that can be accessed by climbing some cliffs near the area in which the encounter with a Spectator takes place.
Killing the Goblin leaders[edit section | visual editor]
Once inside the Shattered Sanctum, the party can proceed to kill all of the goblin leaders. Paladins (all subclasses) get special class dialogue when approaching each leader, typically causing combat to begin immediately.
Priestess Gut[edit section | visual editor]
Priestess Gut can be found in front of the giant throne immediately north of the front entrance at X: 297 Y: -18. She offers to brand the party with the Brand of the Absolute, which can be accepted or rejected. Regardless of whether the brand is taken or not, Gut recognizes the party as fellow True Souls. She attempts to probe into the party's minds with her illithid powers. Allowing her to do this, results in her noticing that something is amiss. Explaining that it is the result of the tadpoles and asking if she can help, commences Ask the Goblin Priestess for Help. Gut says that the party should join her in her private chambers.
Following her to her chambers, lets her she saying that she has a cure for the tadpole. She says that a special cleansing potion must be taken first. However, an Arcana check reveals this is a sleeping potion. If she is called out on this, or if the party member in question is resistant to sleeping potions (i.e. a drow, elf or half-elf), she becomes hostile and also triggers several nearby goblins to become hostile. However, if the potion is taken, she chains up the party member and says she intends for them to become her pet squid. It is possible to either break free with an Acrobatics or Strength check, but a special scene plays if nothing is done at all. Korrilla appears from a portal to assassinate both Gut and her Ogre guard. Then she disappears after a brief conversation, warning the party to be more careful.
Minthara[edit section | visual editor]
The drow Minthara can be encountered in the northeastern corner of the Shattered Sanctum at X: 333 Y: 42. There is a Scrying Eye that must be dealt with before defeating her, otherwise the camp is alerted. Minthara can easily be taken out after speaking with her, as she runs across the bridge to gather the troops. While she is running on the bridge, attack the bridge's posts and she falls into the chasm below. Otherwise, once the scrying eye is dealt with, only Minthara and her minions in the room become hostile, so the other two leaders can still be dealt with stealthily. If Minthara is only knocked out instead of killed, she later can be recruited to the party in Act Two.
Dror Ragzlin[edit section | visual editor]
Dror Ragzlin is unique in that he is the only member of the trio that cannot be killed with stealth. If killing Ragzlin, no matter how, the entire camp becomes hostile. For this reason, it is best to wrap up all business in the goblin camp and acquire the waypoint in the Selune Outpost below the Shattered Sanctum before killing him.
Dror Ragzlin is in the throne room to the north, casting Speak with Dead on an illithid corpse at X: 296 Y: 40. A cutscene automatically plays as the party enter the room, with Ragzlin asking if they would like to speak to a squid.
If Ragzlin is allowed to commune with the illithid on his own, its killer is revealed to be the party after the second question. This can be avoided by taking control of Ragzlin's questions with a DC 10 Wisdom Check and asking questions other than who is the killer such as "Why was the Nautiloid in Faerûn?" Asking an obvious question like "Who is the Absolute?" causes Ragzlin to be suspicious of the party. Otherwise, if the party is caught out at being the illithid's killer, they can talk Ragzlin down through a Persuasion check or by using Detect Thoughts to reveal that he likes being called the Absolute's Right Hand.
Returning to the Grove[edit section | visual editor]
Upon returning to the Grove, Zevlor approaches the party and states his scouts brought news that the goblin leaders have been defeated. He thanks the party and states that the refugees pooled up their gold to reward the party, which they can either accept or refuse. The reward includes gold in addition to a helmet Wapira's Crown, which cannot be acquired otherwise. Then, he tells the party that the tieflings plan to celebrate and offers to go with the party to camp immediately or later.
If Halsin has not been rescued as part of Rescue the Druid Halsin then he escapes on his own and appears back in the Grove.
Alternative solution: Starting the Raid on the Grove[edit section | visual editor]
Double-Crossing Minthara[edit section | visual editor]
Alternatively, the quest can be completed without killing all three goblin leaders. After initialising the raid on the grove by talking with Minthara, it is possible to double-cross her. First, Halsin must be freed in the Worg Pens but left there. Then, after agreeing with Minthara to seize the grove, the party must talk to Halsin in the Worg Pens. After informing Halsin that Minthara has left for the grove, he urges the party to head to the grove and defend it against the raid. At this point, a long rest is required to trigger the raid. Long resting directly after Minthara leaves for the grove but before Halsin has been spoken to results in a successful raid and the slaughter of all tieflings and druids in the grove.
Defending the Emerald Grove[edit section | visual editor]
At the Emerald Grove, the party must side with the Tiefling defenders. If the goblin forces are defeated and Minthara is killed or knocked out, then the quests Rescue the Druid Halsin and Defeat the Goblins are completed without killing Dror Ragzlin and Gut. If Minthara is knocked out instead of killed, she can be recruited as Companion in Act Two.
Quest rewards[edit section | visual editor]
- A Headless Horde ( Soldier background)
Notes[edit section | visual editor]
- While it was believed that the quest would transition after a certain number of long rests, this has been proven false. Proxy Gate Tactician (2023-09-08). Busting More Myths in Baldur's Gate 3. YouTube. Retrieved 2023-10-21.


