| Loyal Warrior | |||||||
| Shadowheart | |||||||
|---|---|---|---|---|---|---|---|

| |||||||
| Stats | |||||||
| Level 1 | |||||||
| |||||||
| High Half-Elf | |||||||
| Humanoid | |||||||
| 10 | |||||||
| 15 | |||||||
| 9m / 30ft | |||||||
| Medium | |||||||
| 55kg / 110lbs | |||||||
| +2 | |||||||
| +1 | |||||||
| Passive features | |||||||
|
| |||||||
| Character information | |||||||
| Class | Trickery Domain Cleric | ||||||
| Background | Acolyte | ||||||
| Location | Nautiloid | ||||||
| Family | Arnell Hallowleaf (father), Emmeline Hallowleaf (mother) | ||||||
| Allies | Shar | ||||||
| Enemies | Selûne | ||||||
| In-game | |||||||

| |||||||
Origin characters can be played as the main character, otherwise, they can be recruited as a companion early on.
We're in this together, but I'll happily go it alone. My faith will keep me company.— Shadowheart's strong devotion.
Gameplay
As a Cleric, Shadowheart is capable of casting spells, healing and buffing allies, and tanking damage for her party. Her subclass is Trickery Domain, allowing her to cast a variety of stealth and illusion magic not normally available to Clerics.
Proficiencies
Equipment
Saving Throws
Skills
Spells Known
As a Cleric, Shadowheart automatically knows all non-cantrip Cleric spells.
Level 1 Spells Known
Cantrips Known
 Guidance
 Resistance
 Sacred Flame
 Fire Bolt (from High Half-Elf)
Recruitment
Shadowheart can be recruited in Chapter One.
- Shadowheart is first encountered on the Nautiloid during the Prologue, trapped inside a Mind Flayer pod. She can be freed by interacting with the nearby console or using certain class-restricted dialogue options on the pod. If she is freed, she will join the party as a temporary companion. Upon escaping the Nautiloid, she leaves the party.
- Shadowheart is encountered again a second time at the Ravaged Beach inside the Wilderness. If she was freed from the pod during the Prologue, she will be unconscious on the ground and wake up when interacted with. If she was not freed, she will instead be found attempting to gain entry to the nearby Dank Crypt. Either way, she can be invited to join the party after speaking with her.
- If Shadowheart is not interacted with at the Ravaged Beach, she will move to the Druid Grove on her own in search of a healer. She can be spoken with there and invited to join the party.
Background
A loyal cleric of Shar, Shadowheart is the sole survivor of a holy mission undertaken on the Mistress of the Night's behest. She alone must deliver a relic of immense power to her coven in Baldur's Gate, while threatened by a strange new magic that is burgeoning from within.
Personal Quest
Shadowheart's Companion Quest is: Daughter of Darkness.
Personality
Shadowheart is guarded and hesitant to reveal information about herself, her motives, or the relic she carries. She displays a particular distrust of Githyanki such as Lae'zel. Often, she seems indifferent to the plight of others; however, she does not explicitly take pleasure in their suffering, and will disapprove of unnecessary cruelty and violence. She will usually approve of finding non-violent solutions to situations, and treating animals and children with compassion. Above all, Shadowheart values pragmatism.
Interactions
Approval
Shadowheart likes finding pragmatic and efficient solutions to problems. She appreciates discretion, privacy, and open-mindedness. Shadowheart generally responds well to acts of heroism.
The following story and dialogue choices will cause Shadowheart to gain approval.
![]() Spoiler warning! This section reveals details about the story of Baldur's Gate 3.
Spoiler warning! This section reveals details about the story of Baldur's Gate 3.
Act 1
- Free her from her pod aboard the Nautiloid (Actual approval occurs when meeting at the Ravaged Beach). (+10 Approval)
- Accept Astarion's apology when you meet him and say you would have done the same. (+1 Approval)
- Persuade the Tieflings to let Lae'zel go without a fight.
- Ask Lae'zel to say 'please' after rescuing her. (+1 Approval)
- Use Animal Handling to calm the Scared Boar found near Astarion or tell it (Speak with Animals) that you will not hurt it. (+1 Approval)
- Kill the skeletons inside the Dank Crypt and trigger her "!", tell her you agree with her.
- Read the Book of the Dead Gods inside Dank Crypt and succeed the Religion Check.
- Decline the devil's offer to remove the tadpole.
- Tell her you would never trust a devil.
- Tell Andrick and Brynna to forget the owlbear and go away.
- Give scent (Animal Handling) to Scratch so he can come to the Camp or tell Scratch (Speak with Animals) he can come to the Camp.
- When entering the Sunlit Wetlands, pass the check to break the illusion, then BAA at the redcaps when you speak to them.
- Demand that Crusher kiss your foot.
- Agree to Abdirak's ritual for Loviatar.
- Convince the spiders in the pit that goblins taste better than you
- Pass the Deception Check when speaking to the Githyanki Patrol.
- When she has odd magical flare-up, choose to change the subject and ignore it.
- Pet the Owlbear Cub or send him to your camp.
- Save Rugan, then use Persuasion to convince him to sell his employer's wares.
- Use Persuasion/Intimidation to get Aradin and Zevlor to stop fighting or stand back and watch. (+1 Approval)
- Refuse to help Zevlor persuade Kagha to let the Tieflings stay. (+1 Approval)
- Use Deception/Intimidation to Convince Nadira to give you her Soul Coin after saving her from a Bugbear Assasin. (1+ Approval)
- Tell Arka to seek vengeance and spill some goblin blood over Kanon's death. (+1 Approval)
- Tell Rolan, Lia and Cal to leave the Grove while they still can. (+1 Approval)
- Persuade Arka not to kill Sazza.
- Show the Tiefling Guex how to fight.
- Rally the Tiefling children during their training.
- Do not allow Lae'zel to force Zorru to bow during interaction.
- Using the Bard interaction with the bird Topaz, while using Speak with Animals.
- Persuade Kagha to free Arabella.
- Swear to Nettie to take the Wyvern Poison.
- Persuade the goblins to let you pass into the Blighted Village.
- Persuade Fezzerk at the Windmill to leave peacefully.
- Persuade Lump the Enlightened to fight for you.
- Successfully intimidate Derryth Bonecloak for a reward in exchange for the Noblestalk, then take the reward and keep the Noblestalk.
- Tell BOOOAL he is a fake god, tell him you are going to kill him and take his power.
- Convince Elder Brithvar to free the deep gnomes after the fight with Nere.
- Give Shadowheart the Idol of Shar
- Do a successful persuade to convince Sa'varsh Kethk to spare Youth Varrl.
- Do a successful Dexterity Ability Check to non-fatality stab Youth Varrl.
- Successfully persuade Varsh Ko'kuu to let you take the githyanki egg and suggest you'll take it to a better Creche or raise it yourself.
- If Lae'zel is chosen to use the zaith'isk, succeed a difficult persuasion or Wisdom check to have her get out of the it before it harms her .
- If Lae'zel is chosen to use the zaith'isk, succeed a difficult deception check or a Wisdom check followed by a persuasion to have her get out it' during the second phase. Will permanently lower Lae'zel's INT by 2.
- If Lae'zel is chosen to use the zaith'isk, succeed a difficult deception check or a Constitution check followed by a persuasion to have her get out of it during the third phase. Will permanently lower Lae'zel's INT and WIS by 2.
- Successfully persuade Lae'zel to stand by your side when deciding to give the Mysterious Artefact to Ch'r'ai W'Wargaz.
- Refuse Vlaakith's demands to enter the Mysterious Artefact.
Camp/Conversation
- In camp on the first night tell her you agree with her about finding a healer as soon as possible.
- Tell her that you don't care who she worships.
- Ask her about her faith, then persuade her that you have no problems with it.
- Talk about her missing memories, make her promise to point out Night Orchids.
- Pet Scratch.
- Feed the Owlbear Cub when it arrives at the Camp.
- Pet the Owlbear Cub when it stays at the Camp.
- At the next long rest after the events at the Crèche, encourage Lae'zel to listen to Kith'rak Voss or make her own choice when he visits the camp and speak about the Mysterious Artefact.
Act 2
- On entering the Shadow-Cursed Lands from the Rosymorn Monastery Trail, convince the goblin Warrior Gronag to fetch the bone he just threw.
- Don't drink the wine when talking to Jaheira inside.
- Warn Isobel that Marcus plans to kidnap her when he attacks the Last Light Inn.
- As The Dark Urge, tell Isobel that you have the urge to kill her, then deny the urge and ask her to forgive you.
- Agree to play hide-and-seek with Oliver.
Camp/Conversation
- Give Shadowheart a Night Orchid.
Unsorted
- Agree to help Arabella find her parents.
- Allow Arabella to join your camp.
- Use Deception to convince Kar'niss to give up his magic lantern.
- Use Intimidation or Deception to convince Kar'niss and his group to move on without the magic lantern.
- Perform the blood offering to Shar at the secret alter under the town square of Reithwin Town.
- Make Malus Thorn make the Sisters test their skills against each other.
- Make Malus Thorn kill himself.
- Convince Yurgir to kill himself.
Disapproval
Shadowheart dislikes those that disapprove of her worship or people pressing her for answers or details. She does not like needless cruelty or violence and can respond unfavorably to being too open with untrustworthy or unknown individuals.
The following story and dialogue choices will cause Shadowheart to lose approval.
![]() Spoiler warning! This section reveals details about the story of Baldur's Gate 3.
Spoiler warning! This section reveals details about the story of Baldur's Gate 3.
Act 1
- Threaten Astarion in your first encounter with him.
- Attack the Tieflings holding Lae'zel in a cage. (-1 Approval)
- Recruit Lae'zel into the party. (-5 Approval)
- Let Lae'zel make Zorru bow.
- Tell Lae'zel she's good at interrogations.
- Tell Auntie Ethel about the tadpole.
- Tell Astarion you trust him.
- Take her to the Chicken Chase in the Goblin Camp, and tell her not to be hasty.
- Agree to kill Karlach for Anders.
- Attack the Owlbear in its den
- Select the option to attack Fezzerk and the goblins by the windmill in the Blighted Village
- Insist on continuing to use the tadpole's power after the second dream
- Pick a fight with Priestess Gut while she is still on her throne
- When she has the odd magical flare-up, ask if it was some form of Sharran magic
- If you agree to pay the extra 200 gold to the artist after you free him
Creche Y'llek
- Let Lae'zel speak for the group when you enter the Gith Creche and questioned by Gish Far'Aag.
- Show Gish Far'aag the Mysterious Artefact to gain entry into the Creche.
- Offer to fight Youth Varrl to the death.
- Kill Youth Varrl.
- Suggest you'll cook or sell the githyanki egg when trying to convince Varsh Ko'kuu to give it to you.
- Present Kith'rak Therezzyn the Mysterious Artefact.
- Accept Vlaakith's demands to enter the Mysterious Artefact.
Camp/Conversation
- At the next long rest after the events at the Crèche, encourage Lae'zel to kill to Kith'rak Voss when he visits the camp and speak about the Mysterious Artefact. This leads into a very difficult optional boss fight.
- Letting Volo follow through with his attempt to remove the parasite
- Persuade her to eat the Noblestalk.
Act 2
- At the Last Light Inn, drink the wine Jaheira offers.
- Take the Ritual Dagger of Shar her secret alter under the town square of Reithwin Town.
- Give up all your gold to Gerringothe Thorm.
Romance
The following section explains Shadowheart's romance.
![]() Spoiler warning! This section reveals details about the story of Baldur's Gate 3.
Spoiler warning! This section reveals details about the story of Baldur's Gate 3.
Similarly to other characters, her first important romance scene will be unlocked during the Party by proposing to have a drink in private with you. Shadowheart will only propose it to you if you sided with the Tieflings and if you have at least medium approval. You'll meet her away from camp later that night, where you will have a deep conversation. After some dialogue, the camera fades and returns a few hours later showing both of you laying on the ground, holding hands. You can choose to kiss her, and then both will return to camp.
Next day, you can have a conversation with her regarding the previous night. Her dialogue will depend on her level of approval.
Trivia
- Shadowheart is voiced by Jennifer English.
- According to Larian Studios, until Patch 3, Shadowheart was the most romanced female companion and the second most romanced companion overall.
- The cantrip selection Shadowheart has in the beginning is very sub-optimal, which can be frustrating, especially to newer players who may not understand why:
- As the
 cantrip Shadowheart starts with is a high half-elven racial spell, its attack roll bonus scales off intelligence, an ability Shadowheart is not specialized in. This makes the hit chance of this version of firebolt very low in Shadowheart's hands.
 - Her other cantrip,
 is not an attack cantrip, but rather a saving throw cantrip, This means it is not helped by the various bonuses and advantages an attack would enjoy (High Ground Rules, Advantage from hidden attack, etc). Furthermore, it is a dexterity save cantrip, and dexterity is an ability many enemies are decent at.
 - The best way out of this situation is to pick up a better offensive cantrip elsewhere, either by picking
 when at cleric level 4. Or finding equipment that grant offensive cantrips (in such cases Shadowheart's natural Spellcasting Ability, Wisdom, is used instead)
 - And since her Strength and Dexterity isn't high either, early on her best offensive option is likely to be
 while at range, and
  while up close. Both of course costs spell slots.
 - She can also indirectly contribute of the party's damage output via
 and
and  , the former makes the affected enemies 10% more likely to get hit, the latter makes the affected allies 10% more likely to land a hit. Note that bane requires its target to fail a saving throw to take effect so it is somewhat less reliable.
- These are both
 Concentration spells however, so there is a risk in using these. make sure Shadowheart is safe from damage if this is the option chosen. Also note that only one Concentration spell can be maintained at a time by a single caster.
- These are both
- Finally,
 confers the Wet Condition to the affected targets, making them vulnerable to cold and lightning damage, meaning they will take double damage from those damage types. This also potentially creates a harmful surface for the party's enemies.
- As the
Gallery
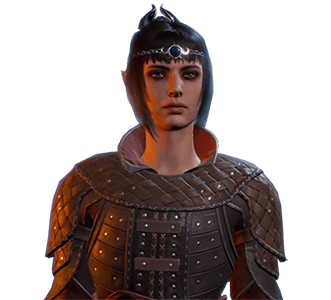
Shadowheart's appearance pre-release
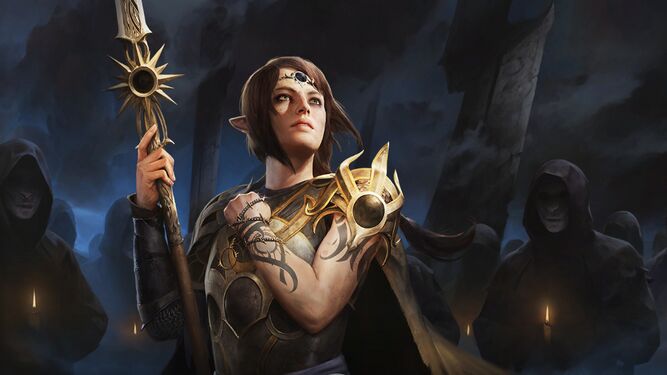
Shadowheart's Early Access promotional art
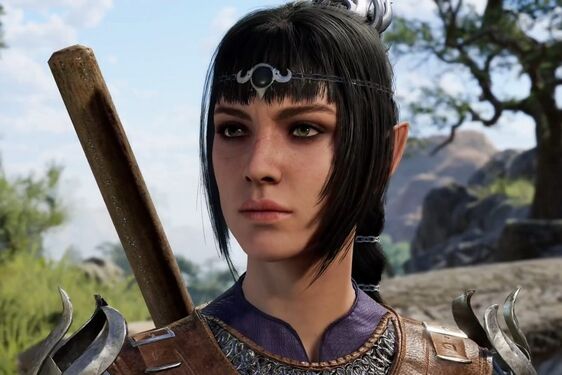
Shadowheart during Early Access
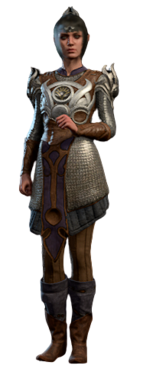
Early Access model


External Links
 Shadowheart on the Forgotten Realms Wiki