Break Yurgir's Contract

From Baldur's Gate 3 Wiki
Jump to navigation Jump to search
One Dark Justiciar remains, hidden in the Gauntlet

Break Yurgir's Contract is a sub-quest of Kill Raphael's Old Enemy in Act Two of Baldur's Gate 3. It can be started by speaking with Yurgir in the Gauntlet of Shar and agreeing to help him break his contract.

Objectives[edit | edit source]

Objectives and journal entries may vary pending party decisions and outcomes.

Investigate the Gauntlet of Shar for clues.
  • The orthon is bound by Raphael's contract and seeks a way to free himself from it.
  • We came upon a mysterious ritual site. It seems one of the orthon's targets has assumed a new shape.
  • We spoke to the pile of corpses that serves as the orthon's bed. It mentioned that the orthon's last target is now 'many'.
  • We learned that the rats in the Gauntlet of Shar are actually one, single person - a man called Lyrthindor.
Deal with the Last Justiciar.
  • We discovered that the Last Justiciar's body was disassembled into a swarm of rats. Now that he's returned to his true form, we can kill him.
Return to Yurgir.
  • We have dealt with the Last Justiciar, whose body had disassembled into a swarm of rats. Yurgir's contract can now be ended.
Quest Complete
  • We helped the orthon break free from his contract - but it seems that Raphael had already planned for the outcome.
  • We moved on before we could break the orthon's contract.
  • We killed the orthon without resolving his contract.
  • We told the rat that we would leave them alone.
  • We made a deal with the rats. In return for being left alone, they told us about a cache of hidden treasure.

Walkthrough[edit | edit source]

The rocks that can be climbed down to the foot of the Shar statue.

This quest occurs if the party manages to successfully convince Yurgir to stand down by offering to look into the terms of his contract. After convincing Yurgir, he sings the terms of his contract:

Spill all the blood sworn to the night. Silence all prayers; smother each rite
Wander Shar's halls; hungry to slay; Leave no Justiciar alive to obey.
Leave none to hear it, then be set free; This song is your oath, swear, swear it to me.

Based on his contract, it appears that there is still a remaining Dark Justiciar somewhere in the Gauntlet of Shar. Of all the suspicious things in the Gauntlet, the most noticeable are the rats who, when spoken to with Speak with Animals, tells the party they aren't worthy to walk on sacred ground.

The book at the foot of the Shar statue.

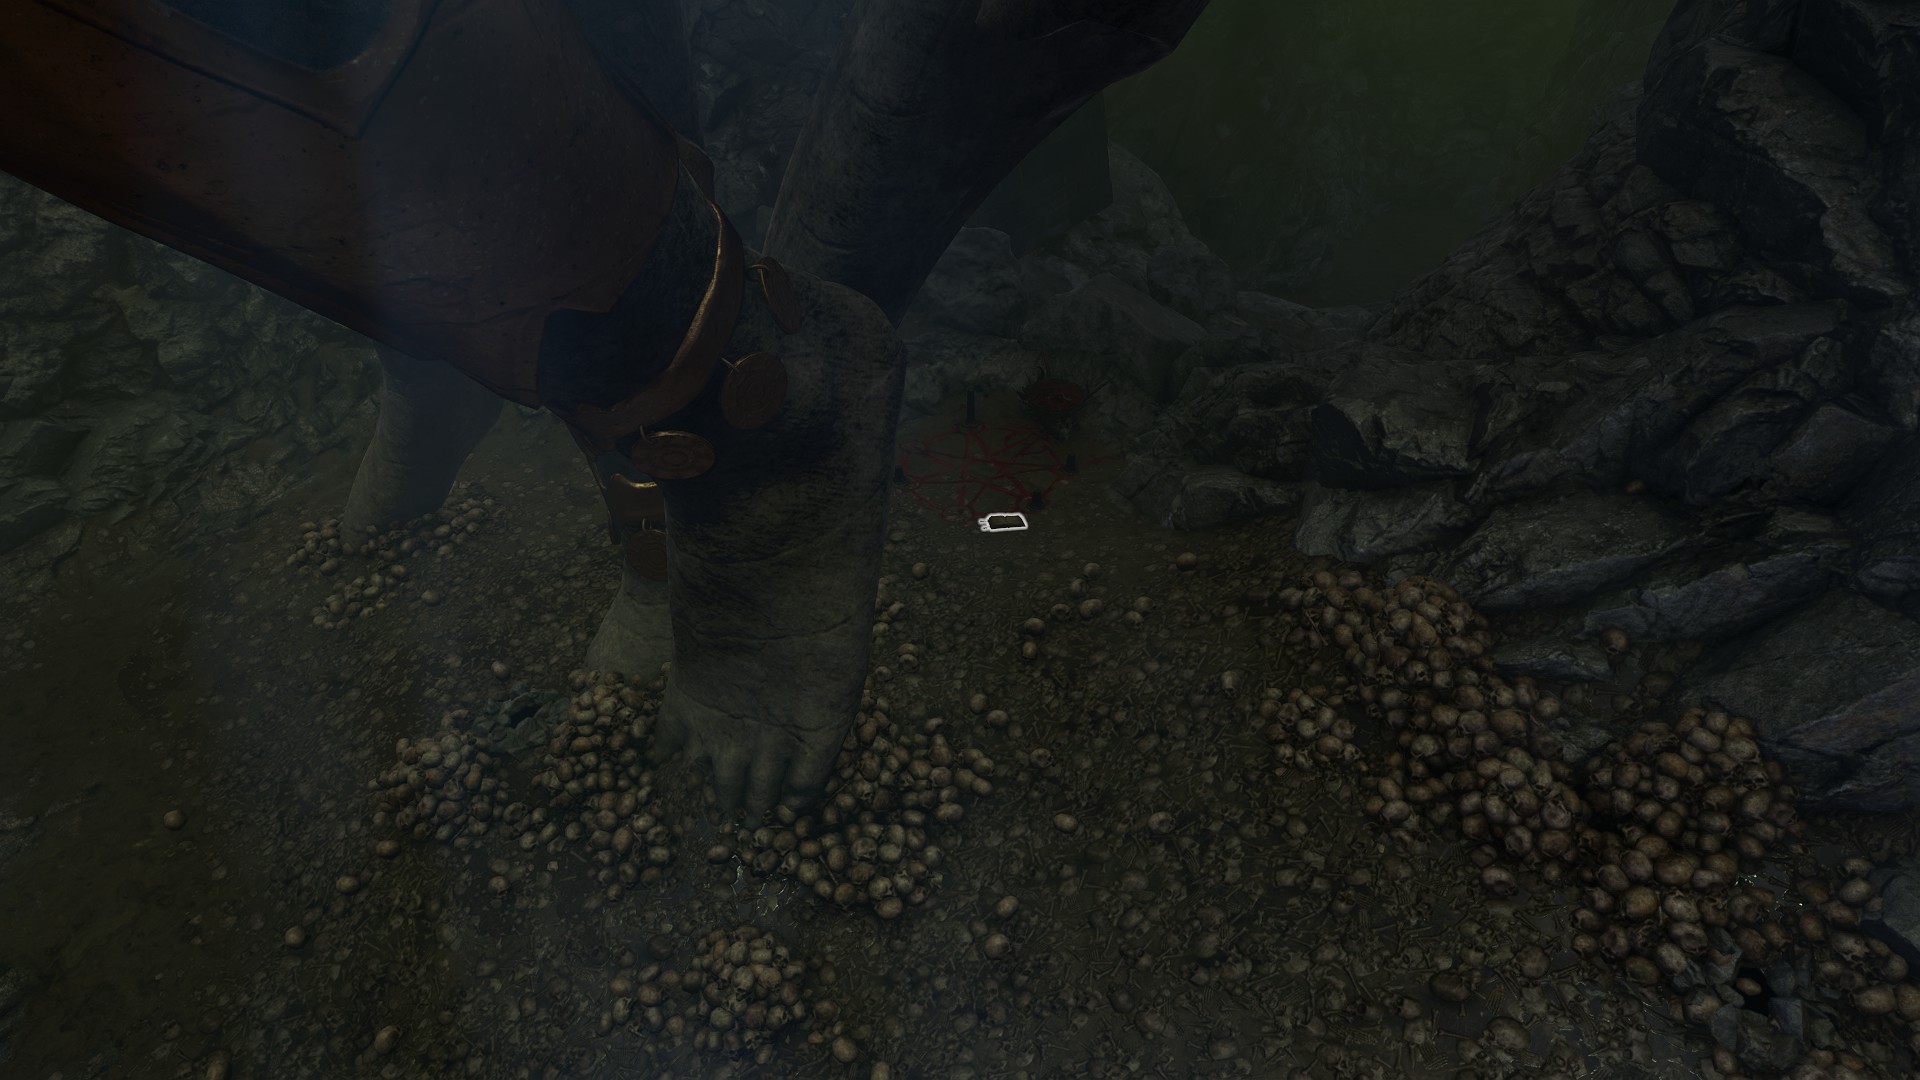
To find more information on the rats, the party needs to travel down to the base of the statue of Shar. Two possible routes are the following:

  • Across from the Silent Library is a craggy rock that can be climbed down. Then follow another set of craggy rocks to climb down the the feet of the Shar statue.
  • If the party exits west of Yurgir's throne, there are a set of broken stones the party can climb down from slightly to the north (X:-684, Y:-737). After this, the party can climb down one set of cragged rock (X:-699, Y:-735) and move slightly to the north to find another set (X:-731, Y:-750) to get to the feet.

Below the feet is a ritual circle. Read the book One Becomes Many and then light the candles around the circle. A rat appears and offers a bargain - if the party leaves them alone, then it will show them the location of a secret treasure cache. The party can technically still complete the quest while getting the location of the cache, but it requires very quickly targeting the rat before it scurries off. Otherwise, if the party denies the deal, simply attack the rat and several waves of rats appear to fight. There are normal rats, but also necrotic rats and somniatic rats. Defeat all the waves of rats and Lyrthindor returns to his human form. Enraged, he attacks the party.

Upon returning to Yurgir, Raphael appears, and points out that Yurgir is in breach of his contract for recruiting the party to deal with the remaining dark justiciar. Raphael then convinces Yurgir to sign a new contract, and tells him he should give his "sub-contractors" a reward for finishing the job, to which Yurgir says the party can take whatever he leaves at the Gauntlet. Unfortunately, this does not provide any unique loot and choosing to go this route means missing out on the Hellfire Hand Crossbow looted from Yurgir's corpse. Regardless, the quest completes with Raphael and Yurgir going to the House of Hope to discuss his new contract.

Lyrthindor can also be killed before encountering Yurgir in the first place, if the party heads towards Balthazar and the Gauntlet's trials first instead of encountering the displacer beast and attacks the rats along the way. If the party then goes to Yurgir's hideout, he will be encountered in the process of leaving the temple, and will not attack unless prompted. If left alone, Raphael will still show up, ending the quest as above, and Astarion will react as though the party had knowingly aided Yurgir.

Quest Rewards[edit | edit source]

Consequences[edit | edit source]

If, in Act Three, the party undertakes Escape the Deal as part of Deal with the Devil or otherwise visits the House of Hope, then the party has a much lower roll to recruit Yurgir for Gather Your Allies. It's still possible to recruit Yurgir if he's killed, though.

If Yurgir is spared, Astarion is deeply upset, particularly if he's in the party. He requires either a Persuasion or Deception Check (DC 14) to remain in the party.

Notes[edit | edit source]

  • The party can still track down Lyrthindor's ritual circle and make a deal with him (or kill him) even if Yurgir is killed.
  • It is possible to learn a little about Lyrthindor by casting Speak with Dead on Yurgir's bed, which is made of Dark Justiciar corpses. If asked whether any Dark Justiciars survived Yurgir's attack, they will say that one survived and became many.