Objectives and journal entries may vary pending story decisions and outcomes.
Reach Moonrise Towers.
The dream visitor told us to go to Moonrise Towers and infiltrate the cult of the Absolute. The cult's secrets may teach us how to free ourselves of these parasites.
We reached the shadow-cursed lands. We should find Moonrise Towers, which is where the parasites are coming from.
We met a drider who worships the Absolute. He can lead us to the heart of the cult in Moonrise Towers, where we may find answers.
Harpers attacked the cultists we travelled with. We decided to help the Harpers, and fought against the cult.
We found a Moonlantern that will protect us from even the deepest parts of the shadow curse. With it, we can safely reach Moonrise Towers.
We learned about a place nearby that is protected from the shadow curse. The people there may know how to get to Moonrise Towers safely.
Harpers are trying to discover how the Absolute's cultists safely traverse the shadow curse. If we help them, we might find a way to reach Moonrise Towers.
We met a group of Harper scouts travelling through the shadow-cursed lands, and defended them against shadows. Grateful, one of them showed us where to find a safe haven nearby.
We reached Last Light Inn, a safe haven in the shadow-cursed lands. Jaheira, the Harpers' leader, let us in after we gained her trust. We should see what we can learn from the occupants about the Absolute.
We met the cleric Isobel. She said that our parasites could help us infiltrate the cult of the Absolute and find the source of Ketheric's power.
We met Marcus, a True Soul instructed to abduct the cleric Isobel from Last Light Inn and take her to Moonrise Towers.
We saved Isobel from being abducted by Marcus for the Absolute. She said that our parasites could allow us to infiltrate the ranks of the cult of the Absolute.
Jaheira, the Harpers' leader, told us to go to Moonrise Towers and infiltrate the ranks of the cult of the Absolute.
Last Light Inn and its occupants were consumed by the shadow curse. It is no longer safe.
Infiltrate the cult of the Absolute.
We reached Moonrise Towers. We need to infiltrate the cult's ranks and find the source of these parasites.
We were granted entry to Moonrise Towers. The guards believe us to be True Souls, and have sent to speak to a high-ranking cultist named Z'rell.
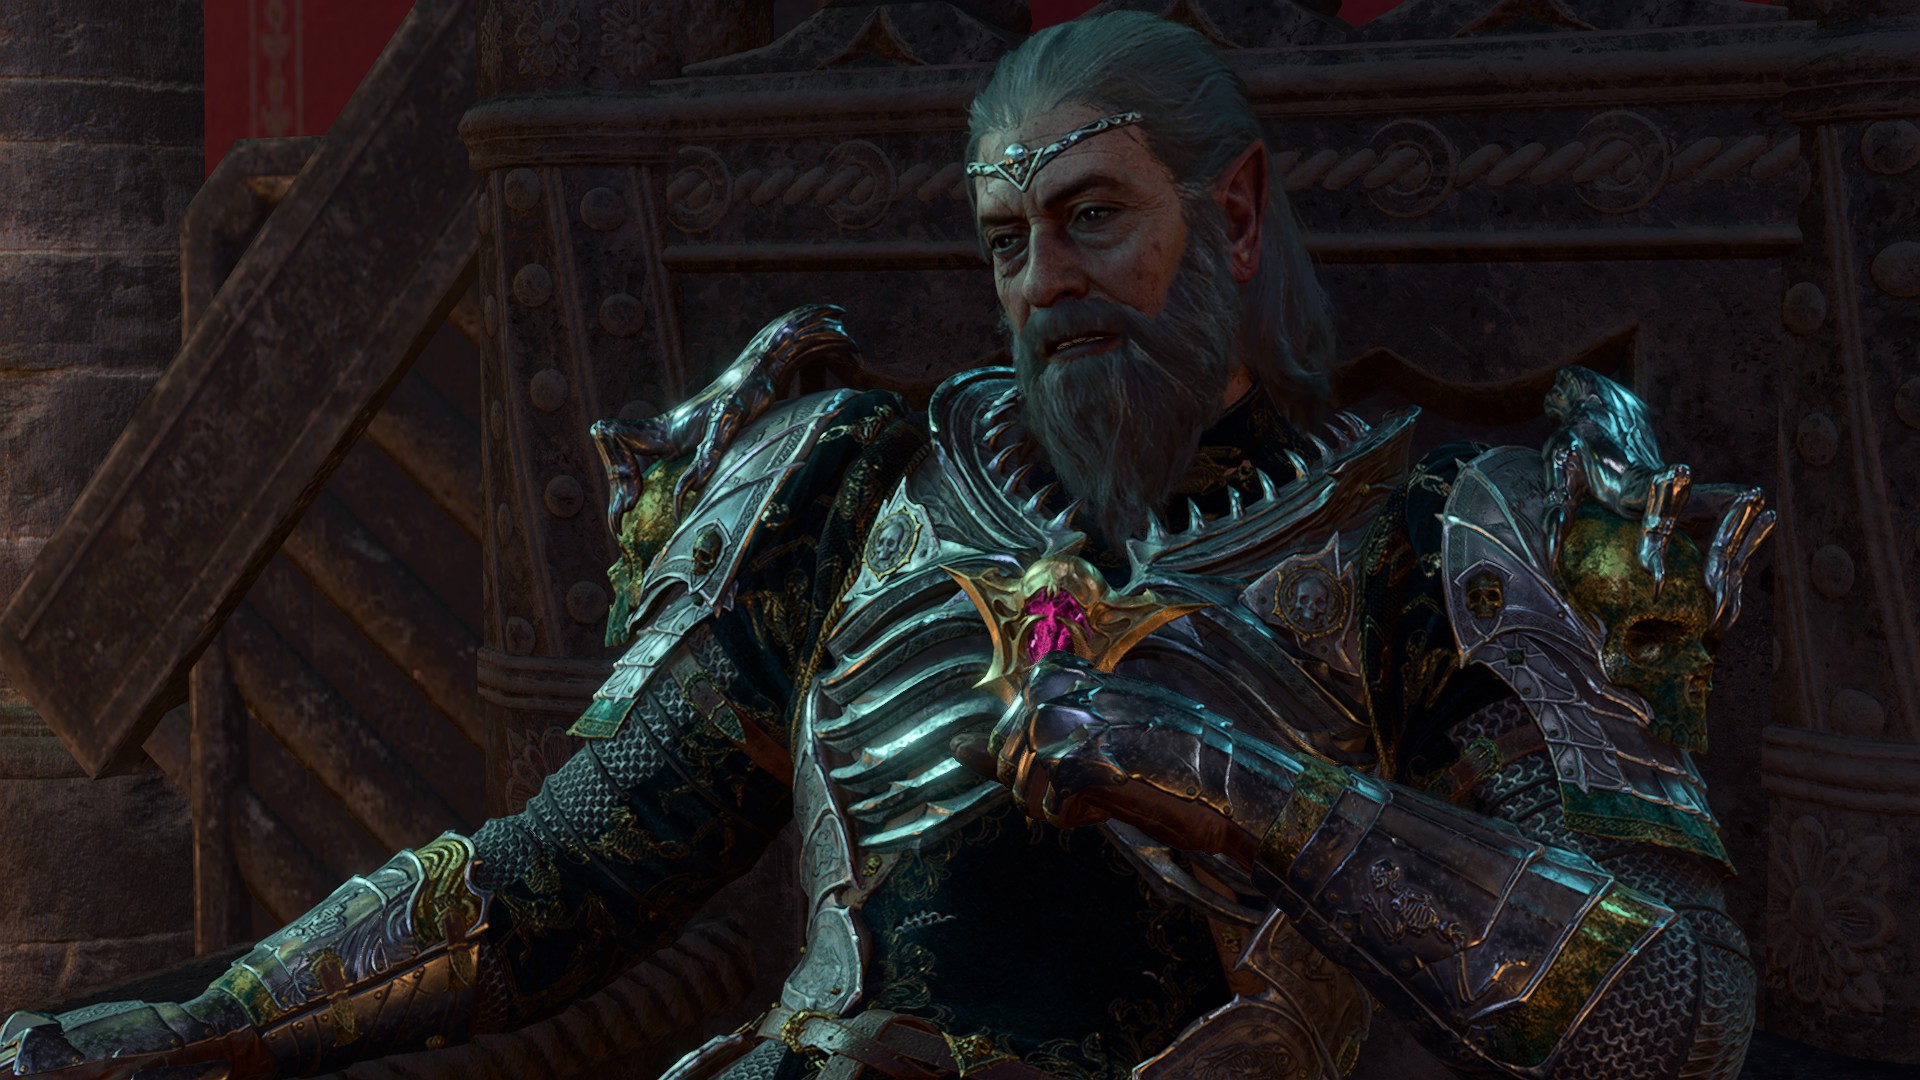
We witnessed a goblin attack Ketheric Thorm, the Absolute's Chosen, and strike a fatal blow. Ketheric recovered almost instantly. Something is making him invulnerable.
Disciple Z'rell wants to entrust us with a task - this could be our chance to further infiltrate the cult's ranks. We are to meet her upstairs at Moonrise Towers.
Disciple Z'rell has asked us to find out what has happened to Ketheric Thorm's advisor, Balthazar - and, more importantly, find the relic he was sent to retrieve.
We killed Disciple Z'rell. Whatever task she had for us, it won't help us to learn more about the cult now. We should search the tower for another way.
We found Balthazar's diary and learned that he went on a mission to the Thorm Mausoleum to find the 'Nightsong'. This Nightsong seems to be the key to his invulnerability. We should follow this lead.
Disciple Z'rell was impressed that we captured the cleric Isobel. She reminded us that Balthazar is our current priority.
We found Balthazar in the temple below the Thorm Mausoleum. He asked us to help him find the relic for Ketheric.
We learned that the relic Balthazar is hunting is the source of Ketheric's invulnerability.
We found the 'relic' that is the key to Ketheric's invulnerability. It is a living aasimar called Nightsong, caged in the Shadowfell.
We helped Balthazar return Nightsong to Moonrise Towers. Disciple Z'rell would be happy to hear this.
Disciple Z'rell was pleased that we helped return Nightsong to Moonrise Towers. She has now asked us to kidnap the cleric Isobel from Last Light Inn.
We successfully captured Isobel. This should please Disciple Z'rell enough for her to grant us an audience with the Absolute.
We were unsuccessful in our mission to capture Isobel. Disciple Z'rell will not be pleased to hear that Isobel died.
We told Ketheric of our success in retrieving the Nightsong. He wasn't pleased by our methods, and gave us an option - kneel at the altar and brave the Absolute's judgement, or go to Last Light and capture the cleric Isobel for him.
Investigate Moonrise Towers.
With Moonrise Towers hostile to us, infiltration is no longer an option. We should search the tower ourselves to see what we can learn about the Absolute and the source of our parasites.
We attacked Ketheric, but we cannot harm him so long as he is invulnerable. We need to find the source of his protection and strip it from him.
Defeat the cult of the Absolute.
We found the necromancer Balthazar in the temple below the Thorm Mausoleum. He is looking for a relic for Ketheric Thorm. We should make sure we find it first.
We defeated the necromancer Balthazar, failing to assist him in his mission to retrieve a relic for Ketheric. The relic is clearly important for the Absolute. Finding it ourselves may help us against the cult.
Request an audience with Ketheric Thorm.
We succeeded in capturing Isobel at Last Light Inn and sending her to Moonrise Towers. We should report to Ketheric.
We failed to capture Isobel, but because of our success with Nightsong, Disciple Z'rell has granted us an audience with Ketheric Thorm. He will be the one to pass judgement upon us. We can find him on the roof of Moonrise.
Disciple Z'rell was pleased that we successfully captured both Nightsong and Isobel. She has granted us an audience with Ketheric Thorm on the roof of Moonrise.
Receive judgement at the altar of the Absolute.
We met with Ketheric Thorm on the roof of Moonrise. He is upset that his daughter Isobel is dead. He has told us to kneel at the Absolute's altar to receive judgement.
We met with Ketheric Thorm on the roof of Moonrise. He is pleased with our work and has granted us an audience with the Absolute. We can kneel at the altar in Her name.
We forced our way onto the roof of Moonrise to speak with Ketheric Thorm. Though he is pleased we captured Nightsong, he is not impressed with our disregard for orders. He has told us we can either go back out to retrieve Isobel for him, or kneel at the Absolute's altar to beg forgiveness.
Assault Moonrise Towers.
We killed Nightsong, so Ketheric Thorm is now vulnerable. This is our time to strike.
We freed Nightsong and she flew across the shadow-cursed lands toward Moonrise Towers. She seeks to wreak vengeance on Ketheric Thorm.
We met with Jaheira at the entrance to Moonrise. She and her Harpers are ready to help us with the assault, and to end Ketheric Thorm.
Confront Ketheric Thorm.
We reached Moonrise Towers, where Nightsong has launched a siege. We will need to fight our way to Ketheric Thorm if we want to find the source of the power behind the parasites.
We reached Moonrise Towers. With Nightsong dead, we will need to fight our way to Ketheric Thorm if we want to find the source of the power behind the parasites.
Moonrise Towers is under siege. It's time to end Ketheric Thorm and the cult of the Absolute.
Defeat Ketheric Thorm.
We attacked Ketheric Thorm on the rooftop of Moonrise Towers.
Quest Complete
We did battle with Ketheric Thorm. Before we could defeat him, we were interrupted by a giant tentacle that carried Ketheric away - and Nightsong with him.
We knelt at the altar for our audience with the Absolute. A great tentacled beast rose from beneath the tower, and transported us somewhere below.
If using the elevator in Grymforge as part of Travel through the Underdark, the party arrive at a Sharran worship site. Directly ahead is an Absolutist Expedition Trunk with torches and various potions, which can be lockpicked ( DC 10 Sleight of HandCheck). The party must move west to find an exit to the Shadow-Cursed Lands and Elminster for The Wizard of Waterdeep if he was not encountered already, and reach the Ruined Battlefield. Right by the exit are two braziers - the party can light them and take the torches, as they are useful for avoiding the shadow curse. In order to avoid succumbing to the shadow curse, a party member must be holding a lit torch, or otherwise be illuminated (such as by the Light cantrip, or the passive effect of the The Blood of Lathander). The party must continue exploring westward to encounter some Harper Scouts, led by Lassandra. The Harpers are suspicious and order the party forward, when a harper named Yonas is taken by a Shadow and transformed by the shadow curse. A fight breaks out between the newly transformed Yonas and seven Shadows against the remaining Harpers.
After the Shadows are defeated, Lassandra thanks the party and urges them to carry a torch, as it is enough for the edges of the Shadow-Cursed Land. She tells them there is one place safe from the curse, the Last Light Inn, and marks it on the map.
The drider offers safe passage through the Shadow-Cursed Lands.
If using the Mountain Pass route, as part of Travel through the Mountain Pass, then a goblin greets them and asks if they are the True Souls the goblin is expecting. The goblin tells the party to grab a torch, stick to the light as much as possible, and go to the rendezvous point to wait for the guide to Moonrise Towers. This starts Follow the Convoy.
If approaching the rendezvous point, an orc named Kansif asks if the party have what is needed to summon the guide. To summon the Drider guide, as Vez explains, a special lyre is needed - the Spider's Lyre. This lyre can be obtained by:
Once the lyre has been produced, a DC 16 PerformanceCheck is prompted, but the result is the same whether it is passed or failed - the guide just makes a snide comment if it was failed. Performing using the lyre also grants the Plucking the Lyre's Web to characters with the Entertainer background.
If not having the lyre, then the party can summon the guide using illithid powers ( DC 14 WisdomCheck). Additionally, Barbarians, Sorcerers, Bards, Clerics, and Paladins all have special dialogue options to summon the guide.
The guide in question is a Drider named Kar'niss. He owns a functioning Moonlantern and has been tasked with shuttling cultist initiates to Moonrise Towers. He ferries the party to Moonrise, and they must remain in the glow of his Moonlantern to stave off the shadow curse.
During the trek, a group of Harpers ambush the convoy. The party can to betray the convoy and help the Harpers, or fight alongside the convoy in the hopes of being more convincing at Moonrise. If siding with the Harpers, they take the drider's Moonlantern and refer the party to Last Light Inn. If sticking with the convoy, then Kar'niss safely guides the party to the front entrance to Moonrise Towers.
Once arriving at Last Light Inn, there is a Harper, who calls for Jaheira. Jaheira is instantly wary of the party and summons vines to stop them. She produces a Mind Flayer Parasite Specimen and explains that the mind flayer tadpoles react to those infected. She brings the specimen up to the party and it reacts, causing Jaheira to believe the party are True Souls. If the tieflings are saved during Save the Refugees, then Mol appears to vouch for the party, explaining that they protected the Druid Grove.
If the tieflings are not saved, either by ignoring the Grove or by raiding it, then Marcus Falgor comes to their aid. Although he clearly does not recognize the party, he communes with them telepathically. He tells Jaheira that the party helped him fight off cultists, so they can be trusted.
Jaheira is shocked at how that is possible. She demands answers. Jaheira insists on knowing the whole truth not accepting any vague answers. The Mysterious Artefact gets Jaheira to back down, to which she invites the party in for a drink. If the wine is smelled first ( DC 10 MedicineCheck, or DC 10 MedicineCheck for rogues and druids), a hint of Klauthgrass is detected - a truth serum. Jaheira's trust can be earned regardless of if the serum is drunk and the question she asks is the same - is the parasite changing the party? Jaheira refuses to believe an assertion that the parasite is not doing anything, but she believes an assertion that the party members are resisting the urge to change.
Once Jaheira trusts the party, she explains the situation. The leader of Moonrise Towers is a man named Ketheric Thorm. He is immensely powerful and gifted with immortality. The Harpers have come to find a way to stop the cult and kill Thorm once and for all. The Harpers have had little luck, but Jaheira believes that the party can make a difference by infiltrating Moonrise as a True Soul.
After Jaheira starts to trust the party, she refers them upstairs to gain a blessing from Isobel a cleric of Selûne who is the one responsible for keeping Last Light Inn shielded. Isobel is on the balcony, finishing a prayer to Selûne in order to strengthen the wards around the Inn. If speaking to her, Isobel strengthens the party's resistance to the curse with a Blessing of Selûne, and if the Harpers took Kar'niss' Moonlantern, she gives it to them. After the party is done talking with Isobel, chaos breaks out in the Inn. A Flaming Fist named Marcus reveals himself to be a True Soul tasked with kidnapping Isobel and bringing her back to Moonrise Towers. Sensing the tadpoles in the party, he tells them to aid him. This starts Resolve the Abduction. The party can either turn on the Harpers or choose to fight off Marcus. Additionally, a winged horror swoops in and kidnaps Mol, if she is alive.
If the tieflings are not saved, the events play out slightly differently. After Jaheira backs down, Marcus can be spoken to in Isobel's room upstairs, where he reveals that he was sent on a mission to kidnap the cleric. The party can either attack him, or go down and report it to Jaheira with a high enough persuasion or deception roll. If Jaheira is convinced of his betrayal, she tells the party to go to Isobel to protect her while she gathers her most trusted Harpers. However, the choices to fight Marcus or aid him are still the same.
Several things can happen:
The party can avoid talking to Isobel, and hence never trigger the abduction.
Marcus can be fought off, saving the Inn and its inhabitants.
Marcus can knock out Isobel and kidnap her, with or without the party's help.
Isobel can die.
If Isobel is kidnapped or dies, the protection around the Inn vanishes. All of the inhabitants inside succumb to the shadow curse. except Jaheira. Some of them die instantly, while others become hostile and must be killed.
After entering Moonrise Towers, the party is urged to go to the audience chamber. Upon entering it, Ketheric sits on a throne while one of his minions, Disciple Z'rell, can be seen interrogating a group of characters about what happened at the Goblin Camp during Act One. Depending on several things the party did during Act One, some variations are possible.
Fezzerk acting as the primary "speaking" goblin character, with or without Minthara present.
Sazza being part of the goblin group if she was freed from the Grove and spared in the Shattered Sanctum. She can also act as the primary "speaking" goblin character if Fezzerk is not present.
A goblin named Darra may take on the speaking role usually occupied by Fezzerk if he is not encountered during Act One or if he is killed prior to this scene and if Sazza is also not there. Darra has been observed to be accompanied by a second goblin named Racha.
A specific goblin named Drenn always appears to be present in this scene, for specific reasons.[verify]
During this scene, the party is allowed to select dialogue options that "insert" them into the interrogation, or they can remain silent until other outcomes prompt them to respond.
With their selected dialogue choices, the party can attempt to "plead" the case of the character that Ketheric is judging, but Ketheric eventually refuses to believe the judged characters have any worth and orders the new True Souls -- the party -- to handle it. Ketheric leaves for his quarters and Z'rell tells the party to do whatever they want with them. The goblins can be killed, or set free. The party also has the option to try attacking Thorm, but he just walks away and tells Z'rell to deal with it, and the whole area becomes hostile.
After dealing with the goblins, Z'rell must be reported to. She is up the stairs behind the throne in the audience chamber. Upon speaking with her, she telepathically connects with the party to see how the goblins died, and then connects again to search for "proof of their faith" or loyalty to the Absolute.
There are different options to "prove" the party's faith to Z'rell. These options include:
[PERSUASION] Distract her with thoughts of your aching for Karlach. (DC 14)
[PERSUASION] Distract her with thoughts of your dalliance with Lae'zel. (DC 14)
[PERSUASION] Distract her with thoughts of your sweet moments with Wyll. (DC 14)
[PERSUASION] Distract her with your yearning for Gale. (DC 14)
[PERSUASION] Distract her with your lusts for Astarion. (DC 14)
[PERSUASION] Distract her with thoughts of your care for Shadowheart. (DC 14)
[PERSUASION] Distract her with thoughts of your night with Minthara. (DC 14)
[PERSUASION] Distract her with thoughts of your romantic desires. (DC 14)
[DECEPTION] Fake it - fill your mind with love for the Absolute. (DC 14)
[OATH OF THE CROWN] [DECEPTION] Let her believe your oath is to the Crown of the Absolute. (DC 14)
[DARK URGE] [INTIMIDATION] Lash her with the atrocities you've conducted. (DC 15)
[ROGUE] [DECEPTION] Think in Thieves' Cant, masking your true thoughts as Absolutist zealotry. (DC 21)
[MONK] Empty your mind. Show her a perfect, harmonious soul.
[TRUE SOUL] Distract her by drawing her toward your hunger for power.
[WISDOM] Overwhelm her by unleashing a wave of hatred as you prepare to attack. (DC 21)
[FIGHTER] [WISDOM] Bring to mind your years of rigorous combat training - show her the depths of your dedication. (DC 21 )
If Z'rell is convinced of their faith, the No Peeking! inspiration is granted for party members with the Urchin background and Z'rell gives them a new task - track down Balthazar, a servant of Thorm's whom the cult has lost contact with. He was last seen at the Thorm Mausoleum. If the player character passes an automatic dice roll, they may be given the option to press Z'rell for further details about the mission and / or Z'rell's personal thoughts about it.
Z'rell gives the party a key to Balthazar's room and instructs them to take a Moonlantern and touch nothing else. However, the party can access a secret area in his room in order to start Balthazar's Experiment.
The final meeting with Ketheric can go very differently depending on if the party aided him or sabotaged him. However, it always results in the subsequent quest Defeat Ketheric Thorm.
If the party sabotaged Ketheric by either freeing or killing the Nightsong, Ketheric loses his immortality. If Last Light Inn is still intact, the party can join Jaheira, the Harpers, and the Flaming Fists in a frontal assault on Moonrise Towers, against a large number of cultists. If 'Barnabus' and the other gnolls were freed, they also join the fight on the party's side. Once the main floor has been taken, Jaheira can be persuaded to come with the party to the rooftop, where Thorm awaits.
There is an entirely optional battle in the Moonrise Towers Prison, where the party can fight alongside several Flaming Fists against a group of undead led by a Death Shepherd and some Myrkulite cultists. Doing so grants the A Bone To Pick inspiration to party members with the Soldier background.
On the rooftop, there is a brief moment to speak with Thorm. The party can try to convince him that he can still redeem himself and stop the madness.
[INTIMIDATION] Surrender now, and I'll consider letting you live. (DC 21)
[PERSUASION] You've seen what I'm capable of. Surrender now, and I'll consider letting you live. (DC 18) (in case the party anyhow has called hostility upon themselves before actually assaulting Moonrise Towers)
Both these options lead to following attempt to convince Ketheric to surrender:
[PERSUASION] I'm not like you, Ketheric. My only interest is what is right. (DC 30)
[PERSUASION] I'm not your executioner. I'm here to see wrongs put to right. (DC 30)
[INTIMIDATION] I may or I may not. But if you try to attack me, I will crush your skull. (DC 30)
[DECEPTION] A higher power wants you to live. (DC 30)
[OATH OF THE CROWN] [PERSUASION] I'm not your executioner. I'm here to see wrongs put to right. (DC 30)
However, if the party have found and read Letter to Ketheric in general's chambers, the initial check might be reduced significantly:
[PERSUASION] Melodia wanted more for you than this, Ketheric. Stop, and you may redeem yourself yet. (DC 10)
Even if he is convinced, he must still be fought, but convincing him here gives the option to convince him later.
If Aylin is freed alive, she joins the party in the battle. Once Thorm is defeated, a tentacle appears to whisk him and Aylin away deeper into Moonrise. This completes the quest and grants the Devastation of the Absolute inspiration to party members with the Soldier background.
If letting Balthazar take Aylin to Moonrise Towers, then he tells them to meet them there to receive Ketheric Thorm's favour. Once arriving and speaking to Z'rell, she only lets the party proceed if Resolve the Abduction is completed. The party must help Marcus kidnap Isobel from the Last Light Inn to be allowed to see Thorm. If Isobel is already dead, then Z'rell lets the party up to face judgement.
If Isobel is kidnapped, Thorm thanks the party and tells them to pray at the altar as a reward. If Isobel died, then he tells them to pray for the Absolute's justice. Either way, a tentacle appears behind the party as they pray at the altar and detects their Astral Prism. Thorm, who knows that the party possess the relic and that it cannot be taken for some reason, commands the tentacle to take the party down to Balthazar's lab, where he wants find a way to sever the connection.
In the lab the party members find themselves trapped in Profane Wombs. After escaping the wombs, Balthazar must be defeated. He is joined by several undead servants. If the party killed Dror Ragzlin and Minthara, then their undead corpses are be among them.


