Ad placeholder
Rescue the Gnome

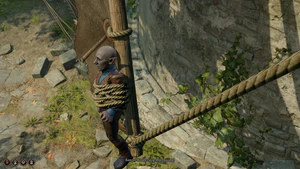
Rescue the Gnome is a Quest in Act One of Baldur's Gate 3. It is initiated by discovering a group of goblins in the Blighted Village laughing at having tied Barcus Wroot to the blade of a windmill.
Objectives[edit section | visual editor]
Objectives and journal entries may vary pending story decisions and outcomes.
Walkthrough[edit section | visual editor]
The only objective of this quest is to free Barcus Wroot. Approaching the windmill at X: 13 Y: 418 automatically initiates a conversation with the goblin leader Fezzerk. There are several options to resolve the situation.
Solving the encounter peacefully[edit section | visual editor]
There are a handful of ways of solving the encounter peacefully without combat:
Intimidate, deceive, or persuade[edit section | visual editor]
- We're allies - I have the Absolute's Brand. Leave the gnome to me. (DC 5)
- We're allies, you and I. Servants of the Absolute. (DC 15)
- You dare refuse a githyanki warrior? (DC 15)
- I won't let you harm a defenseless being - not without a fight. (DC 15)
- Read the goblin's mind.
- You don't have the stomach for a fight.
- Negotiations are over. Either leave or die. (DC 15)
- ROAR. (DC 15 )
- Mine. (DC 15 )
- I'm not bargaining with you. Free him, or I swear on my oath, you will die. (DC 15 )
- All of you lot against one deep gnome? You should go find a better target. (DC 15)
- You've had your fun - it's high time you found someone else to torment. (DC 15)
- Don't utter a word. Just stare down the goblin. (DC 10)
- I consider the gnome under my protection. You don't want to fight me for him. (DC 15 )
- Show him your brand and say you're taking the gnome. The Absolute wills it. (DC 5)
- Your skull will make a fine chalice one I plug those beady eye sockets.
- You're making a mistake. You can think it over in the Fugue Plane.
Using the tadpole[edit section | visual editor]
- You will release the gnome. That's an order. (DC 2)
- I am a True Soul. Now once again - release the gnome. (DC 2)
If convincing the goblins to walk away, the party is rewarded experience as if they defeated the whole group.
Demand you be allowed to pass[edit section | visual editor]
If trying to pass, Fezzerk claims that this is also what Barcus wanted, and demands 1000 gold, leading to several options:
- Pay the goblin.
- I might be willing to part with a more reasonable sum. (100) (DC 15)
- Here's my counter-offer: a far more reasonable sum. (500) (DC 10)
- That's a ridiculous amount. I'll make you a realistic offer. (250) (DC 10)
- Haggle with the goblin, though you lack even a modest sum of gold. (DC 15)
- Read the goblin's mind.
- Your price is absurd and you know it.
- I can pay twice that much. I just have to go and fetch it. (DC 15)
- Here's my counter-offer: you can all live so long as you leave right now. (DC 15)
- This will lead only to pain, not fulfillment.
- Provide directions to a non-existant cache of gold.
- OR YOU CAN LEAVE. ALIVE. (DC 15 )
- Leave. Or die. (DC 15 )
No matter which of the above checks succeed, Fezzerk lowers the price to 5 because he cannot count. Passing the Illithid Persuasion check can force his group to leave without payment. If paid, the party members are allowed to leave, but if approaching again, a fight breaks out.
- Not an orator, eh? I could teach you how to talk gold out of any purse, for free passage.
- Wait! Just let me go...please. (DC 5)
- I'm going to pay nothing and you and your cronies are going to leave. (DC 5)
This causes Fezzerk and his group to leave, rewarding experience as if the party defeated them all.
Approach as a drow[edit section | visual editor]
Drow characters (or those disguised as one) can demand an explanation or demand that Fezzerk leaves. This causes Fezzerk to be nervous, and he asks the talking party member if they are a True Soul:
- Of course I'm a True Soul. How dare you even question the fact? (if aware of true souls)
- I don't answer to the likes of you. (DC 5)
- Naturally - do I look cursed to you? (DC 5)
- Say nothing. Stare down the gibbering coward. (DC 5)
- ROAR. (DC 5 )
- Did I say you could ask questions? (DC 5 )
- I am nature's vanguard, you are but a stench on the breeze. Begone. (DC 5)
- I am duty bound to Virtue itself. You are in my way. Leave this place. (DC 5)
- I am the fear-dream of disloyal whelps. You are starting to irk me. Leave. (DC 5)
- I represent the law, which all must obey. And I order you to leave. (DC 5)
- I am a True Soul. Your prisoner is now mine. (DC 5)
- I am a True Soul. Your prisoner is now mine. (if aware of true souls)
- Show them your brand.
- Show them your brand and tell them to carry on.
All other options start combat.
Attacking the goblins[edit section | visual editor]
If attacking the goblins without attempting to convince them to stop or let the party pass (it is possible to ask what and why he is doing this first) nets +1 -1 +5.
If a fight breaks out, he surrenders when nearly killed, causing the rest of his group to flee. It is possible to interrogate him, demand his possessions, or kill him. Experience is not granted for the goblins that run away, so to obtain the most experience while engaging in Fezzerk's surrender requires the party to kill all other goblins first.
Barbarians have a unique dialogue path:
- Ignore the rage. Listen to your head. There is nothing to gain from being rash. (DC 10 )
- Give in. KILL THE MAGGOT.
- Leave reason to the reasonable. Kill the runt.
Otherwise, the party can interrogate him:
- I want the gold you took. Now.
- Give me my gold back - and anything else you have, too.
- Talk and you might live. If it's worth my while.
- Your valuables - now.
- I want everything of value you have.
- Your valuables are mine now. Hand them over.
... or just kill or release him:
- No mercy. Kill the goblin. +1 -1 +1 +1 +5
- Run along, goblin. Before I change my mind. -1 -1 -5
Freeing Barcus[edit section | visual editor]

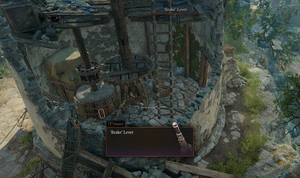
Once the goblins are dealt with, the party must enter the interior of the windmill to pull the brake, allowing them to free Barcus. There are two levers inside the windmill. The "Brake" lever must be chosen to safely stop the windmill. The "Release Brake" lever causes the windmill machinery to spin faster, which launches Barcus into the sky by inertia, subsequently killing him. His body can be found on the western road leading out of the Blighted Village.
If the windmill is stopped properly, the party can free Barcus by interacting with him. Barcus offers the party his luggage in the windmill basement, which contains various goods, including a Smokepowder Satchel. He reasons that lugging the extra weight resulted in the goblins capturing him. Saving Barcus is not required to obtain his possessions, as his luggage is in the basement regardless.
Quest rewards[edit section | visual editor]
- carried by Fezzerk
- in the heavy chest next to Barcus' heavy backpack
- carried by Fezzerk
- 45 XP for saving Barcus Wroot
- 190 XP for making Fezzerk and his group to leave.
- 210 XP for defeating all of Fezzerk's group. After one combat round or so, the rest of the group flees slowly. Besides killing the two devouts and Fezzerk, they do not grant any additional XP.
- 280 XP for making Fezzerk and his group to leave, going turn based mode to attack them, defeating the two goblin devouts and Fezzerk last.
Consequences[edit section | visual editor]
Saving Barcus has far reaching consequences for many quests, including Save the Grymforge Gnomes, Rescue Wulbren, and Avenge the Ironhands. If rescued, he can be encountered again throughout Acts Two and Three.
Notes[edit section | visual editor]
- Exploring the Blighted Village or the area north of its walls may trigger the appearance of Barcus and the goblin group without triggering the quest.
- Entering Grymforge without rescuing Barcus (even without initiating the quest) causes the goblins to disappear and Barcus to die, locking the party out of this quest and future quests involving Barcus.


