Ad placeholder
The Hollow

| Emerald Grove | ||||
| Makeshift Prison | ||||
| ↑ | ||||
| Secluded Chamber | ← | The Hollow | → | Sacred Pool |
| ↓ | ||||
| Ravaged Beach | ||||

Overview[edit section | visual editor]

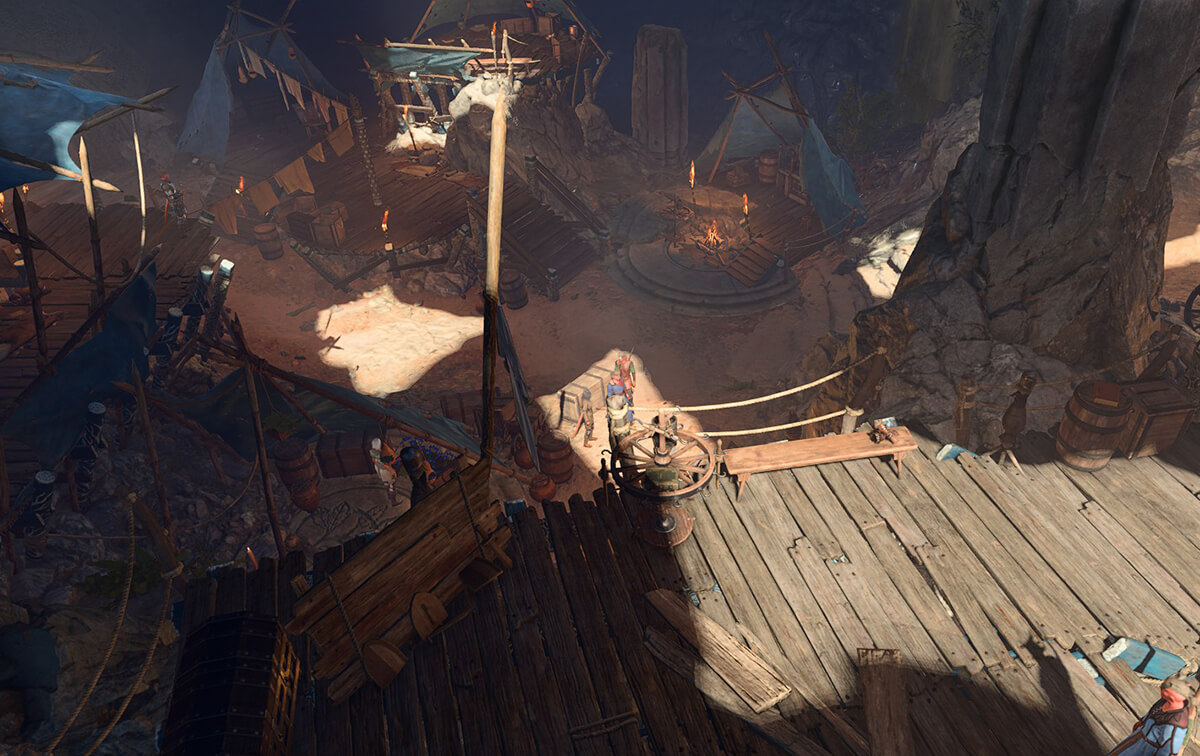
The Hollow is a connective hub area adjacent to the Emerald Grove. It provides easy access to the other parts of the grove and harbours several local traders. Close before the game events commence it became a temporary haven to a group of refugees from Elturel led by 
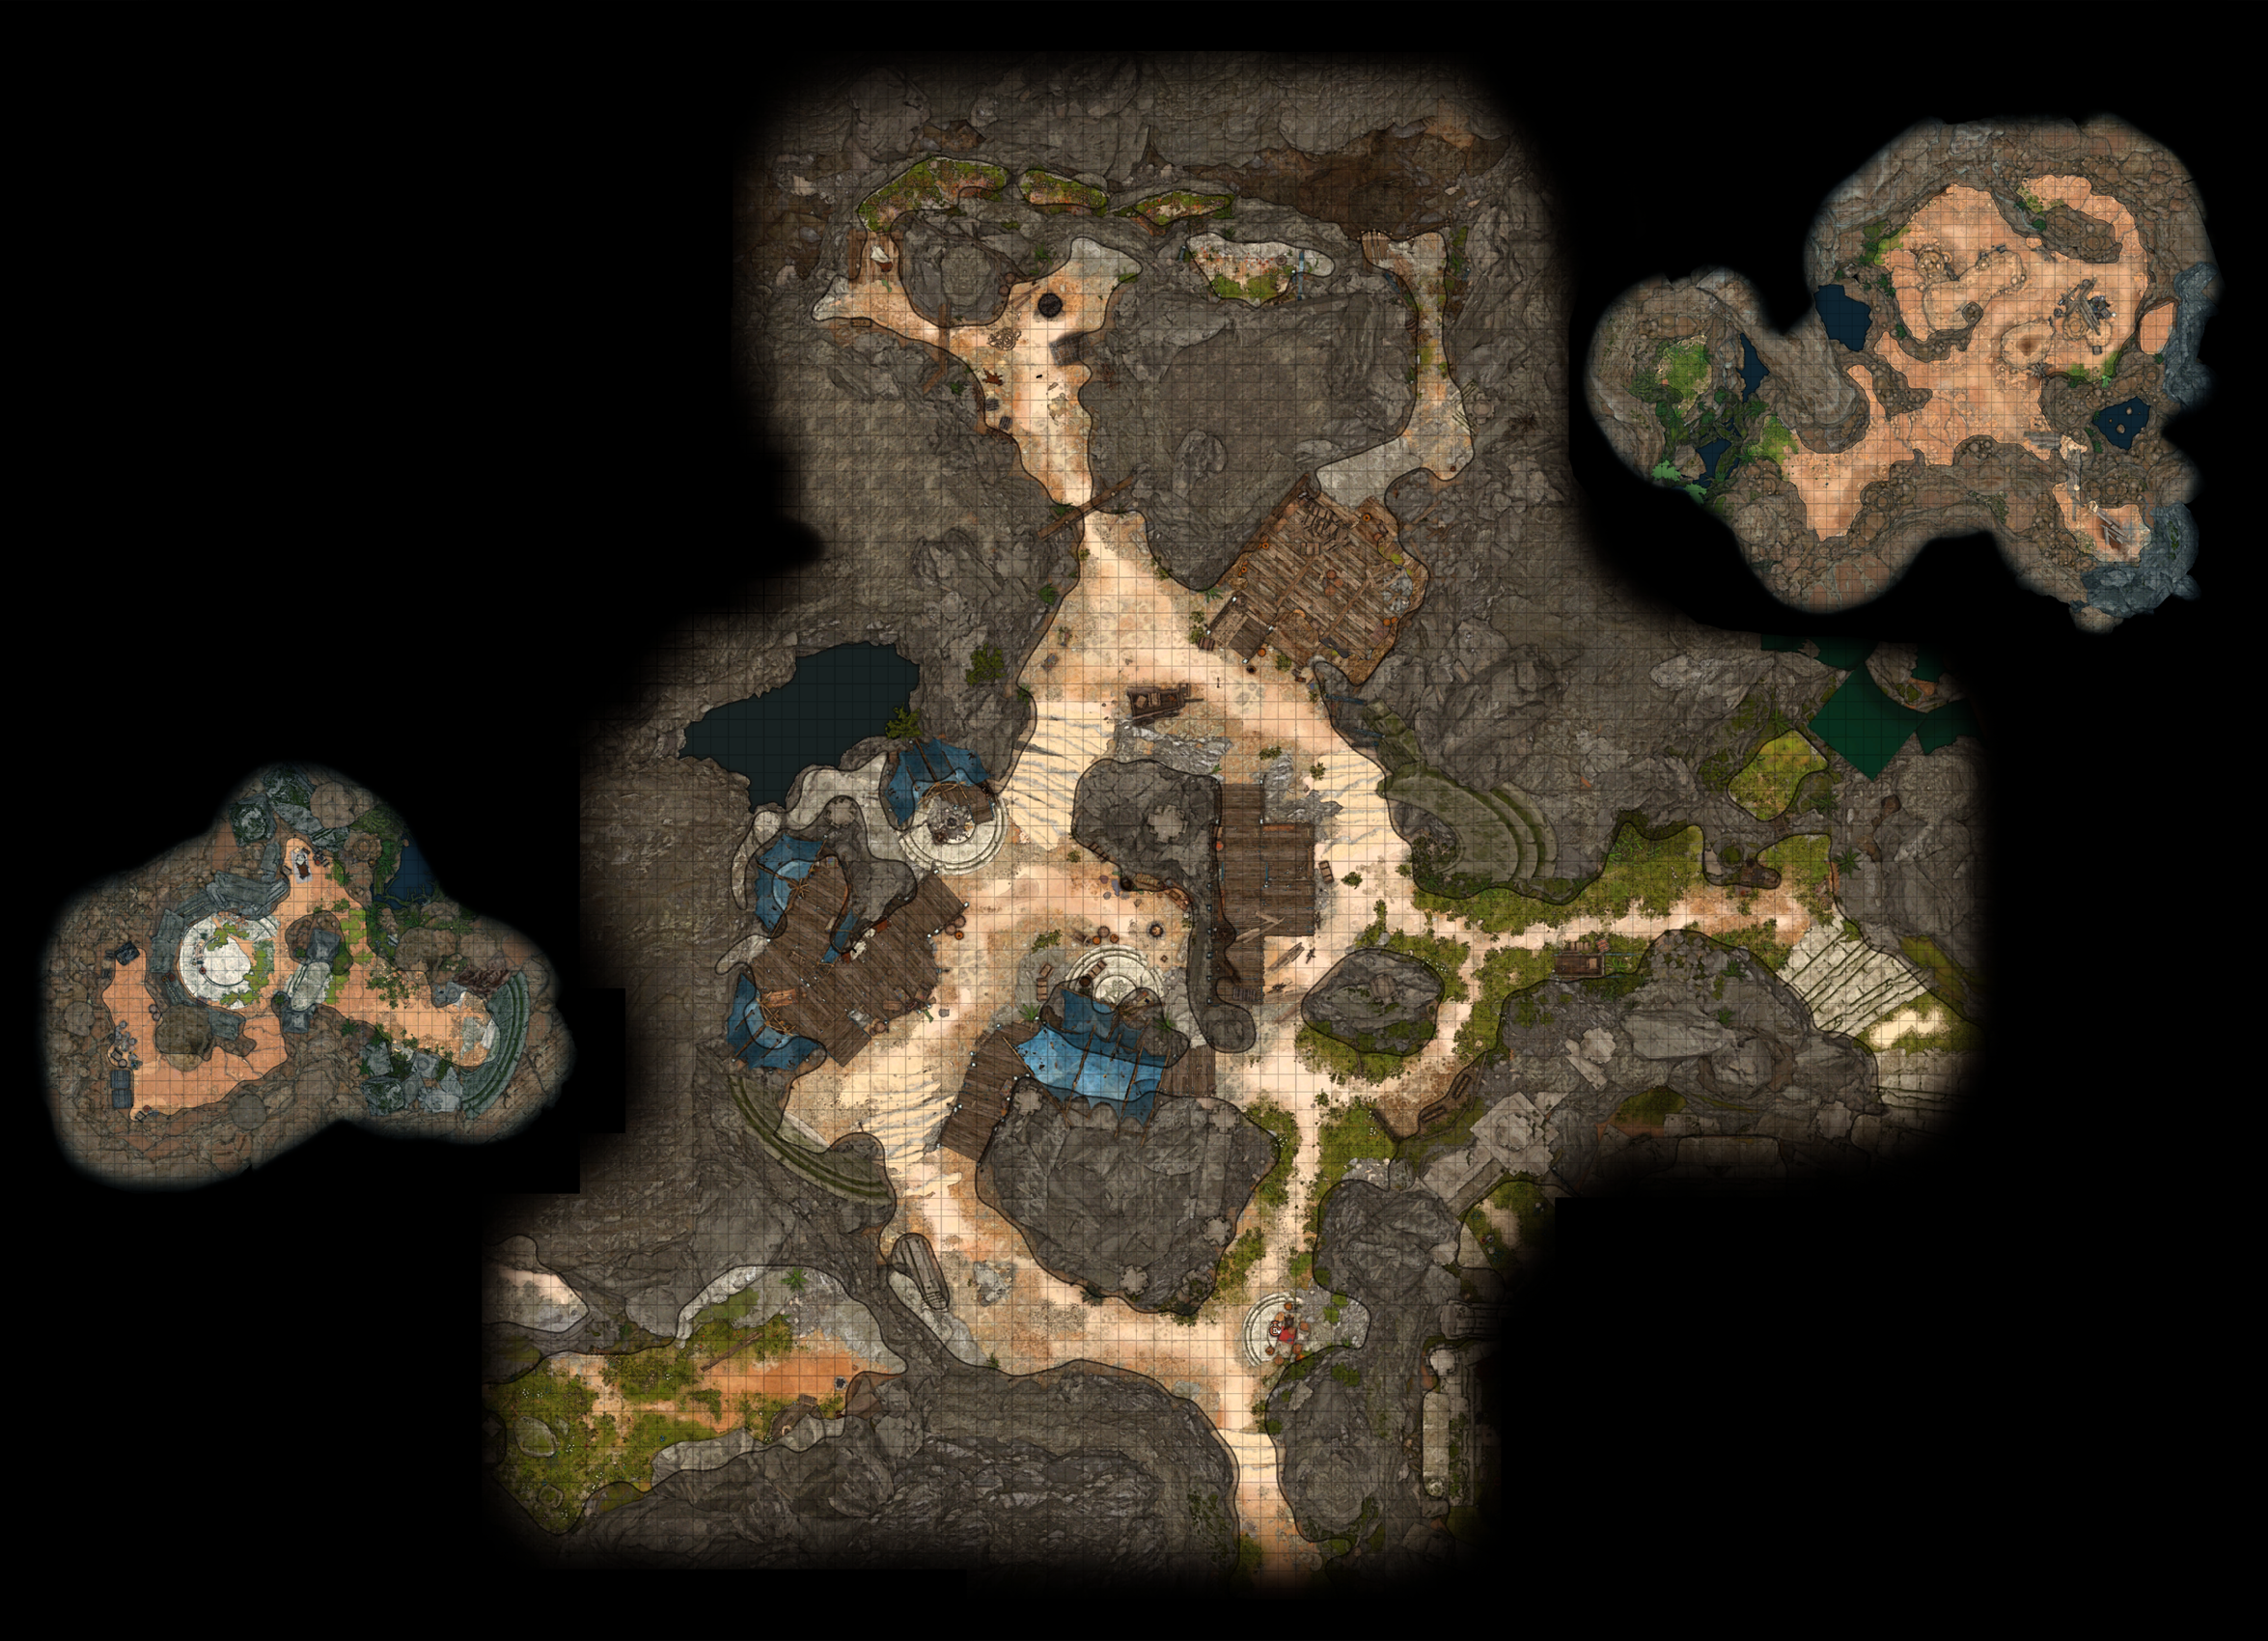
The Hollow is a vast cavern with paths forming an uneven ring, elongated from south to north. In the south, the Hollow is connected with an open ground right behind the ramparts and overgrown portcullis, which is considered a part of the Emerald Grove. The northern end of the cavern ends with an appendix where the makeshift prison can be found. To the east, a stone-paved stairs descend to the Sacred Pool - the central part of the grove.


Entrance[edit section | visual editor]
Apart from the main entrance at X: 204 Y: 501, the Hollow may be also accessed from the Sacred Pool through its archway, and also from the Underground Passage, from where one of the stone doors lead to the fringe path behind the makeshift prison.
Paths which lead from the Hollow into other locations, such as to the Forest and to the Risen Road (both starting from Zevlor's headquarters), can be difficult to access and use backwards, as they require use of spatial movement like ![]()
![]()
Points of interest[edit section | visual editor]
The trading post[edit section | visual editor]
The trading post is the first point of interaction which the party see after entering the Hollow from its main entrance. A round stone ground with an obelisk is in the middle at X: 204 Y: 519; it is tended by halfling druid 
Past the trading post two paths start, running through the Hollow along its eastern and western sides, meeting near the makeshift prison in the farmost northern point.
Farther on the eastern path at X: 207 Y: 531, a trio of tieflings - 


The party can take either Rolan or Lia's side and convince the trio to stay or to leave. All possible dialogue options can be found on any of their pages. The player character's decision determines whether these characters can be met in other acts of the game. If convinced to stay, Rolan and his siblings move from the initial point deeper into the Hollow and stand near 
Entrance to the Sacred Pool[edit section | visual editor]
Following the eastern path further is a stall with three oxen tied to it, and 


![]()
A
If
A bit farther the oxen stall at X: 230 Y: 550 the tiefling boy 

![]()
The way continues to descend towards the Sacred Pool, passing a small stand maintained by 


If the interacting party member then decides to examine Mattis' wares, Silfy tries to rob them. On a successful ![]()
A series of stone-paved stairs come down to the entrance to the Sacred Pool. Upon first time approaching, approximately at X: 260 Y: 540, a cutscene triggers showing a group of tieflings led by 


![]()
![]()
The training ground[edit section | visual editor]
The training ground is at X: 207 Y: 544. Several tiefling children: 


If ![]()
If talking to Guex, the player character can help him train more effectively, passing ![]()
![]()
![]()
![]()
To the west of the training ground a wooden platform extends into a scaffold running around the rock. At its start X: 200 Y: 540, a series of rocky ledges allow to descend deeper in the Hollow, to 
The storage and the makeshift prison[edit section | visual editor]
Further down along the eastern path and past the turn to the Sacred Pool, at X: 200 Y: 574 is a small hut. Its door is locked and red-outlined; lockpicking it is considered a crime. However, the party still can get inside using the rocky shelves behind the makeshift prison. Malnourished Torchstalks are camouflaged along the path and explode if any party member comes too close. At X: 220 Y: 590 a pouch contains gold and random Valuables.
A rat running back and forth from the hut entrance to the nearby smithy can be spoken to via ![]()
Inside the storage hamlet the party meet 
![]()
![]()
![]()
![]()
![]()
![]()

![]()
The storage here can be looted for some potions and / or alchemical ingredients locked up in the Alchemist's Cabinet near Pandirna. The chest she is leaning on contains the ![]()
The northernmost part of the Hollow is separated by a wooden fortification where, at X: 190 Y: 585, a makeshift prison can be found. There, in an iron cage, a goblin scout 


If the goblin survives, a party member can talk to her again, progressing the quest ![]()
![]()
![]()
![]()
![]()
Letting Arka kill Sazza is considered an oathbreaking action for ![]()
![]()
![]()
Dammon's smithy and Auntie Ethel's shop[edit section | visual editor]
At X: 180 Y: 557 is a small smithy where 
![]()
![]()
![]()

Near Dammon's smithy, at X: 186 Y: 570 stands 

![]()
Across the smithy, ![]()
If stolen from, or if any conflict or fighting occurs in the Hollow or nearby parts of the Sacred Pool, Ethel leaves the Hollow and can be found later in the Sunlit Wetlands.
Near Ethel's shop, a tiefling chef
Adventurers' corner[edit section | visual editor]
The north-western corner of the Hollow at X: 171 Y: 540 is occupied by a group of adventurers lead by 


Speaking to Aradin sheds some light on the reason of his crew coming to the grove. He can be convinced (without ability checks) to pass to the party the ![]()
![]()
If Aradin survives the battle and is knocked out at the ramparts, he and his crew leave the Hollow immediately after, leaving all their belongings behind in the adventurers' chest.
Upon first approach to the adventurers a tiefling boy 
![]()
![]()
![]()
![]()
On a scaffold above the adventurers' corner a pair of young lovers, 

Secluded Chamber[edit section | visual editor]
Zevlor resides in a small cavern called the Secluded Chamber behind a stone door at X: 166 Y: 539. The cavern has two levels, of which the upper one features a watch post. From the watch post, it is possible to jump down back into the Hollow at X: 171 Y: 518 with minimal health damage.
The watch post opens to the east onto a stone ledge over the river stream, from where the party can reach Forest through a series of jumps. The northern side of the ledge has a cragged rock that leads up to another rocky shelf with a heavy chest on it at X: 136 Y: 519, containing gold and a random grenade.
Past the chest, the party can also reach the Risen Road by jumping (![]()
If the Hollow is assaulted during the ![]()
Tiefling Hideout[edit section | visual editor]
The Tiefling Hideout is a subterranean cavern hidden under the south-western part of the Hollow. It is occupied by
The party can find the hideout themselves after interacting with various members of Mol's gang, or they can be invited to visit it as a reward for helping or protecting the children.
Related locations[edit section | visual editor]
Related quests[edit section | visual editor]
Characters[edit section | visual editor]
Adventurers[edit section | visual editor]


Tieflings[edit section | visual editor]


Tiefling children[edit section | visual editor]


Traders[edit section | visual editor]


Other[edit section | visual editor]

Creatures[edit section | visual editor]


Loot[edit section | visual editor]
Items which can be found or looted
Related literature[edit section | visual editor]
This list includes only items which cannot be found or purchased in other Acts of the game.


Notes[edit section | visual editor]
- ↑ This entrance to the hideout can be used only by Small, Tiny and


- ↑ Held by

- ↑ Throughout the game dialogue files, the ones concerning the encounter with Mol and her underage subordinates are described with tags starting "DEN_Thieflings/"
- ↑ 4.0 4.1 4.2 Only if having survied the first goblin attack on the grove
- ↑ Only if freed in the Shattered Sanctum
- ↑ Only if saved from

- ↑ Only if saved from the


